Do you want to create a membership website on WordPress in an instant? And are you looking for a way to make more money?
Through a membership website, you can lock exclusive content and get users to pay for access. For instance, you can offer eBooks, courses, white papers, PDFs, webinars, forum access, and more to people that subscribe to a membership.
It’s a great way of monetizing your website.
In this article, we’ll show you how to create a membership website on WordPress. Let’s start with the setup process (you can skip ahead to any step you want):
- Step 1: Pick the Best WordPress Membership Plugin
- Step 2: Set Up MemberPress WordPress Plugin
- Step 3: Change MemberPress Settings
- Step 4: Add Your Payment Options
- Step 5: Add Different Membership Levels
- Step 6: Create Access Rules for Your Membership Plans
- Step 7: Adding Content for Different Memberships
- Step 8: Create a Pricing Page
- Step 9: Create a Sign-Up and Login Form
How to Set Up a Membership Site with WordPress
To start, make sure you have a WordPress website up and running. If not, then don’t worry. All you need is a domain name, a web hosting service, and SSL certificates.
A domain name is the web address or the URL of your website (www.example.com), while web hosting services is where all your website files and resources are stored. And to make sure you offer secure transactions to your visitors you’ll need SSL certificates.
Now, you may be wondering, where can you get all these things?
With Bluehost, you can get web hosting for only $2.75 per month and get a free domain along with an SSL certificate. The offer is exclusive to our readers, so make sure you avail it today.
And to get started, you can follow this simple tutorial on how to create a WordPress website:
Once your WordPress website is up and running, just follow these steps to set up a membership website.
Step 1: Pick the Best WordPress Membership Plugin
When it comes to creating a membership website on WordPress, the first thing to do is to select the right plugin. Now, there are some great membership plugins out there, but if you’re looking for a complete solution, then we recommend MemberPress.
It’s one of the best WordPress plugins to set up a membership site. You get loads of features that offer flexibility and customization.
With MemberPress, you can create different levels of memberships, accept online payments, add content behind restrictions, create a pricing page, and more. The plugin even integrates with ExactMetrics, other email marketing services, and affiliate marketing plugins.
Step 2: Set Up MemberPress WordPress Plugin
Now that you’ve selected the right plugin for your membership website, go ahead and signup for an account on MemberPress.
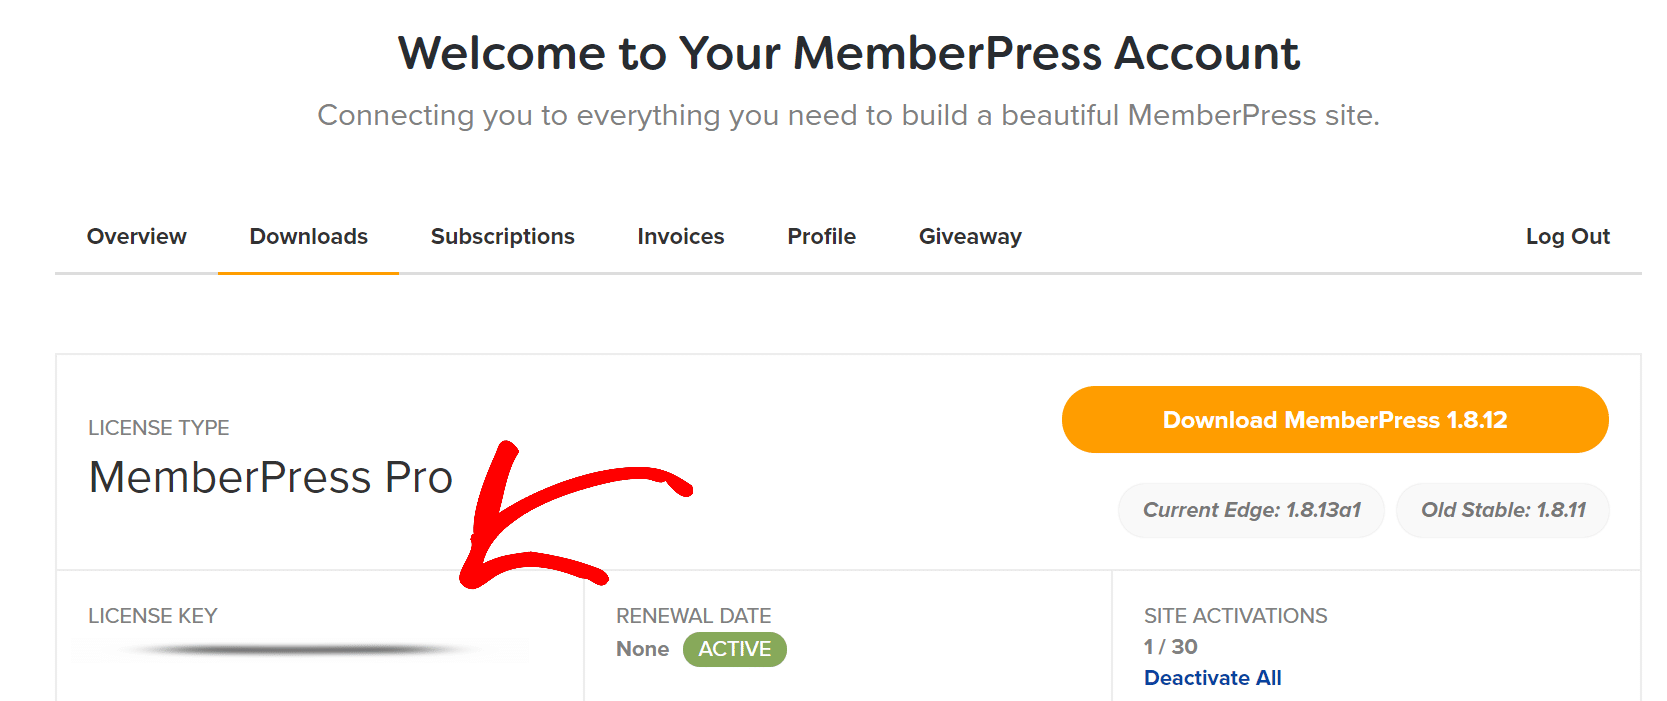
Next, download the setup files from your Account area and upload them in WordPress. To do that, go to your WordPress dashboard and navigate to Plugins » Add New and click Upload Plugin at the top. Simple upload the setup files, install them and then activate the plugin.
If you’re not sure how to do that, you can follow this step by step guide on how to install a WordPress plugin.
After setting up MemberPress, it should appear in your WordPress dashboard. The last thing you’ll need to do before using the plugin is to go to MemberPress » Settings and enter your license key. You can find the license key in your Account area under Downloads.
Step 3: Change MemberPress Settings
Your membership plugin is now ready to use.
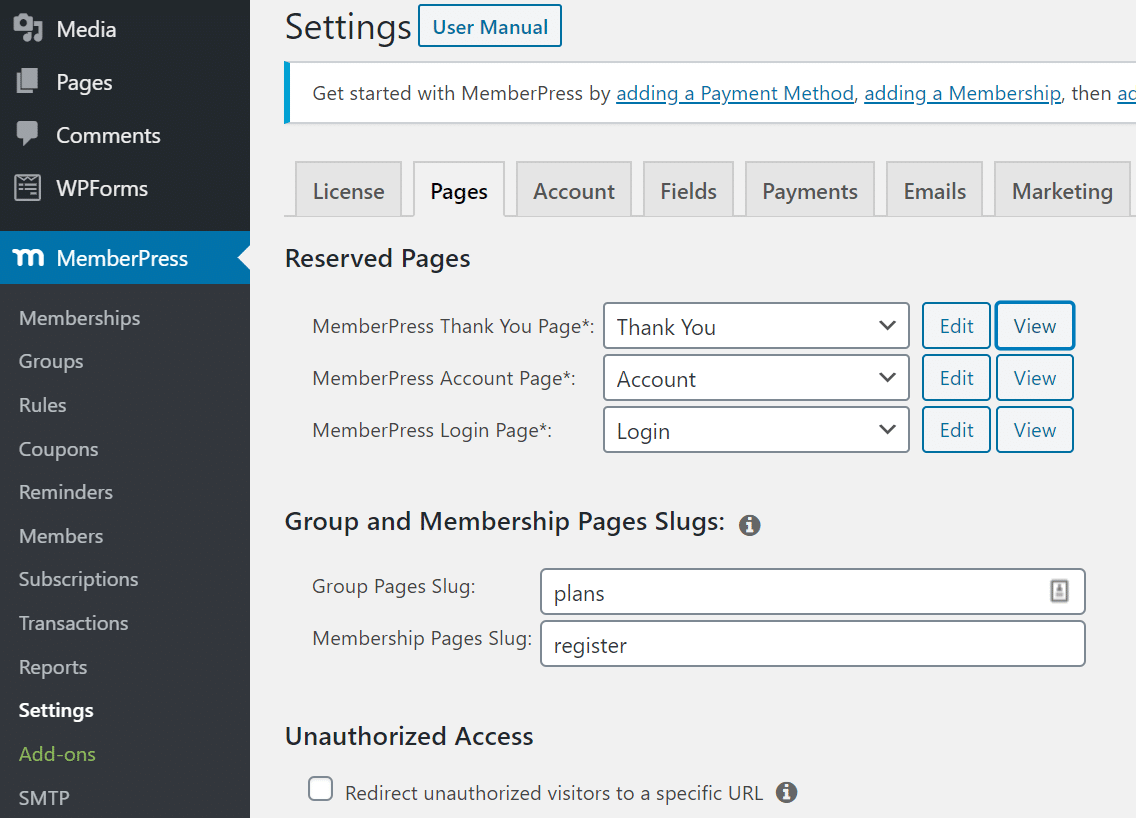
To start, you can go to MemberPress » Settings » Pages. Here you can edit the settings of your membership website to your liking.
For instance, the plugin creates few pages by default like a thank you page, account page, and a login page. You can even change the pages URL and customize the unauthorized access settings.
Step 4: Add Your Payment Options
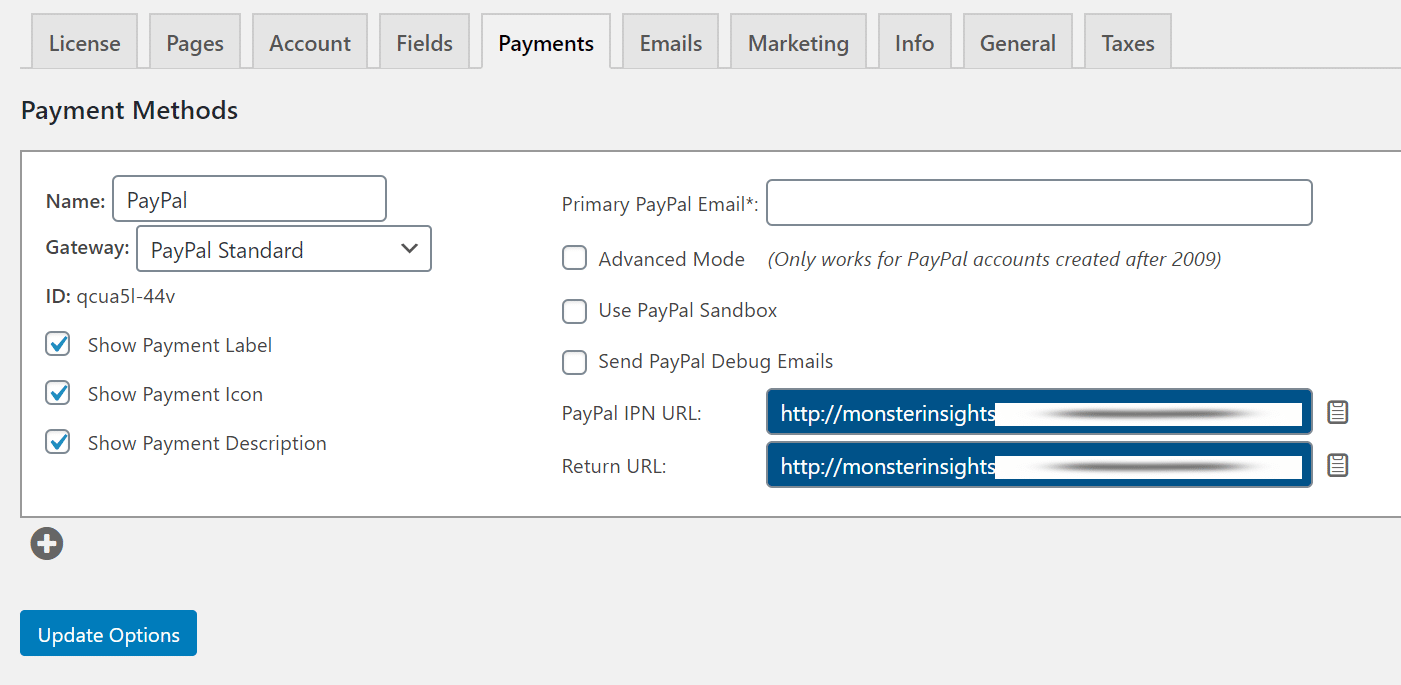
Next, add different payment options you want on your WordPress membership website. To do that, go to MemberPress » Settings and click on the Payments tab.
Now click plus (+) sign to a payment option. Enter the name, gateway (PayPal, Stripe, etc.), and a description. You can also select from different options to show payment label, icon, and description.
Click Update when you’re done.
Step 5: Add Different Membership Levels
After setting up your payment options, you can now add membership levels. You can limit different features and content based on membership levels.
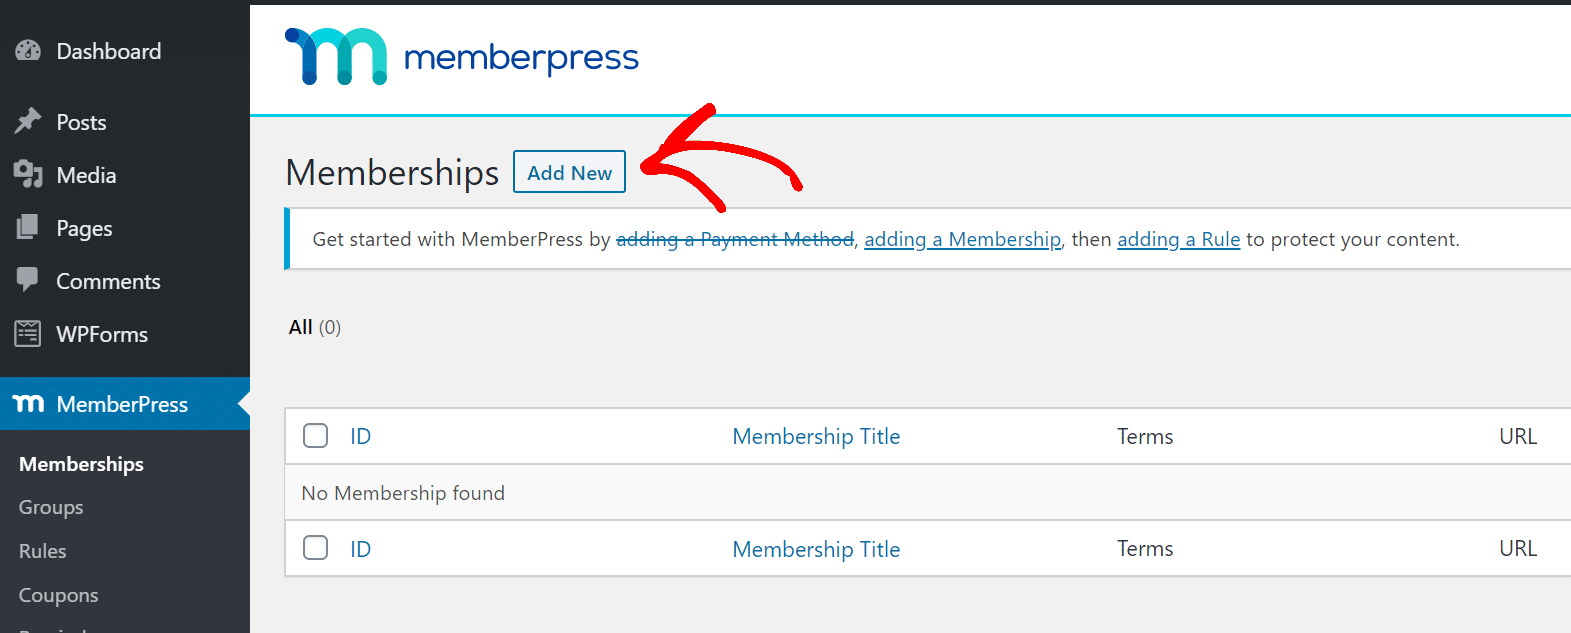
To create one, go to MemberPress and then select Memberships from the WordPress dashboard. Next, click Add New.
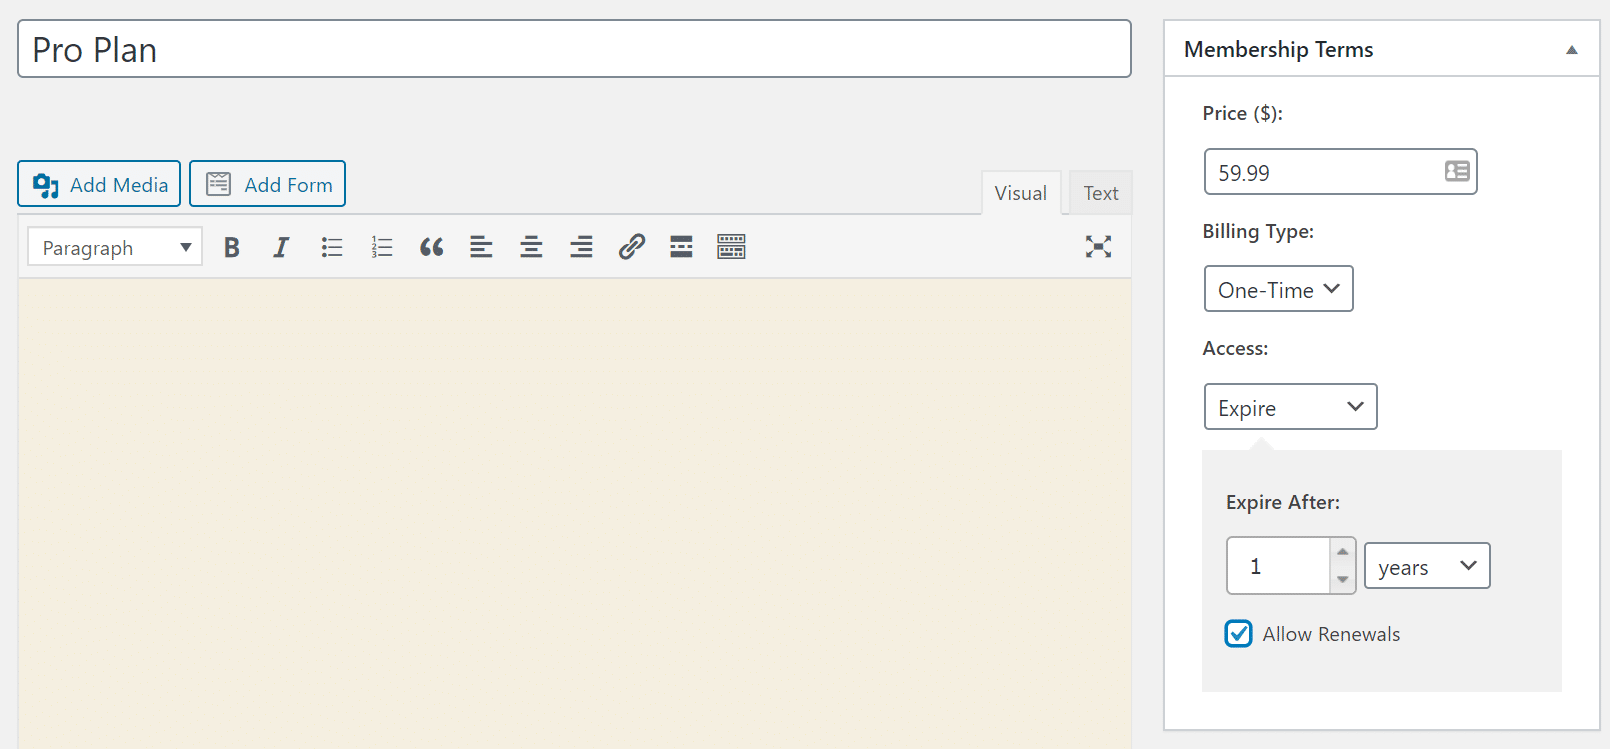
Now, you can enter the details for your new membership option. You can start with a name for your membership, a description, set its price, and you can even add an expiry.
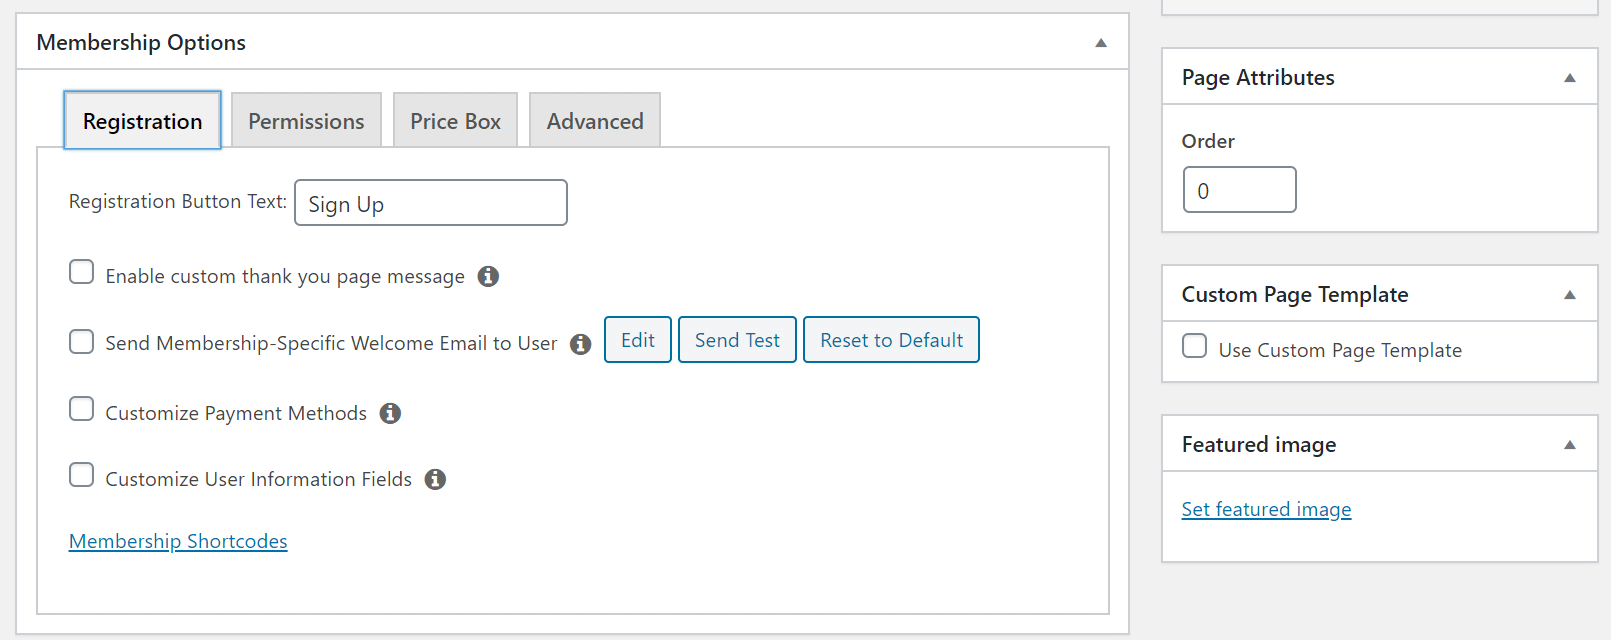
And if you scroll down, you’ll see more options. For instance, you can set its registration, permissions, price box, and look at more advanced settings. After finalizing your settings, click Publish.
Step 6: Create Access Rules for Your Membership Plans
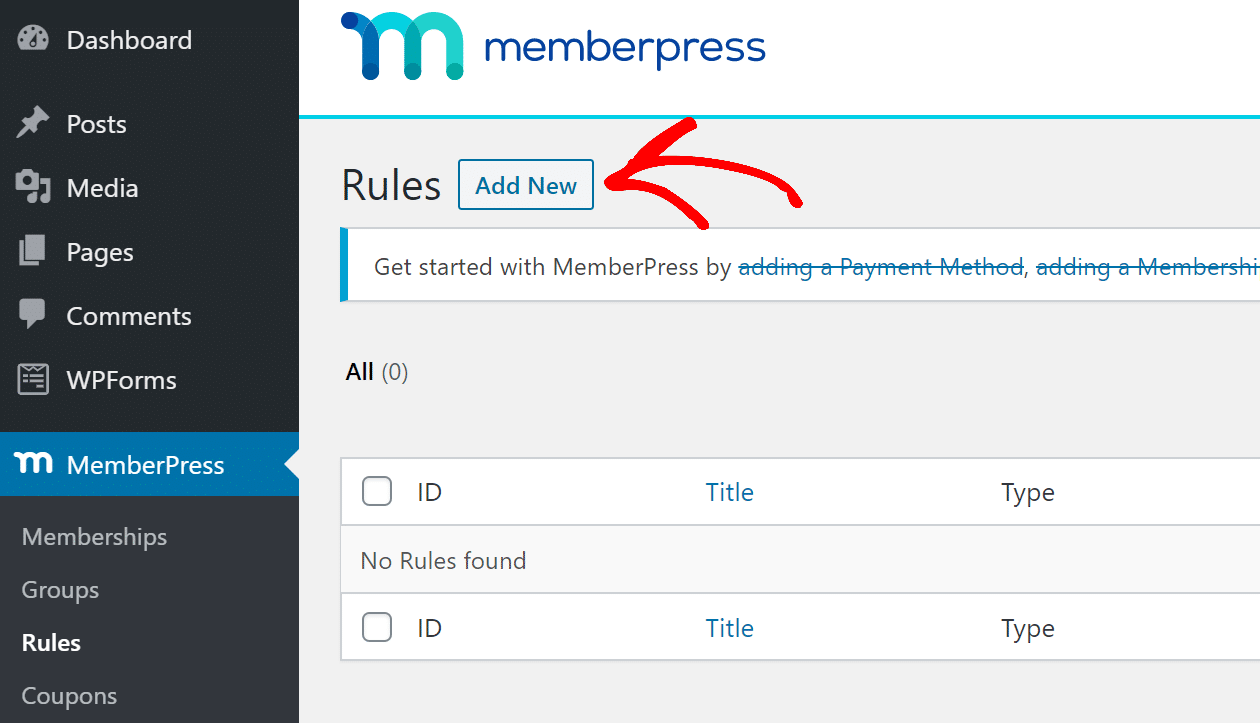
The next step is to create Rules for different membership plans you create in the previous step. You can get started by going to MemberPress » Rules and then select Add New.
On the next page, you’ll see different settings that you can set for your members. For instance, you can select which content to show to which members.
In this example, we selected All Content for our Pro Plan users. You can click the plus sign to add more conditions if you want.
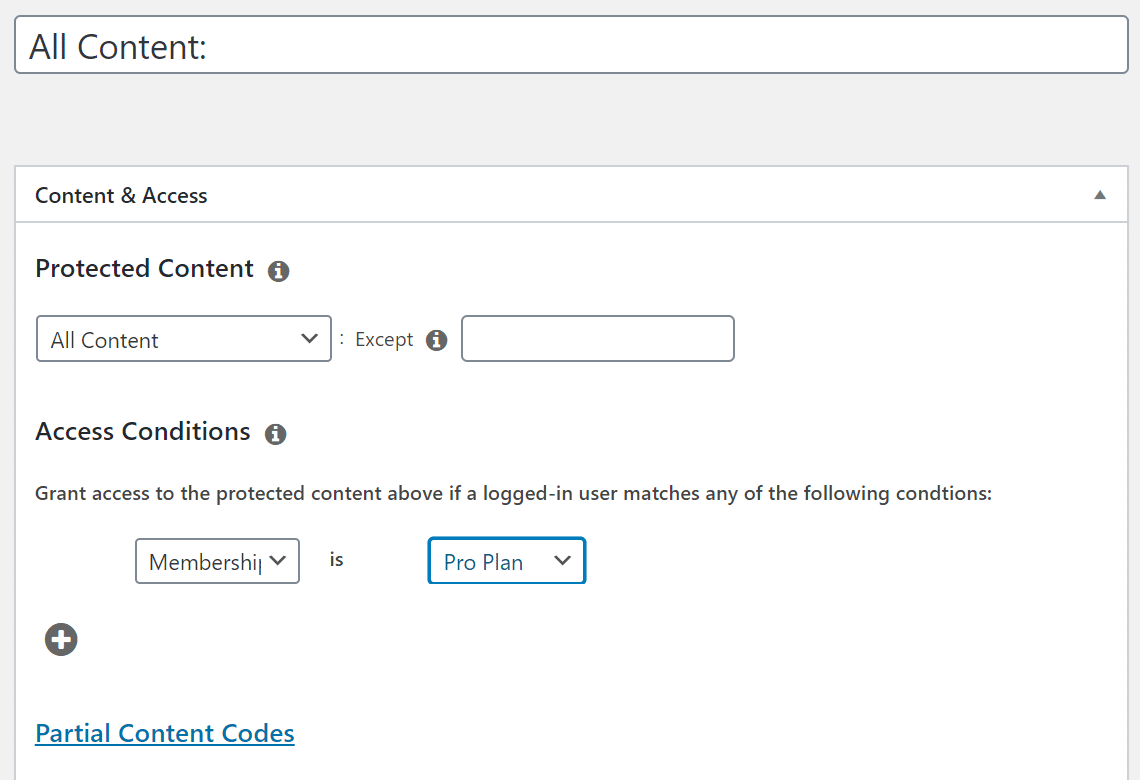
And if you scroll down, you’ll see more options like enable drip or enable expiration. Drip allows you to release content steadily, while expiration sets the time limit when the content cannot be accessed anymore.

Once you’ve made these changes, click Save Rule.
Step 7: Adding Content for Different Memberships
Next up, you can create content that you want to show to different members. You can start by creating any content on a WordPress website.
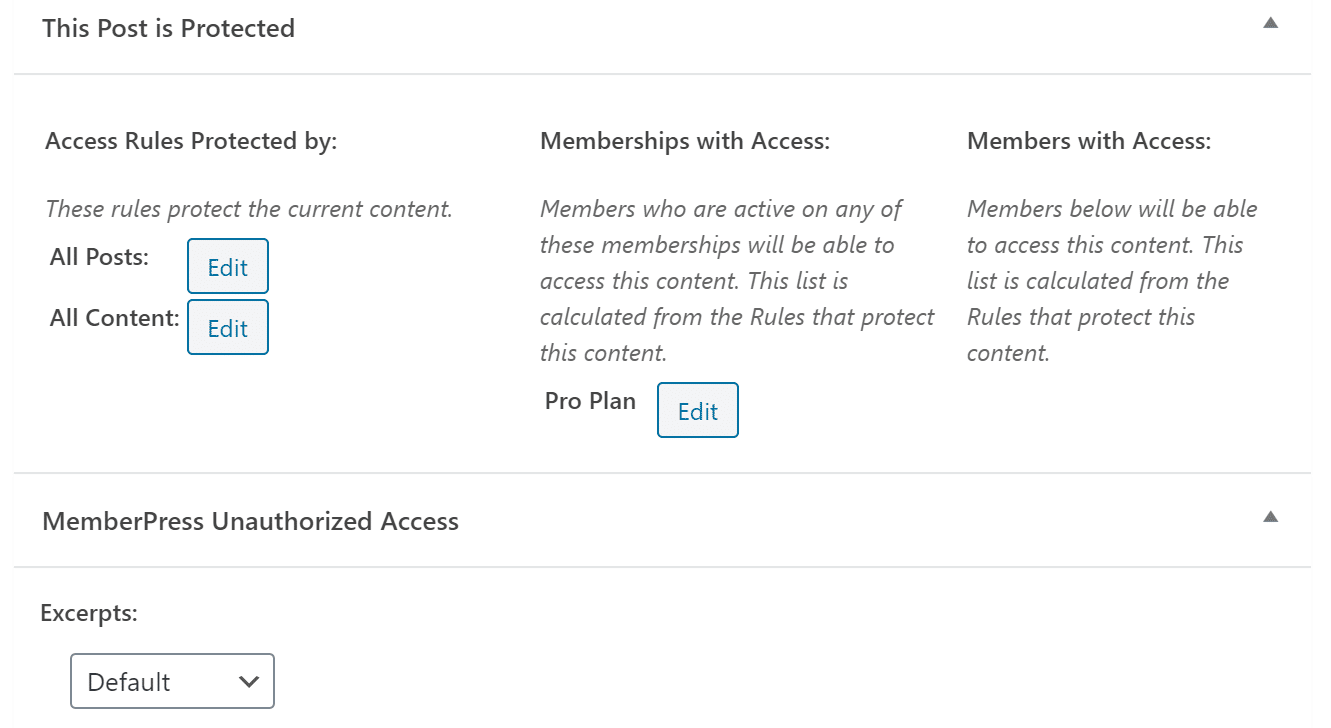
Go to Posts and click Add New. Enter the content and select the category for your post. Once your content is ready, scroll down and you’ll see a section for MemberPress. Here you can configure the settings to lock this content for certain members.
You can see which Members can view your content. Also, you can set what unauthorized visitors will see when they view the post.
Step 8: Create a Pricing Page
After creating your content for different members, you can now create a pricing page. For this, go to MemberPress from your dashboard and then select Groups. Next, click Add New.
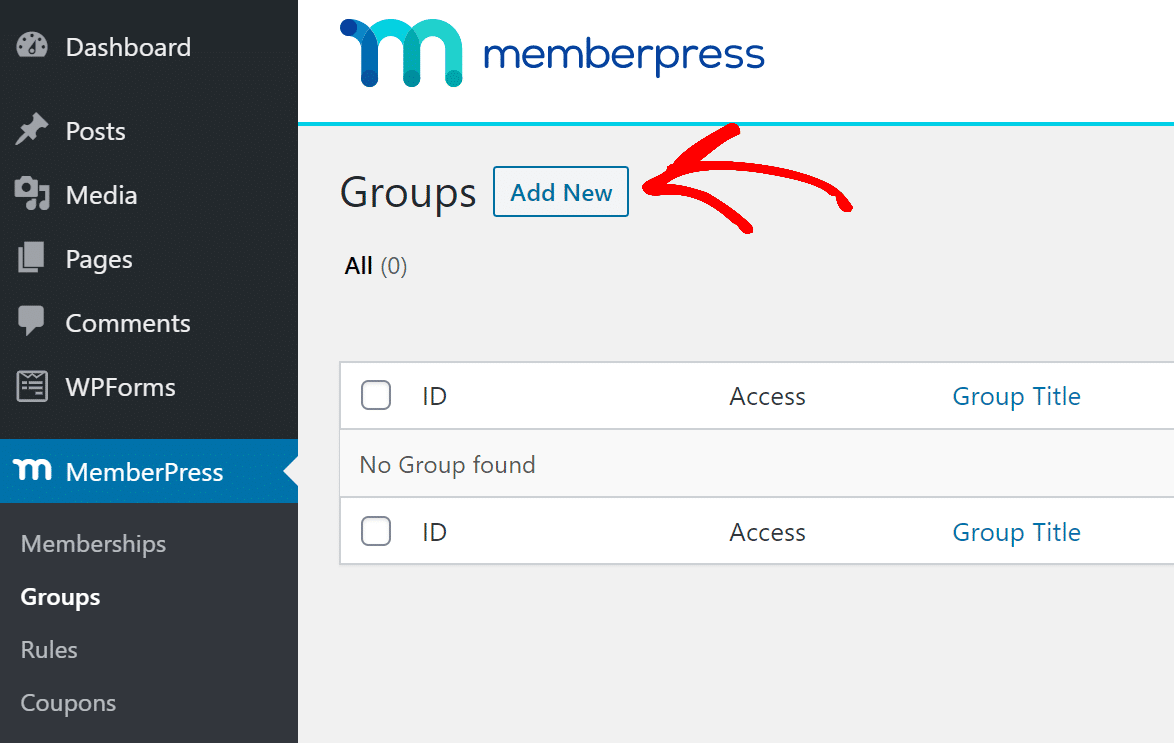
Now enter a title for your group. You can name it Pricing Plans or Subscription Plans. Then scroll down and you’ll see more options.
Under Group Options, you can edit which membership plans you want to show on the page. You can also select from a variety of different themes for your page and add custom CSS.
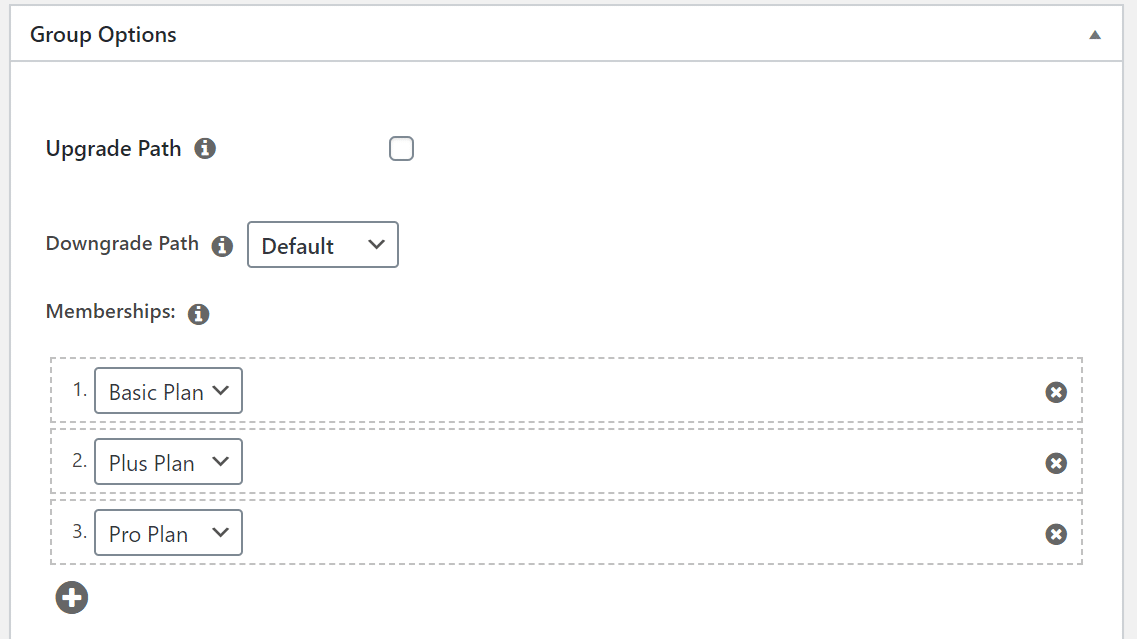
After editing the options, you can click Publish. You can also preview your pricing page and see which theme you want based on your website.
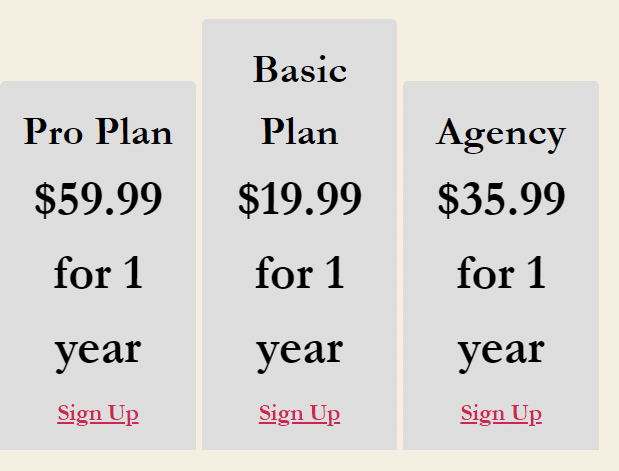
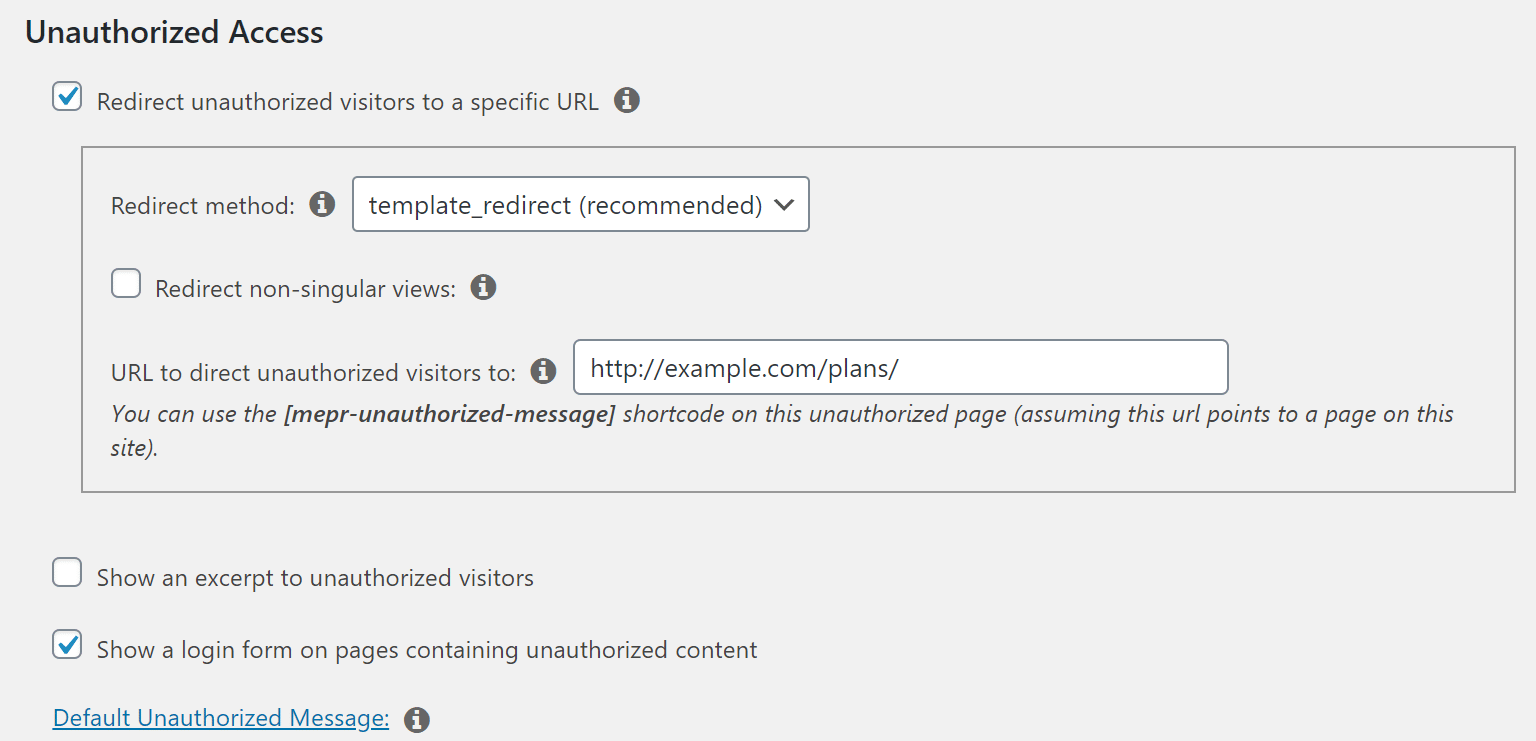
Another thing you need to do is redirect your unauthorized visitors to this pricing page. And a simple way to do this is by copying the URL of the page and then go to MemberPress » Settings and then select Pages tab.
Under the Unauthorized Access, check the box that says Redirect unauthorized visitors to a specific URL. Now, enter the URL of your pricing page to which you want to redirect users. Click Update Profile once you’re done.
Step 9: Create a Sign-Up and Login Form
The last step for creating a membership website is to add a login and a sign-up form for your users.
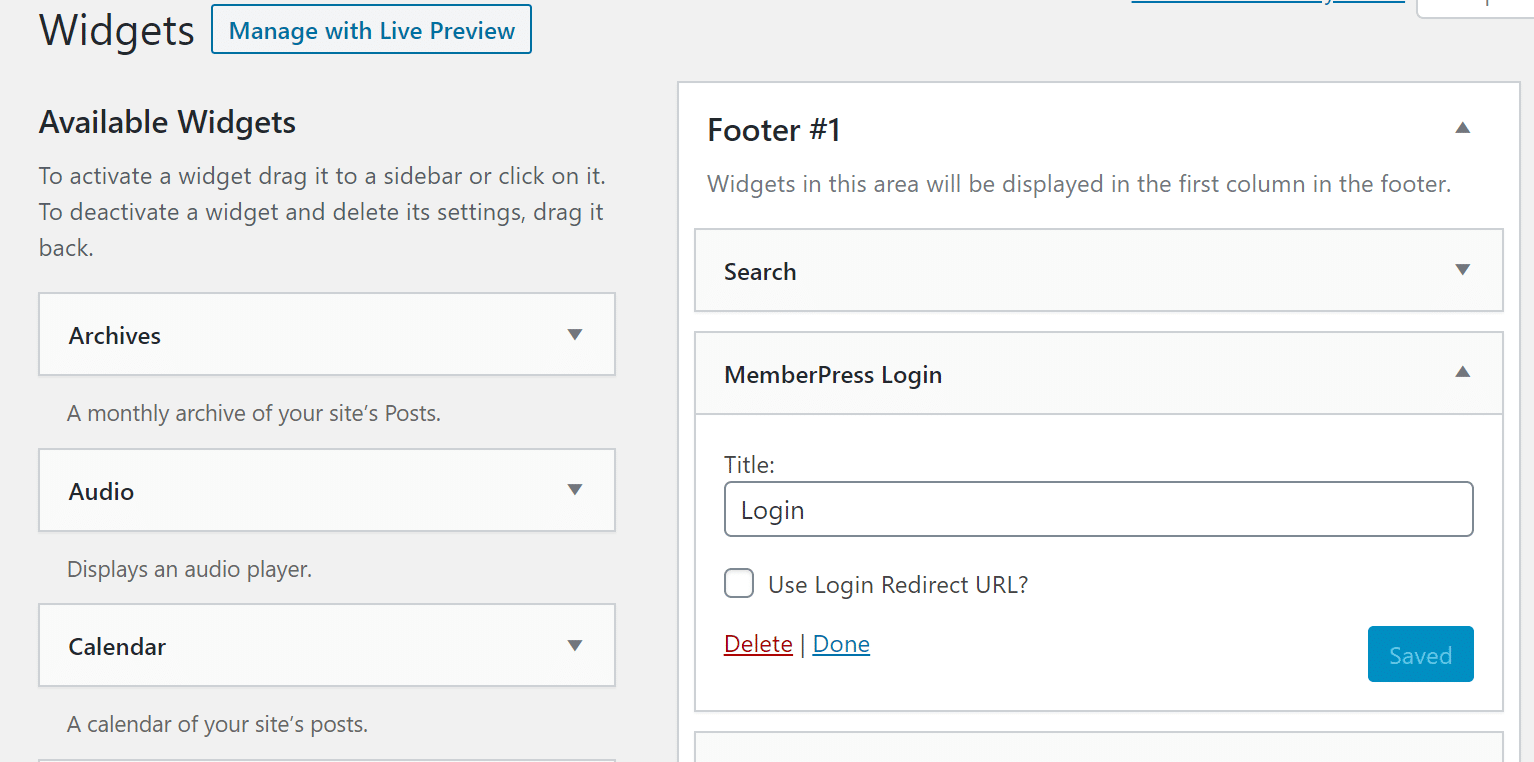
And you can do that by going to Appearance » Widgets from your dashboard and add MemberPress to the widget-ready area.
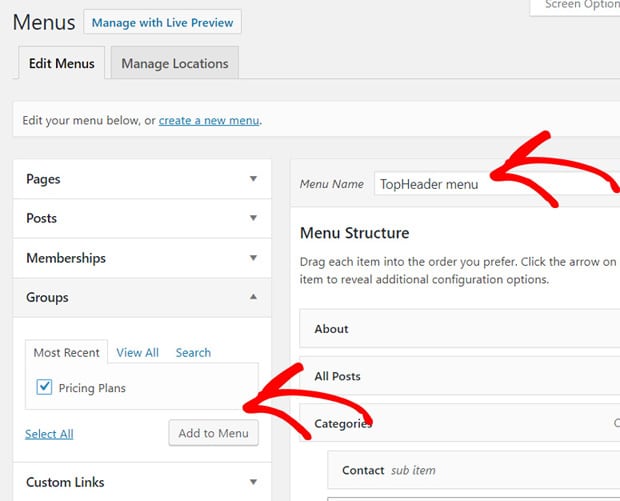
Next, you’d want to show your pricing pages where users can easily access them.
For this, go to Appearance » Menu and create a new menu. You can also edit an existing menu.
Once that’s done, save your settings and your MemberPress membership website is ready!
But wait, what if you want to know how your site is performing?
How to Track Membership Website Performance in WordPress
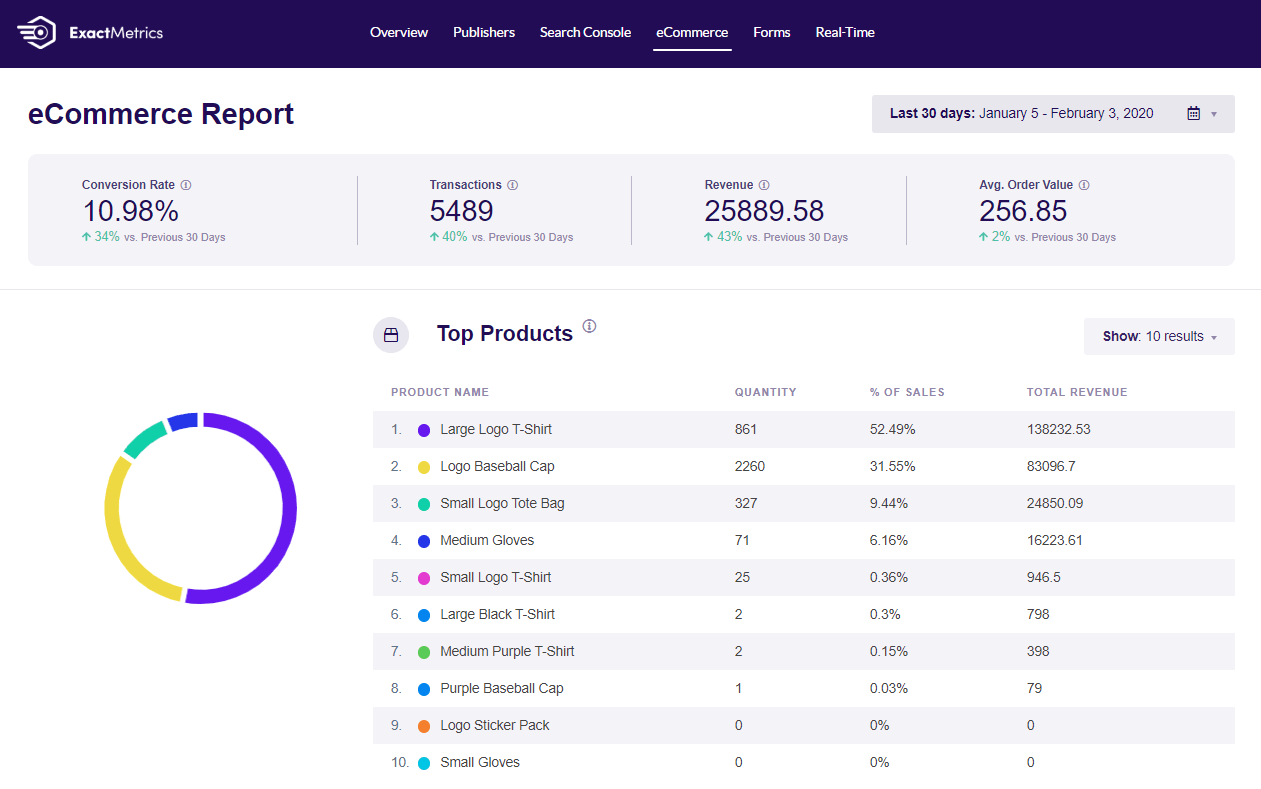
Thanks to ExactMetrics, you can start to track how your membership website is doing. ExactMetrics is the best premium Analytics plugin for WordPress.
It makes it super easy to set up Google Analytics on your website and track its performance. You can get insights about which page performs the best, which downloadable content brings in the most revenue, and lots more.
Just make sure to add ExactMetrics eCommerce addon and it will automatically start to track your membership website. You can then view all the reports inside your WordPress dashboard.
And that’s it!
We hope you liked our article on how to create a membership website. If you found this post to be helpful, then do check out our post on how to properly set up Google Analytics for WooCommerce.
Don’t forget to follow us on Twitter and Facebook to get to know the latest tutorials on Google Analytics.


