Images are the secret weapon for making your website stand out. Research shows that content with images gets 94% more views than content without visuals, according to data from multiple industry studies. But here’s the challenge: simply dropping images one after another on your pages can make your site look cluttered and unprofessional.
Fortunately, the solution is simpler than you might think. Creating an organized image gallery lets you display dozens of photos in a clean, professional layout that visitors love to browse. And if you’re using WordPress, you’re in luck, since it offers built-in tools for the job as well as beginner-friendly tools to get the job done.
In this guide, I’ll walk you through two proven methods for building stunning image galleries on your WordPress site. Whether you’re a complete beginner or you’ve been working with WordPress for years, you’ll find a solution that fits your needs perfectly.
In This Article:
- Why Add an Image Gallery to Your WordPress Website?
- How to Build a WordPress Image Gallery
- Which Method Should You Choose?
- FAQs: Creating Image Galleries in WordPress
Why Add an Image Gallery to Your WordPress Website?
Before we jump into the how-to steps, let me share why image galleries are worth your time. I’ve seen firsthand how the right gallery setup can change a website’s entire user experience.
- Professional presentation: Visitors form impressions in milliseconds. A well-organized gallery immediately signals that your site is professional and trustworthy.
- Better user experience: Instead of forcing visitors to scroll through endless individual images, galleries let them browse efficiently in neat rows and columns.
- Boost engagement and sales: Visual content is 40 times more likely to get shared on social media platforms. If you run an online store, you can link gallery images directly to products, making it easier for customers to buy.
- SEO advantages: Search engines favor websites with properly optimized images. When you add descriptive alt text to your gallery images, you’re helping your site rank higher in search results.
- Space efficiency: Show 20, 50, or even 100 images without overwhelming your page. Galleries make smart use of your website’s real estate.
Pro Tip: According to recent studies, 65% of people are visual learners. This means that presenting your content in gallery format can help more visitors understand and remember your message.
How to Build a WordPress Image Gallery (2 Methods)
Here are two beginner-friendly ways to create a WordPress image gallery.
Method 1: Build Your Gallery Using the WordPress Editor
WordPress includes a built-in gallery feature that works right out of the box. It’s quick to set up and doesn’t require any additional plugins. I recommend this approach if you’re just getting started or need a basic gallery without special features.
However, I need to be honest with you about the limitations. The native WordPress gallery is fairly basic. You won’t get advanced customization options, responsive design controls, or fancy effects like lightbox popups. But for simple needs, it gets the job done.
- Step 1: Access Your WordPress Dashboard
- Step 2: Choose Your Location
- Step 3: Insert the Gallery Block
- Step 4: Add Your Images
- Step 5: Customize Your Gallery Settings
- Step 6: Publish Your Gallery
Step 1: Access Your WordPress Dashboard
Log in to your WordPress site by visiting yoursite.com/wp-admin (replace ‘yoursite.com’ with your actual domain name). Enter your username and password to access the dashboard.
Step 2: Choose Your Location
Decide where you want your gallery to appear. You can add it to an existing page or create a brand new one. On the left sidebar, click either Posts or Pages.
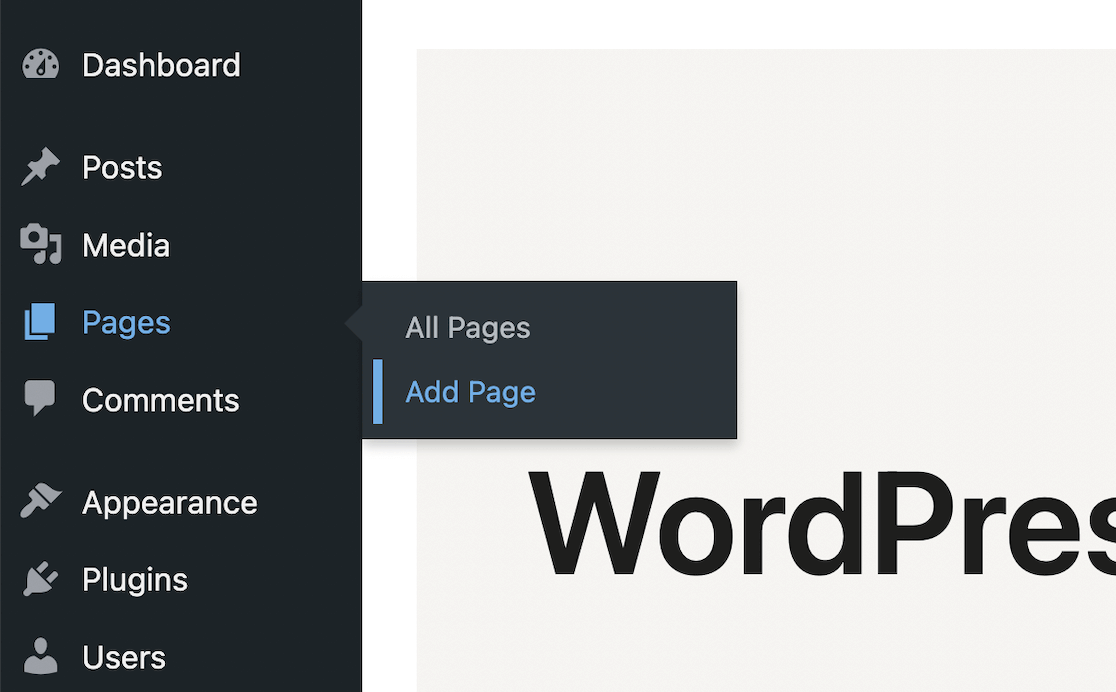
Then, select Add Post, Add Page, or choose an existing item to edit.
Step 3: Insert the Gallery Block
Now, position your cursor where you want the gallery to appear. Click the plus (+) button in the editor toolbar.
Scroll down to the Media section and select the Gallery block.
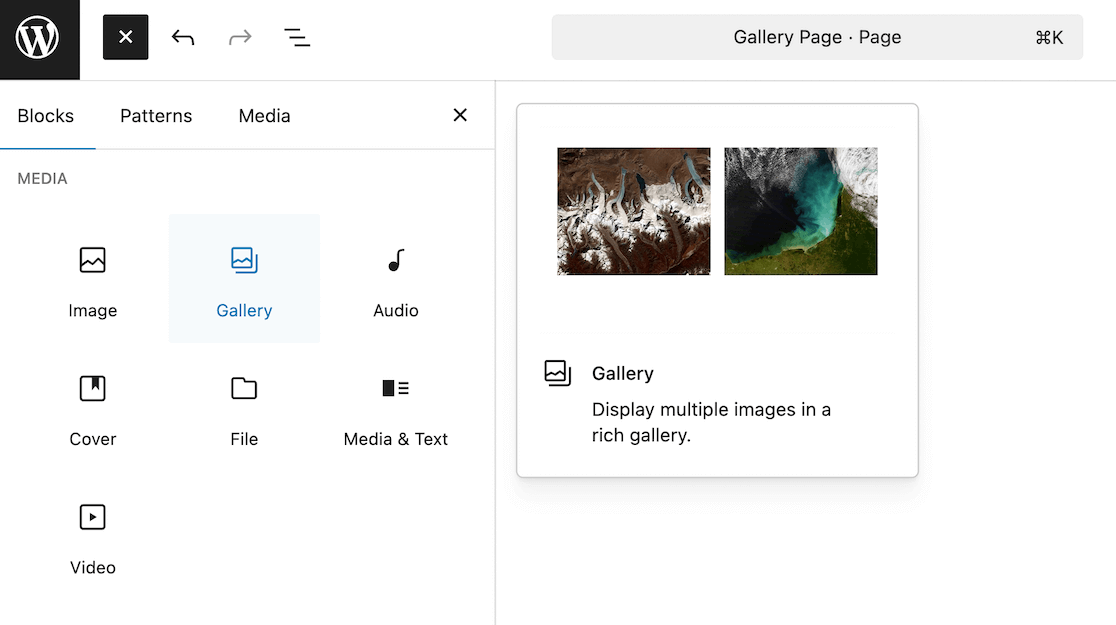
Once you click the gallery block, it will be inserted on your page or post.
Step 4: Add Your Images
Now comes the fun part! You have two options.
You can upload new images from your computer by clicking the Upload button. Or, select from your Media Library if you’ve already uploaded images to WordPress.

Here’s a time-saving trick: hold down the Ctrl key (or Command on Mac) while clicking to select multiple images at once.
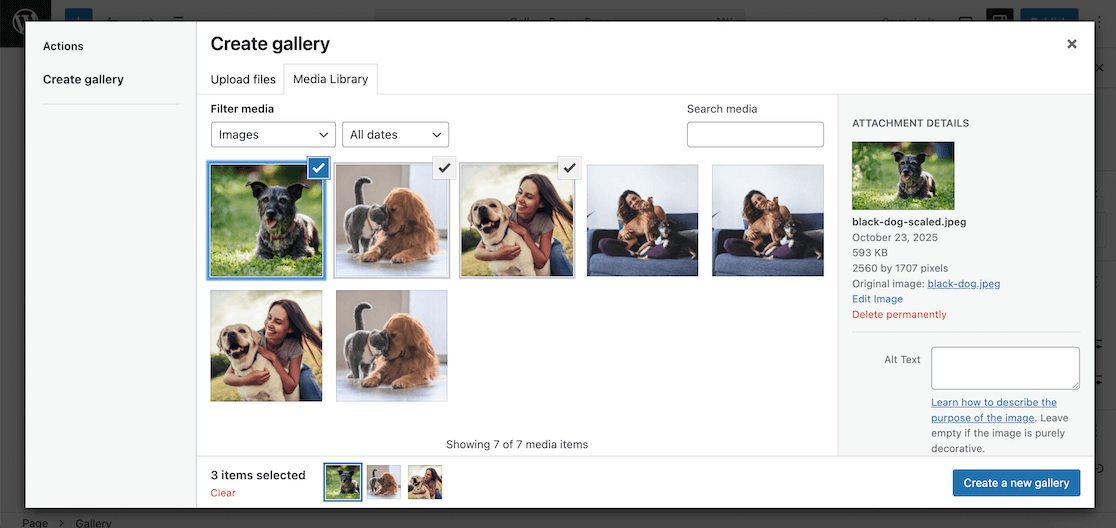
Once you’ve made your selections, hit the Create a new gallery button.
Step 5: Customize Your Gallery Settings
On the Edit Gallery screen, you can:
- Rearrange images by dragging them into your preferred order
- Add captions, titles, and descriptions for each image
- Include alt text (this helps with SEO and accessibility)
- Choose how many columns to display
- Adjust image sizes
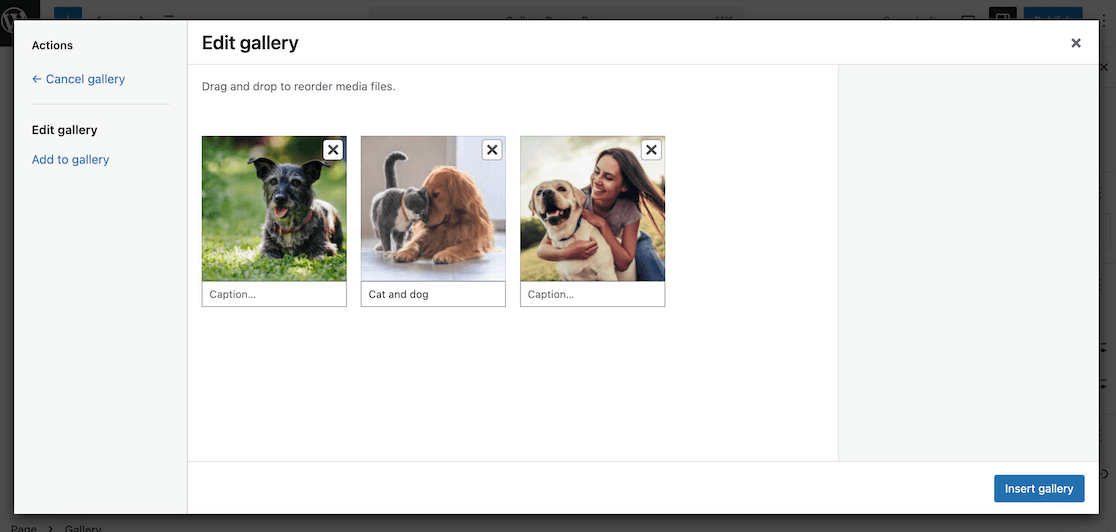
When everything looks perfect, click Insert gallery to add it to your page.

Keep in mind that if you add captions, they will appear on top of the image
Step 6: Publish Your Gallery
Review your gallery one more time to make sure you’re happy with the layout. Then click the Publish or Update button to make your gallery live on your website.
That’s it! Your basic gallery is now live. However, if you want more control over appearance, mobile responsiveness, and interactive features, keep reading to learn about Method 2.
Method 2: Create a Professional Gallery with Envira Gallery Plugin
If you want your gallery to look truly professional, I highly recommend using a dedicated plugin. I’ve tested dozens of gallery plugins over the years, and Envira Gallery consistently stands out as the best option for WordPress users.
Envira gives you complete control over your gallery’s appearance, works beautifully on all devices, and includes features like lightbox effects, drag-and-drop building, and professional templates.
Plus, it’s constantly coming out with cool new features like its Deeplinking Addon, which automatically generates schema markup for your gallery images to improve SEO.
Let me show you how to set it up.
- Step 1: Get Envira Gallery
- Step 2: Activate Your License
- Step 3: Build Your Gallery
- Step 4: Configure Display Settings
- Step 5: Add Your Gallery to a Page & Publish
Step 1: Get Envira Gallery
Visit the Envira Gallery website and review their pricing plans. Choose the plan that matches your needs and budget. A free version is available with basic features, but the Pro version unlocks the full power of the plugin.
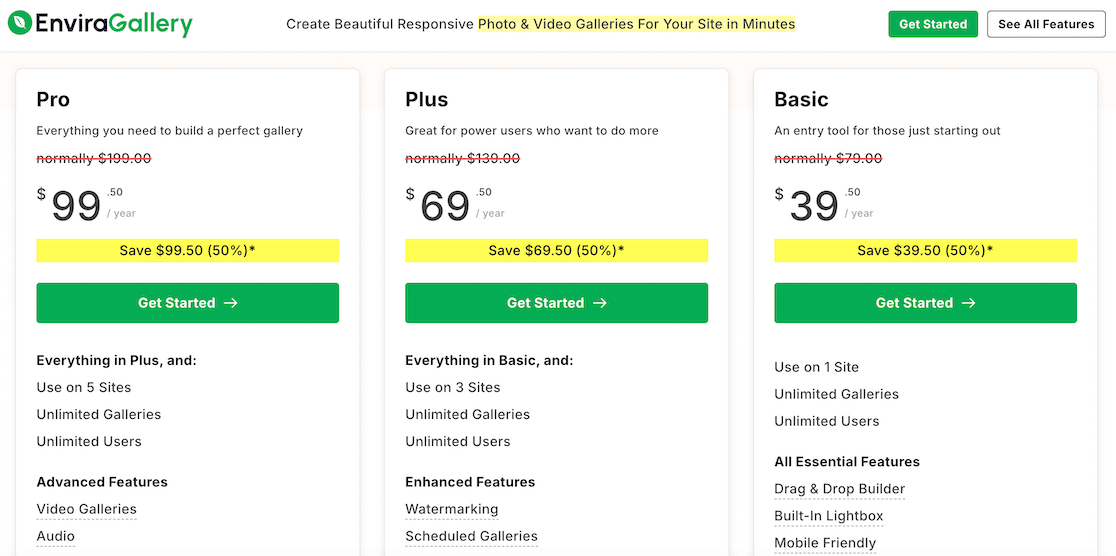
After purchasing, download the plugin file to your computer. Then, go to your WordPress dashboard, navigate to Plugins »
Add New » Upload Plugin, and select the file you just downloaded. Click Install Now, then Activate.
If you’re new to this process, then you may want to check out this beginner-friendly guide to plugin installation for more detailed instructions.
Step 2: Activate Your License
Next, find Envira Gallery in the left sidebar of your WordPress dashboard. Click on Settings. You’ll need your license key, which you can find in your Envira account or in the confirmation email you received after purchase.
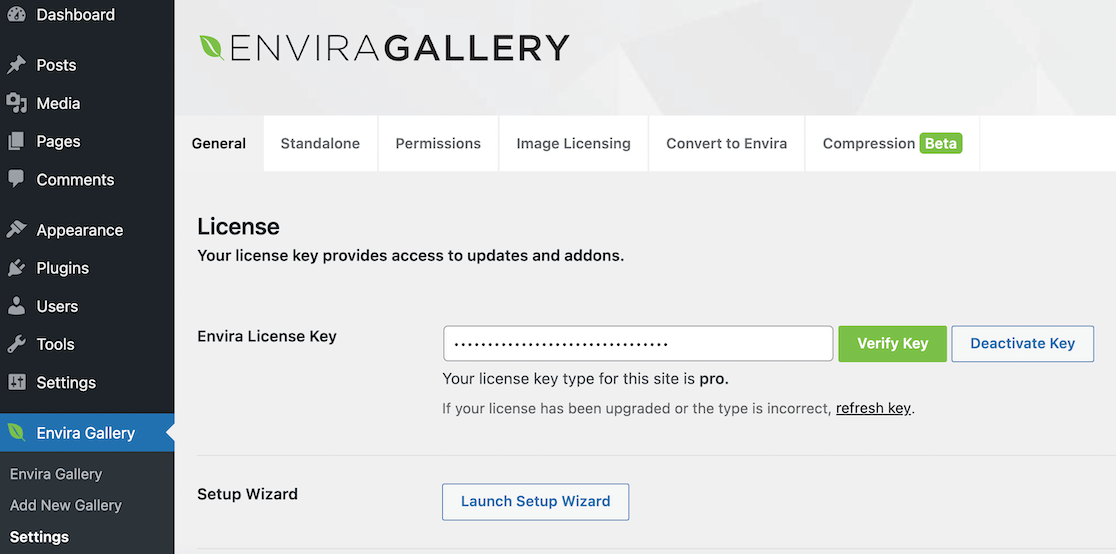
Copy your license key, paste it into the field, and click Verify Key. This unlocks all the premium features.
Step 3: Build Your Gallery
Click Envira Gallery in your sidebar, then select Add New Gallery. Give your gallery a descriptive name at the top of the page.
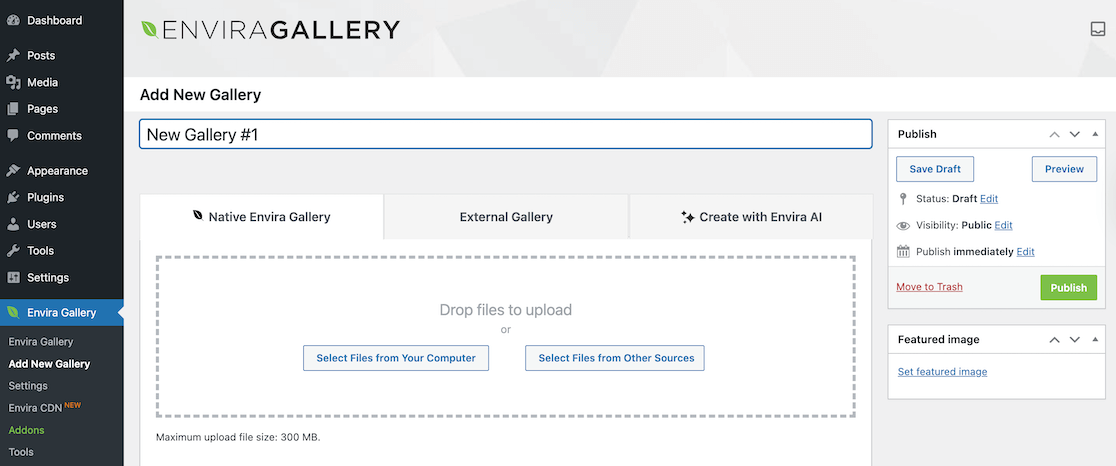
Click Select Files from Your Computer to upload fresh images, or choose Select Files from Other Sources to use images already in your WordPress media library. You can add as many images as you want.
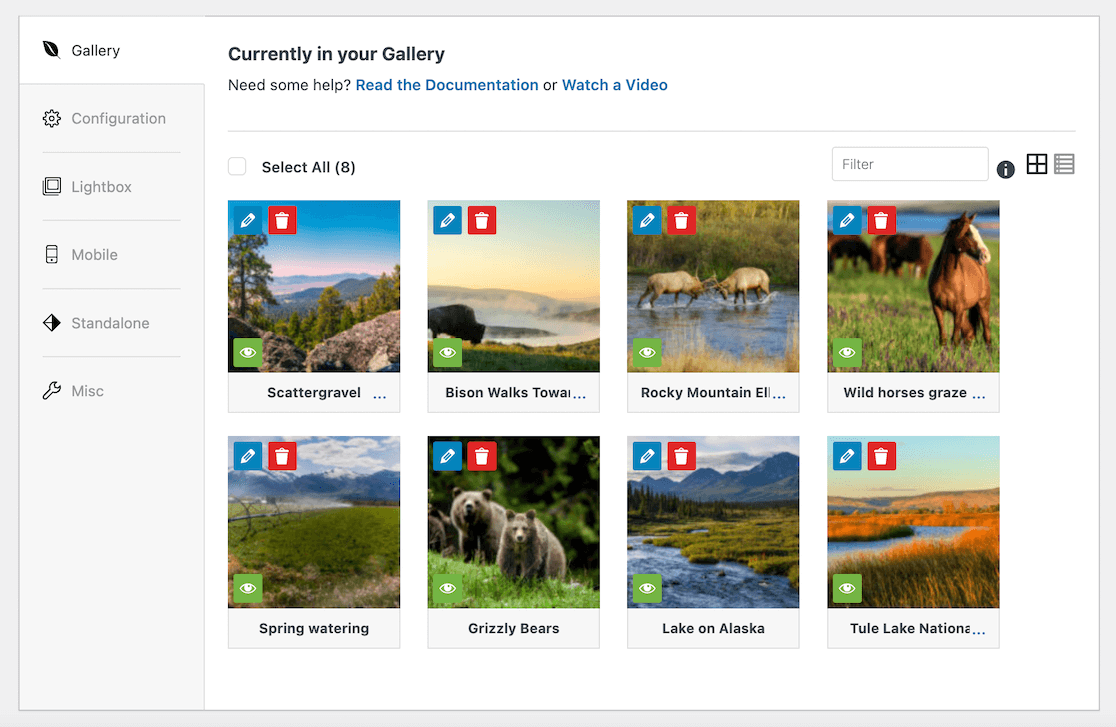
Once you’ve added your images, you can click the pencil icon to add titles, captions, and alt text.
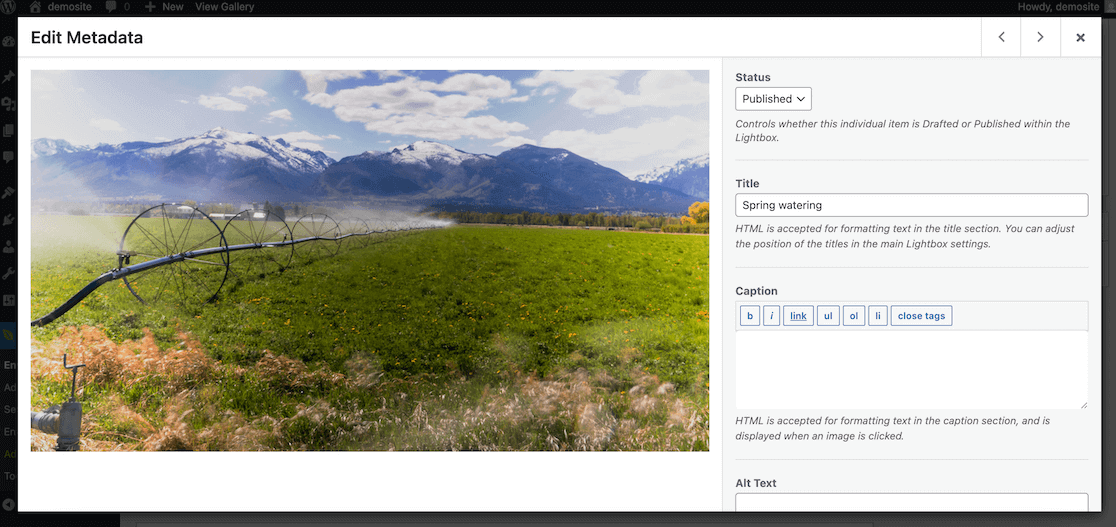
This metadata helps with both SEO and user experience.
Step 4: Configure Display Settings
Next, click the Configuration tab in the left sidebar.
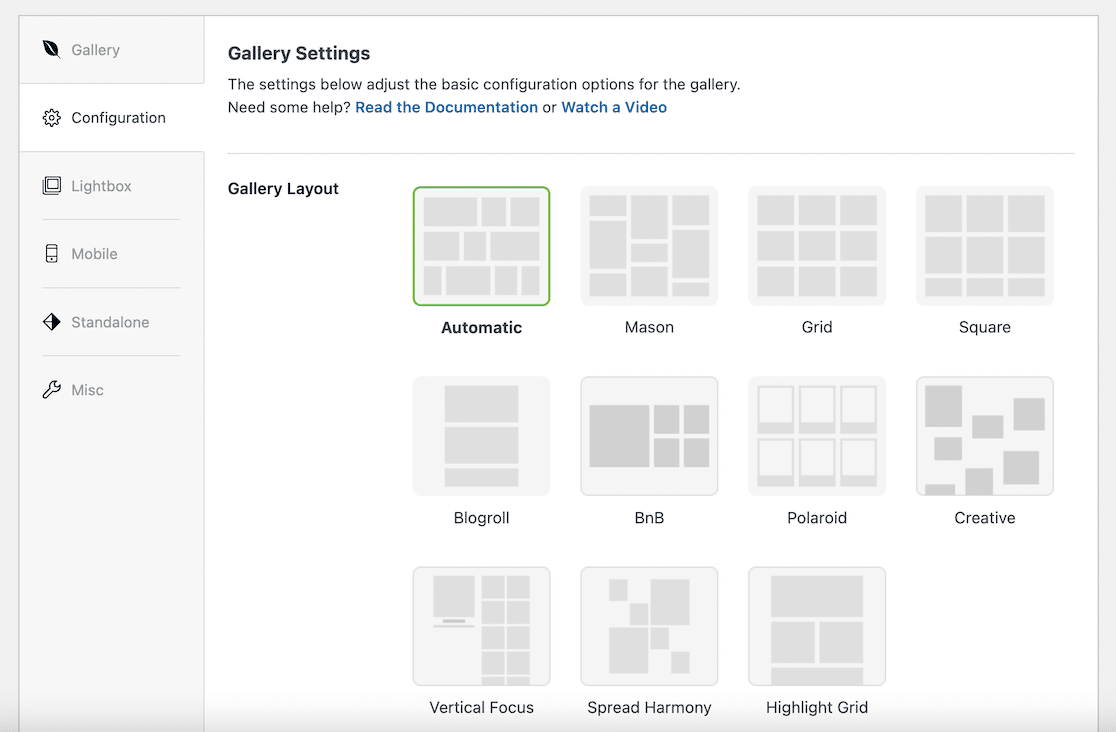
Here’s where Envira really shines. You can adjust:
- Gallery layout and template
- Number of columns
- Image sizes and dimensions
- Spacing and margins
- Caption positions
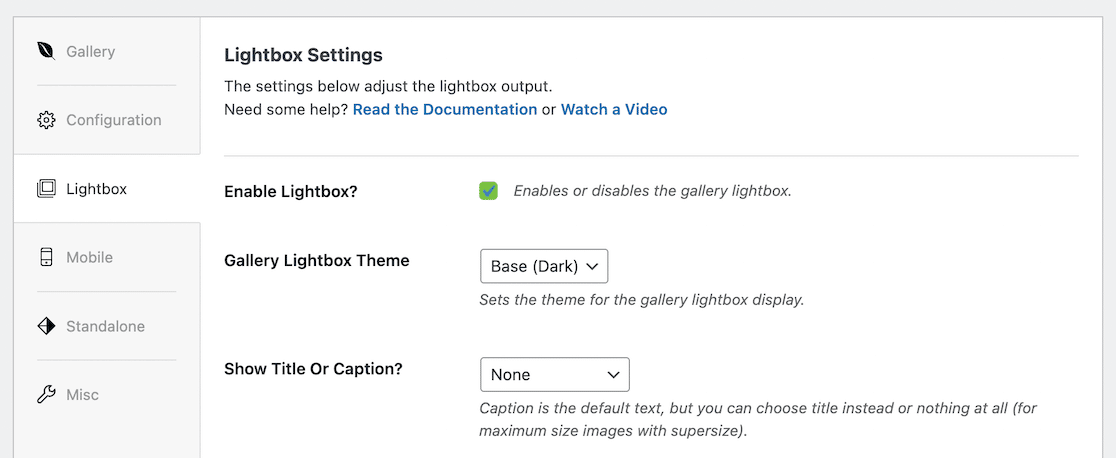
Now, click the Lightbox tab. Make sure to enable the lightbox feature, which allows visitors to click images and view them in a beautiful full-screen overlay without leaving your page.
You can also click the Mobile tab to configure how your gallery appears on smartphones and tablets. You can adjust dimensions, spacing, and whether to show the lightbox on mobile devices.
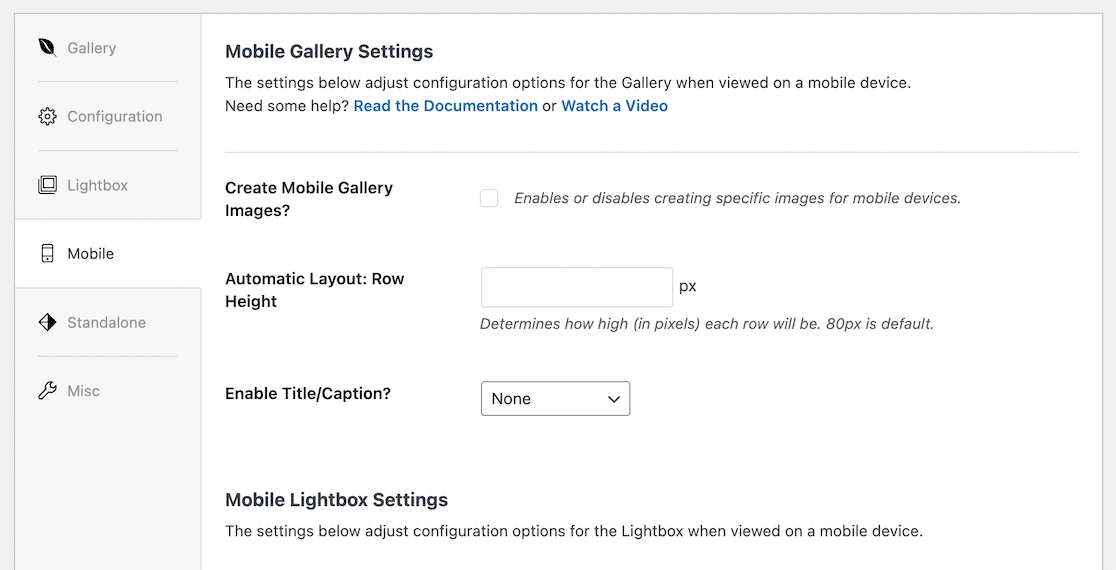
There’s also a Misc section where you can customize your gallery’s slug, add custom CSS, and more.
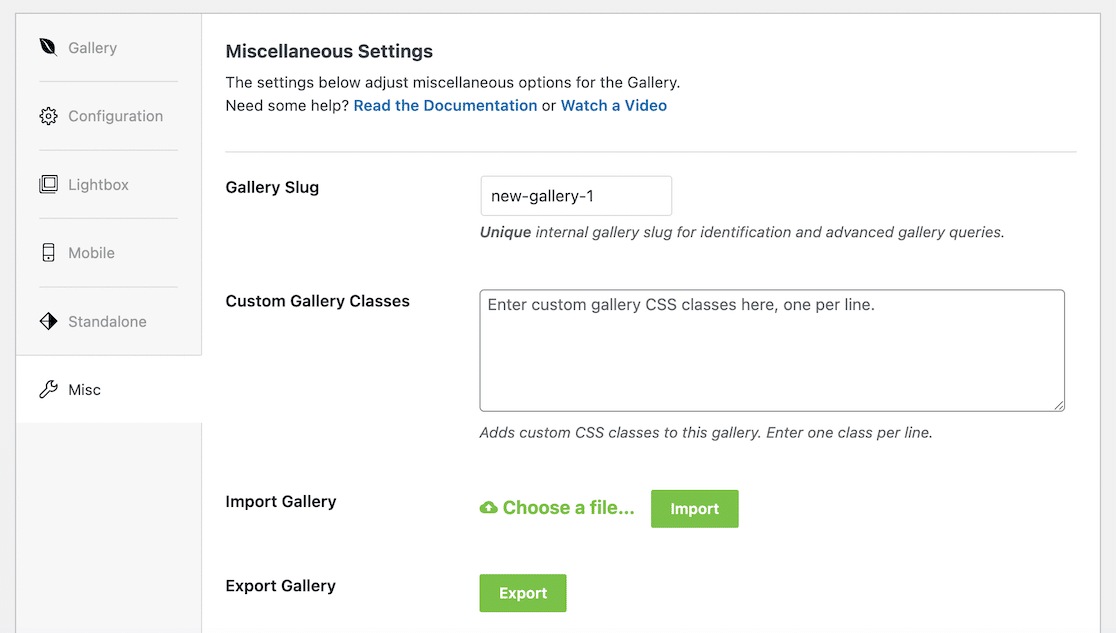
Once you’re satisfied with all settings, click Publish to save your gallery.
Step 5: Add Your Gallery to a Page & Publish
Navigate to the post or page where you want your gallery to appear. In the editor, click the plus (+) button and search for Envira Gallery.

Add the Envira Gallery block to your page.
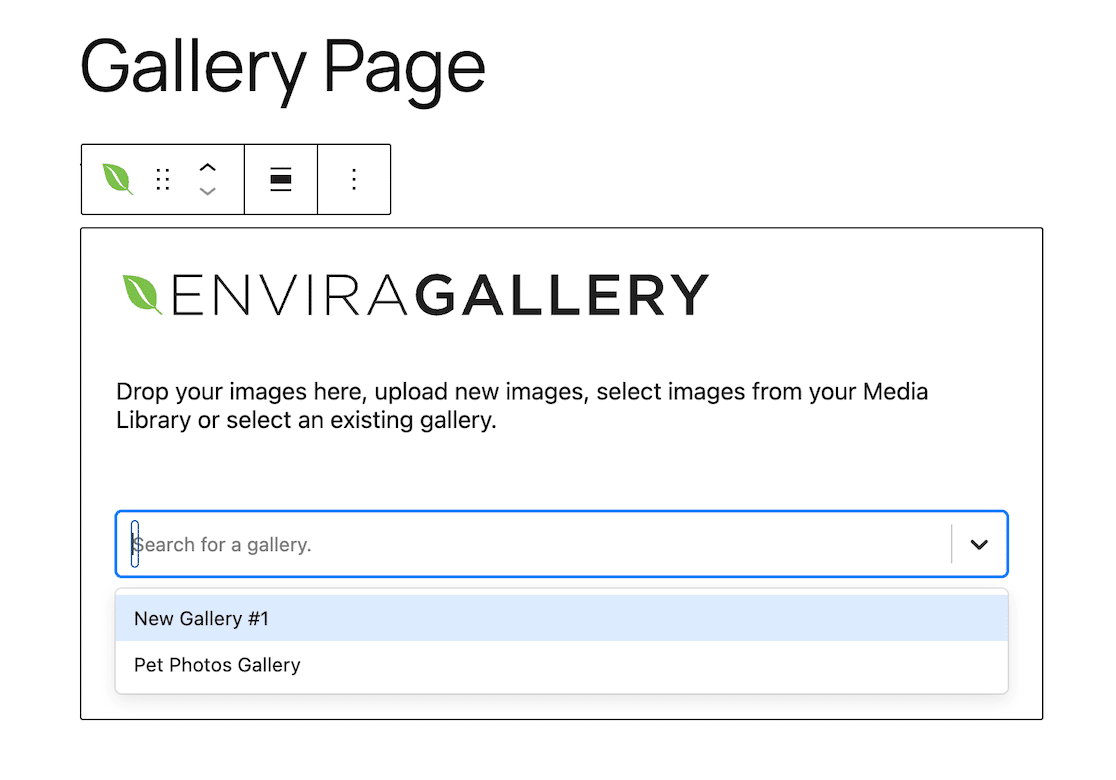
From the dropdown menu in the block, select the gallery you just created. It will automatically appear in your editor with all the settings you configured.
Click Update or Publish, and your professional gallery is now live!

Visit your page to see it in action.
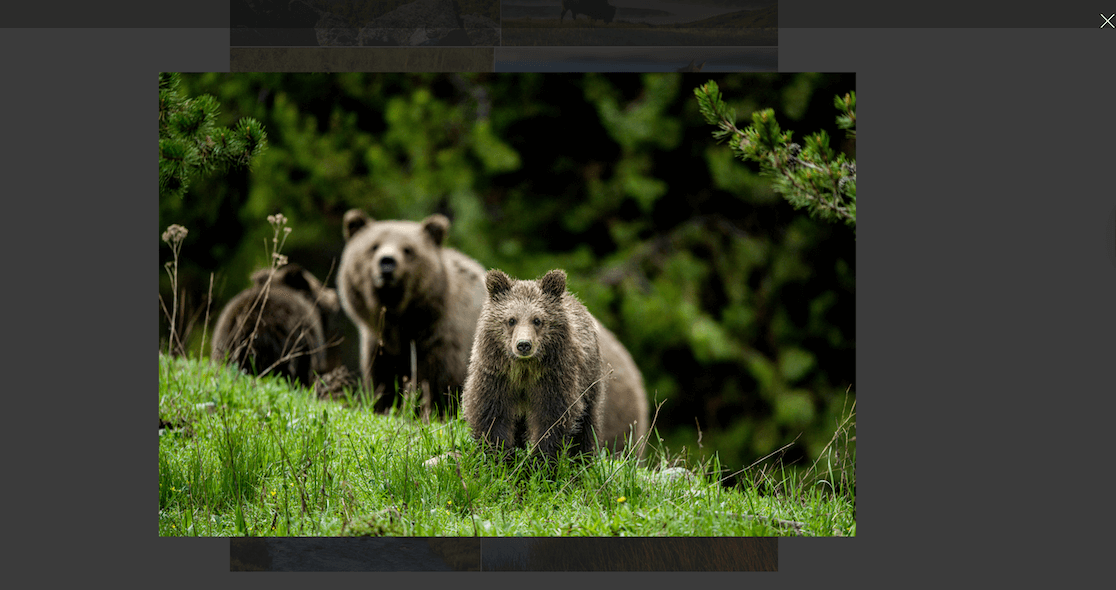
Click on any image to experience the smooth lightbox effect.
Which Method Should You Choose?
Both methods work, but they serve different needs. Here’s some advice on how to decide which one is right for you.
Use the WordPress Editor If:
- You need a simple gallery quickly
- You’re working with a tight budget
- You only have a few images to display
- Basic functionality meets your needs
Use Envira Gallery Plugin If:
- You want a professional, polished appearance
- Mobile responsiveness is important to you
- You need lightbox functionality
- You’re showcasing a portfolio or photography work
- You want complete control over design and layout
In my experience, most serious website owners eventually move to a plugin like Envira because the native WordPress gallery has significant limitations.
Images might not be clickable, or they open on separate pages instead of in a smooth overlay. This creates friction for visitors and can hurt your SEO performance.
For WordPress users who want to track how well their galleries are performing, I highly recommend ExactMetrics.
This powerful plugin connects your site with Google Analytics and shows you exactly which pages and posts are getting the most traffic. This way, you can learn which images and galleries are getting the most attention from your visitors. You can see all your important stats right in your WordPress dashboard without switching between different platforms.
Get started with ExactMetrics today!
I hope this article helped you learn how to create an image gallery in WordPress!
You might also find these articles helpful:
- Our Proven Tactics To Increase SEO Rankings
- How To Embed Videos in WordPress (Step by Step)
- Best Free WordPress Themes
And don’t forget to follow us on X and Facebook to stay updated on the latest Google Analytics tips and tools.
FAQs: Creating Image Galleries in WordPress
What is a gallery in WordPress?
Think of a WordPress gallery as a smart way to organize your images into a grid. Instead of stacking photos vertically down your page, a gallery arranges them side-by-side in neat rows and columns. This creates a cleaner look and lets visitors scan through multiple images quickly without endless scrolling.
How do I create a gallery in WordPress without using a plugin?
The good news is WordPress comes with gallery functionality built right in. Just open any post or page, click the plus icon to add a block, and choose “Gallery” from the media options. Upload your images (or pick from ones you’ve already uploaded), arrange them how you want, and hit publish. No extra software needed!
How do I make a gallery grid in WordPress?
When you’re setting up your gallery in the WordPress editor, look for the columns setting. You can choose anywhere from 2 to 5 columns depending on your layout preference. I usually recommend 3-4 columns for most websites as it creates a balanced look. Once you set the column count, WordPress automatically arranges your images into a grid pattern.
Do image galleries help with SEO?
They definitely can! When you fill out alt text for your gallery images (those descriptive tags that explain what’s in each photo), search engines get better context about your content. Galleries also tend to keep visitors engaged longer, and that increased time-on-page signals to Google that your content is valuable. Plus, people are way more likely to share pages with eye-catching galleries, which can earn you valuable backlinks.

