Want to learn how to sell digital products online for your business?
You can sell tons of different digital assets online, and it’s an awesome way to make more money with minimal cost upfront.
In this article, we’ll show you step-by-step how to sell digital products online without any programming or technical skills required.
Can You Really Make Money Selling Digital Products Online?
Yes! You can absolutely make money selling digital products online. Selling digital content gives you lots of flexibility to offer a variety of products or services. You can launch new digital product ideas, adjust pricing, and deal with any product issues much easier than you typically could when selling physical products.
You’ll also be able to minimize expenses related to business startup and overhead, manufacturing labor, shipping, and managing inventory.
Since it doesn’t require much effort on your end to create digital copies and purchasing is convenient for customers, a digital product can quickly become your best-selling item.
The bottom line is that learning how to sell digital products online is an awesome way to increase your business’s revenue!
What Digital Products to Sell Online?
Now that you know the benefits, you may be wondering what the most profitable digital products to sell are. You can sell all types of virtual content, but here are some of the most popular items:
- eBooks
- Music, audiobooks, and podcasts
- Digital art, photography, and videos
- Software and website themes
- Design templates and DIY tutorials (knitting patterns, building instructions, recipes, etc.)
- Online courses
What you choose to sell will depend on a number of factors such as your interests, industry expertise, and if you’re adding digital eCommerce products to your physical business or creating a totally new brand.
The best digital products provide a solution for customers by filling a gap in the industry, solving an existing pain point, or taking advantage of a new market opportunity.
How to Sell Digital Products Online
- Build a Website
- Install Easy Digital Downloads
- Set Up Your Online Store
- Start Selling Digital Products
- Track Your Site Visitors and Sales
Ready to dive in?
Step 1: Build a Website
There are many websites and platforms that advertise to help you sell digital products. But, most of them are really designed for selling physical products, which can overcomplicate the process with a bunch of expenses and stuff you don’t actually need.
Here are some of the key reasons why we recommend selling digital products on your own site:
- You’ll have complete control over how your products are marketed
- You get to keep more of the profits from your online sales
- You’ll be able to focus your marketing efforts on your own site to grow your overall brand and drive traffic to more of your products, instead of competitors’ items.
Although popular, using a marketplace like Amazon or Envator to sell downloads comes with high fees and other drawbacks for a new business. We recommend selling digital products on your own site and using a marketplace to expand your business after your own online store is successful.
How to Create a Website to Sell Digital Products
Building your own website might seem a bit intimidating, but it’s actually pretty simple nowadays, even if you’re not tech-savvy. We recommend creating a self-hosted WordPress site for your business.
This will give you the most flexibility, readily available tools, and tutorial resources at the lowest price. WordPress is the most popular platform in the world and it accommodates everything from simple personal blogs to mega-corporation eCommerce sites.
We’ll cover the primary steps to get your WordPress website up and running, but you can also check out our detailed tutorial for How to Build a WordPress Website in 7 Easy Steps.
Already have a WordPress website? Skip down to step 2.
Set Up Domain Name and Hosting
A web hosting company is responsible for owning and managing the servers where your website files are stored and ensuring your website operates smoothly without any interruptions. You’ll want to select a hosting provider that offers excellent support, robust security measures, and regular maintenance.
We recommend using Bluehost. They provide a variety of hosting packages specifically designed for WordPress. Plus, setting up your WordPress site with Bluehost is incredibly easy, thanks to their convenient one-click installation process.
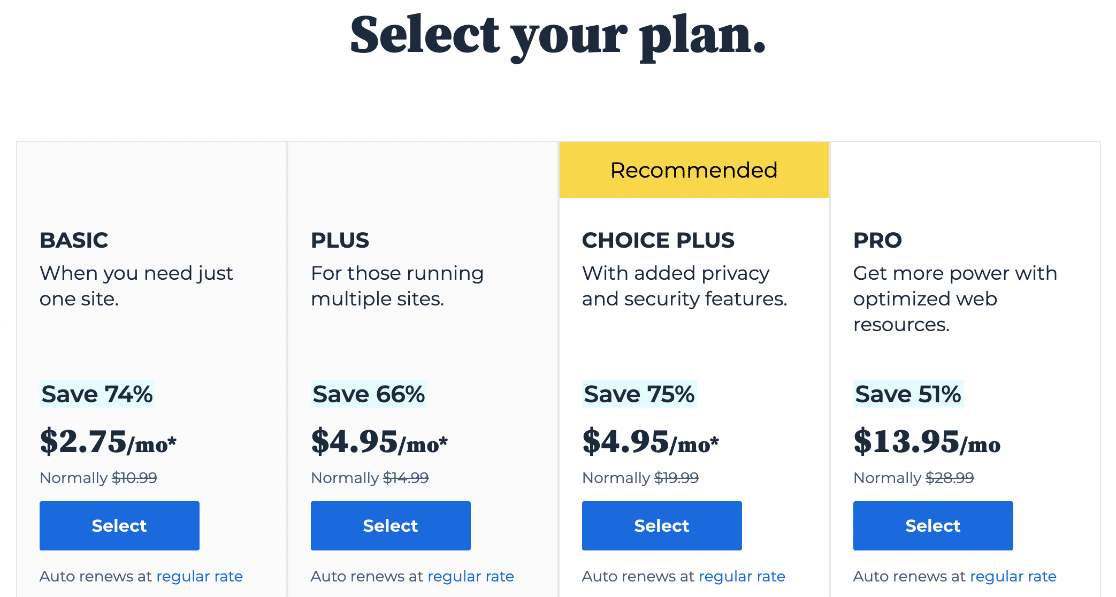
To create a new hosting account, simply visit Bluehost’s sign-up page and click on the Get Started Now button. Then, select the plan that works best for you. If you only need one website, the Basic plan is a great choice. Otherwise, you can choose one of the upgraded plans.
After you’ve selected your plan, you’ll be asked to provide your domain name or create one if you don’t already have one. Most websites use their business name as their website address or URL. You can use .com as the extension or choose one of the other options such as .org, .biz, .net, and more.
Once you’ve selected your domain, you’ll be prompted to provide contact and payment details. When your purchase is complete, you’ll get a confirmation email with instructions for how to log in to your hosting account.
Head to step 1 in our website-building tutorial for detailed instructions on setting up your hosting and domain name.
Install WordPress and Choose Your Theme
Thankfully, Bluehost automatically installs WordPress on your site, so you won’t have to do too much for this step. Using the account details from your confirmation email, go to your Bluehost account and press Log into WordPress on either the Home page or under My Sites.

Next, you’ll be taken to the WordPress Dashboard for your site, which will look similar to this.
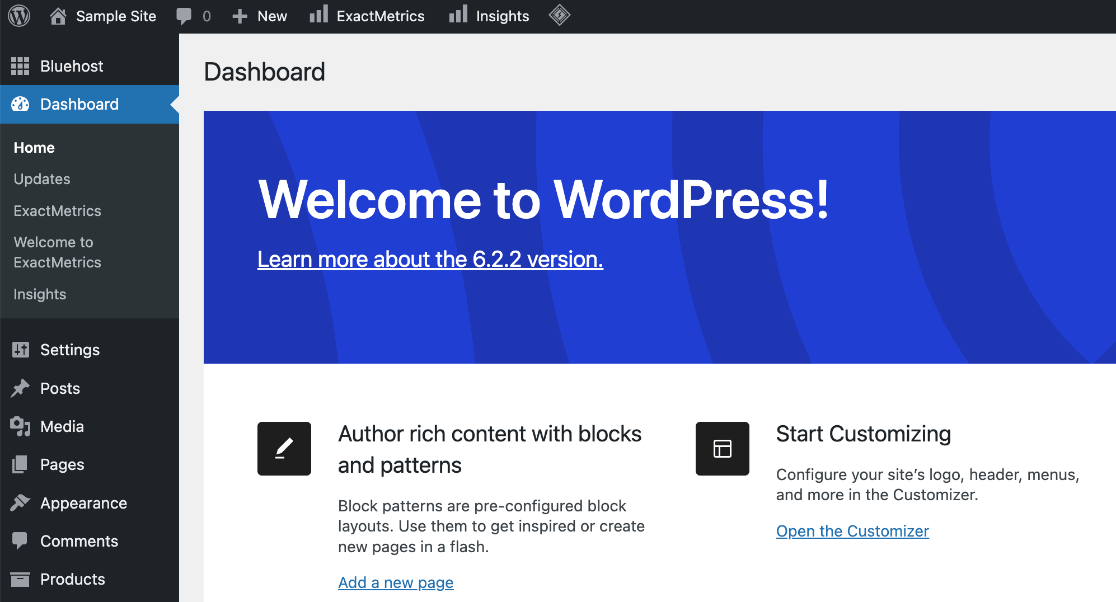
This is where you’ll edit your site, adjust settings, add content, manage plugins, and more. For now, you don’t need to worry too much about it.
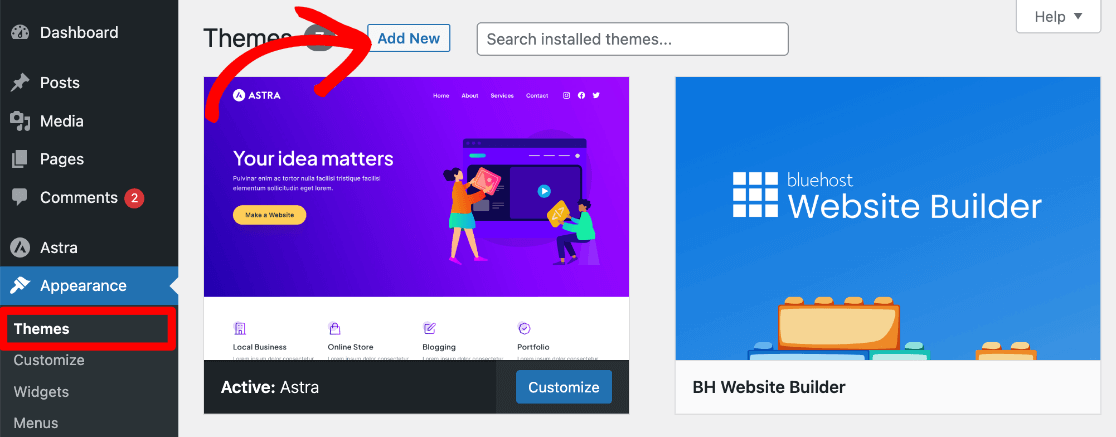
Your website will have a default theme installed already, but now’s a good time to choose the theme you’d like to use for your store. To do that, go to Appearance » Themes from your sidebar. Click Add New Theme. Then, you can search for themes and filter by categories.
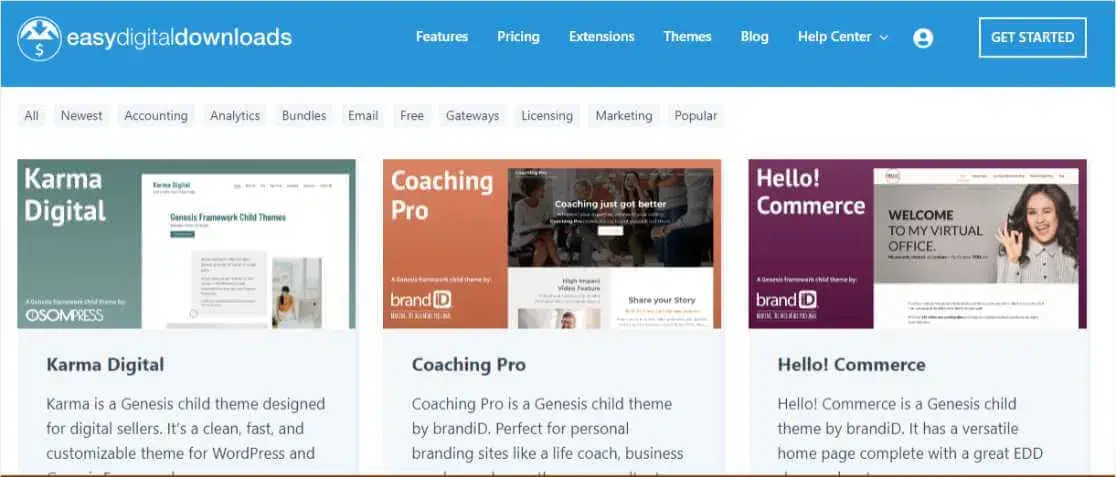
To save time and ensure that your digital product store looks great, we recommend choosing a theme from Easy Digital Downloads’ list of themes that are tested to work with EDD. There are both free and premium options available.
After finding the theme you want, just press Install and then Activate.
For more on choosing your theme, check out step 3 in our website-building tutorial, or take a look at our list of the best free WordPress themes.
Step 2: Install Easy Digital Downloads
Now that you’ve set up your website, you’re ready to learn how to sell digital products online. WordPress offers a huge directory of amazing plugins that let you add almost any functionality to your site without any programming or coding knowledge.
Our favorite plugin for selling digital content is Easy Digital Downloads, or EDD.
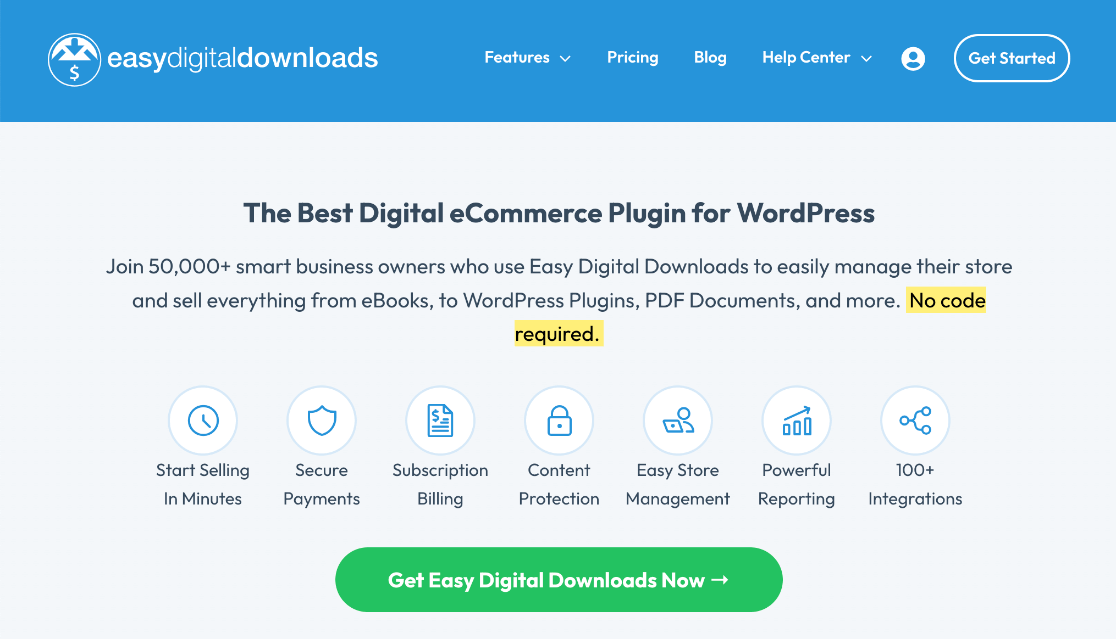
Easy Digital Downloads is the best plugin for selling digital products on WordPress. It allows you to quickly create an online store, accept online payments, and securely manage file downloads. EDD is designed to make digital product sales simple and beginner-friendly. It has all the necessary features, without a bunch of extra stuff that you don’t need. You can sell:
- eBooks
- Music and audio files
- Digital art, graphics, photography, and videos
- Software
- Documents and PDF files
- And other downloadable content types
EDD’s free version offers tons of functionality, and that’s what we’ll be using in this tutorial. However, for more features like recurring payments for a subscription website, integration with email marketing, and more, head to the EDD pricing page and grab a premium license.
Install and Activate EDD
To start, go to Plugins » Add New from your WordPress sidebar menu. Type easy digital downloads in the search bar.

When you see the plugin listed, press Install Now. When the button changes to say Activate, click it.
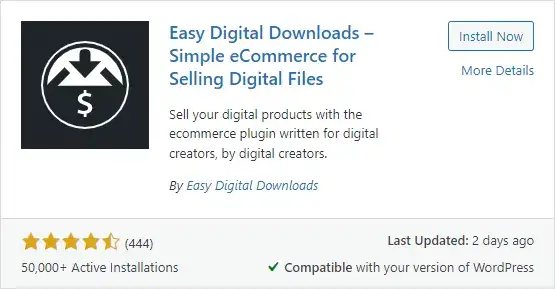
Easy Digital Downloads is now installed and activated on your site. Next, let’s set up your online store.
Step 3: Set Up Your Online Store
You’ll now see a new menu in your WordPress sidebar called Downloads. This is where you’ll manage your eCommerce settings, digital products for sale, and other options.
Before you can start adding products for your customers to buy, you’ll need to do some things to get your store set up correctly. For starters, go to Downloads » Setup from your WordPress admin and launch the setup wizard.
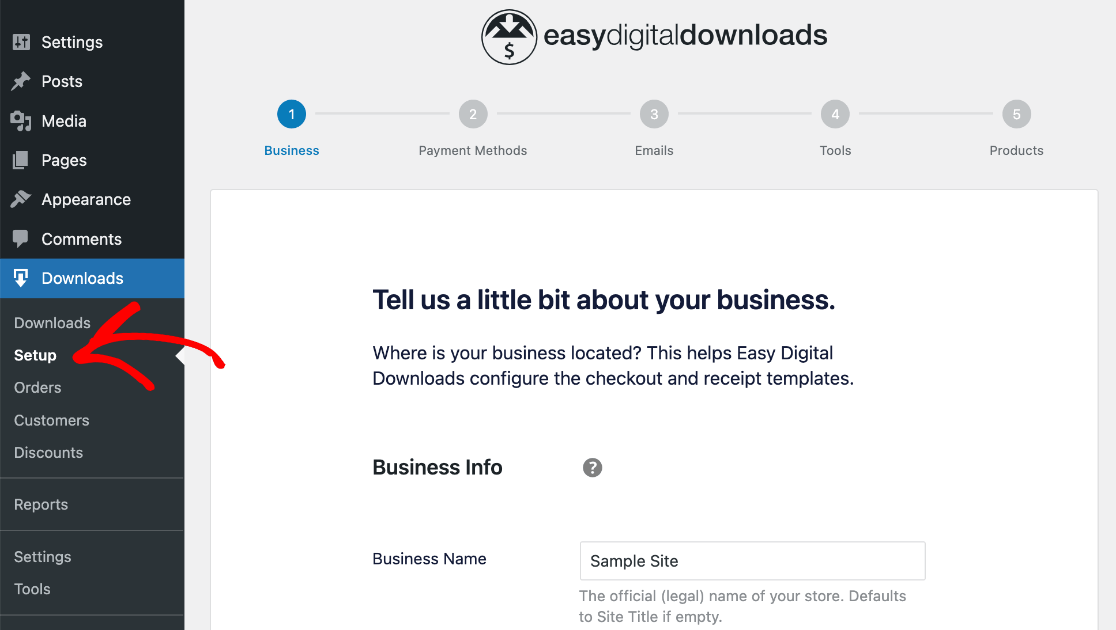
First, you’ll need to enter your Business Info like name, type, address, and currency. When you’re finished, press the Save & Continue button at the bottom.
The next step is Payment Methods. You’ll be prompted to connect with Stripe to accept payments, which is highly recommended. It will also allow you to set up Google Pay and Apple Pay.
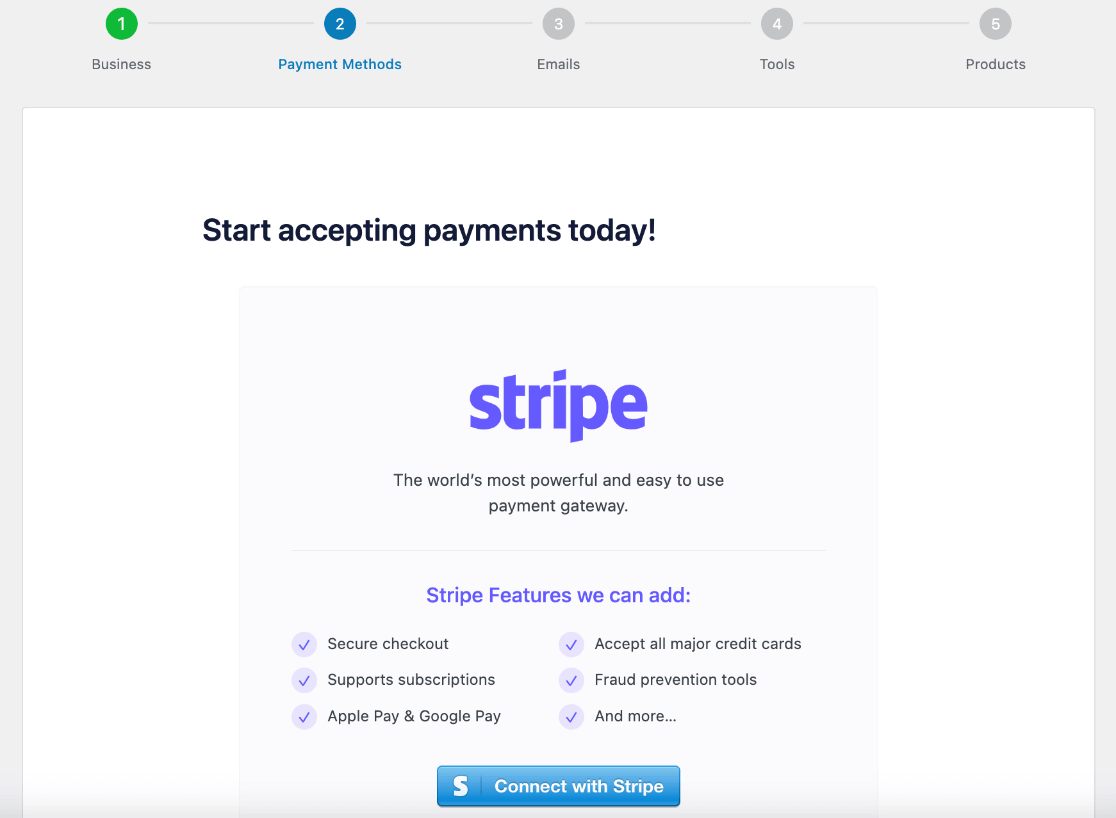
After you’ve finished connecting, press Save & Continue at the bottom. EDD also works with Paypal and other payment gateways, so if you don’t want to use Stripe, you can just press Skip this step.
The next step is Emails. Here is where you can Configure your Receipts. Go ahead and add your business logo if you’d like and adjust other settings for the purchase confirmation emails that’ll be sent to customers.
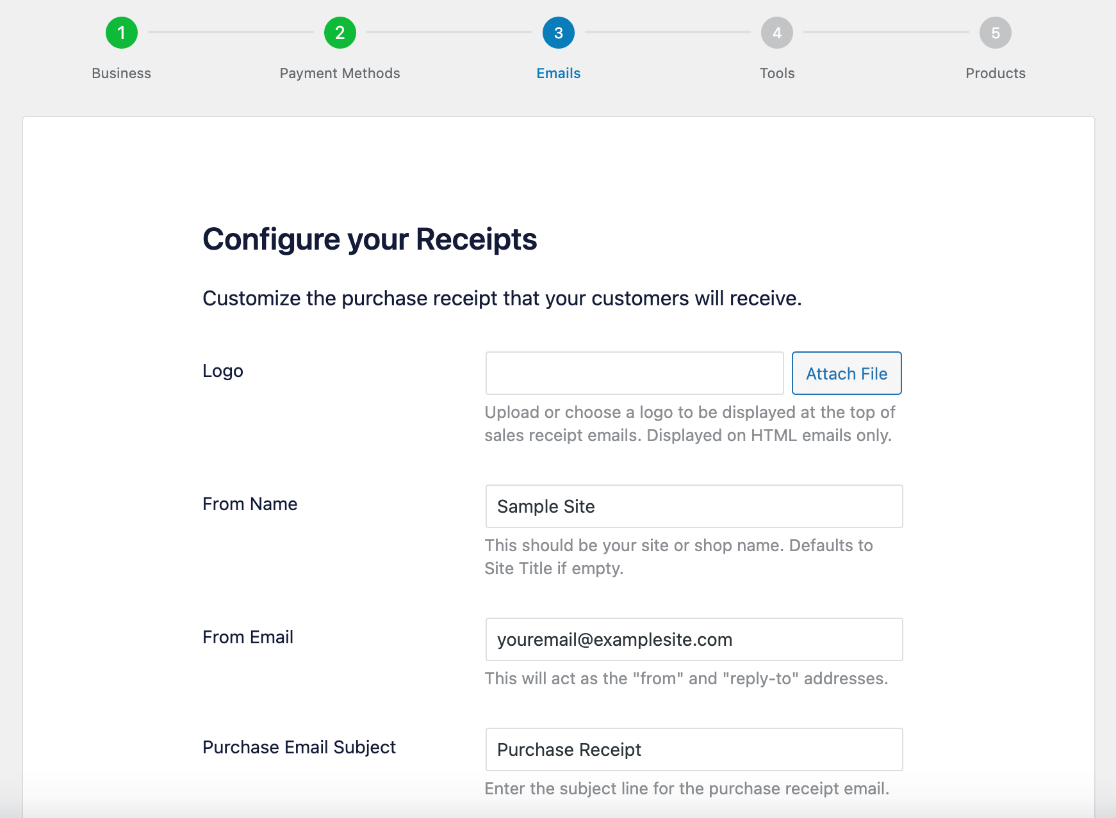
You’ll also have the chance to fully customize what your receipt emails say at the bottom of this screen. When it’s to your liking, press Save & Continue.
On the next screen, Tools, you’ll see a number of different features and additional plugins that you can choose to include or not by clicking the checkmark boxes.
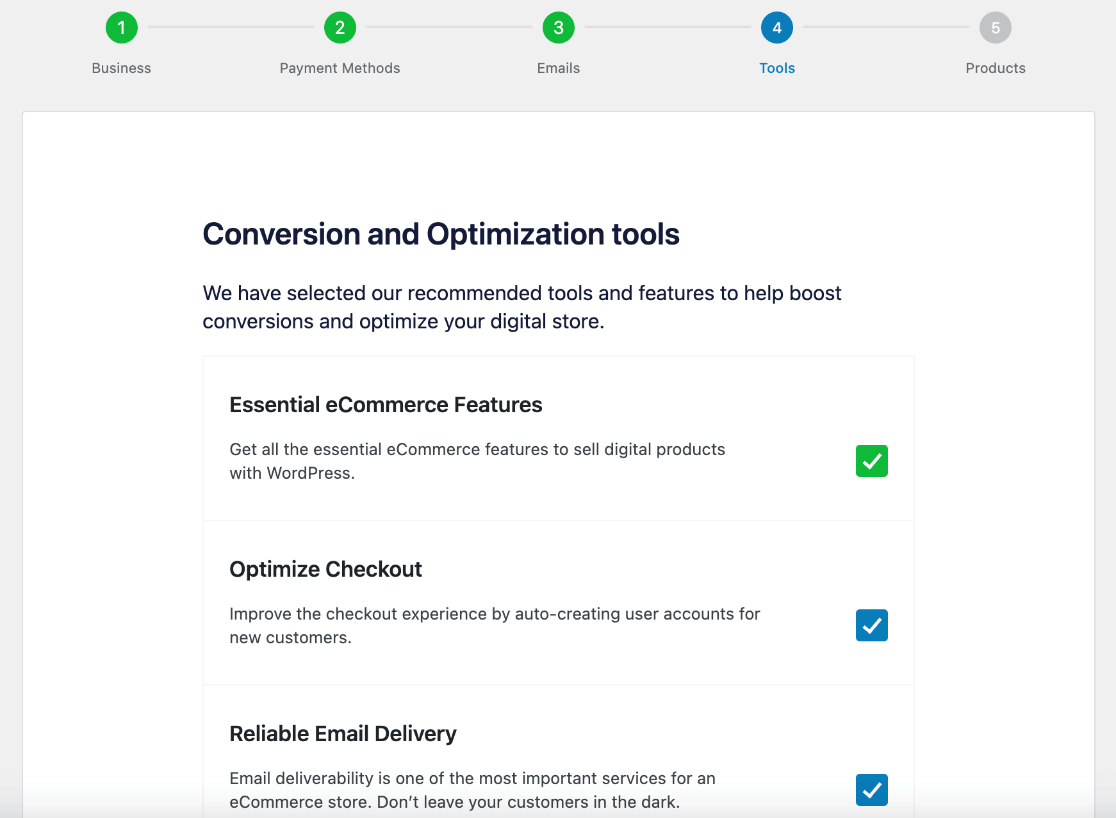
When you’ve configured your tools, press Save & Continue again.
Here, you’ll reach the final step in the setup process, Products. To create your first digital product to sell online, enter the Product Name and Price, choose which Pricing Options, and upload a Product Image.
Note: Choosing Variable price allows you to add multiple prices and assign a name to each one. Then, you can choose the price assignment for each downloadable file. Essentially, this lets you specify additional content that becomes available at a higher price level.
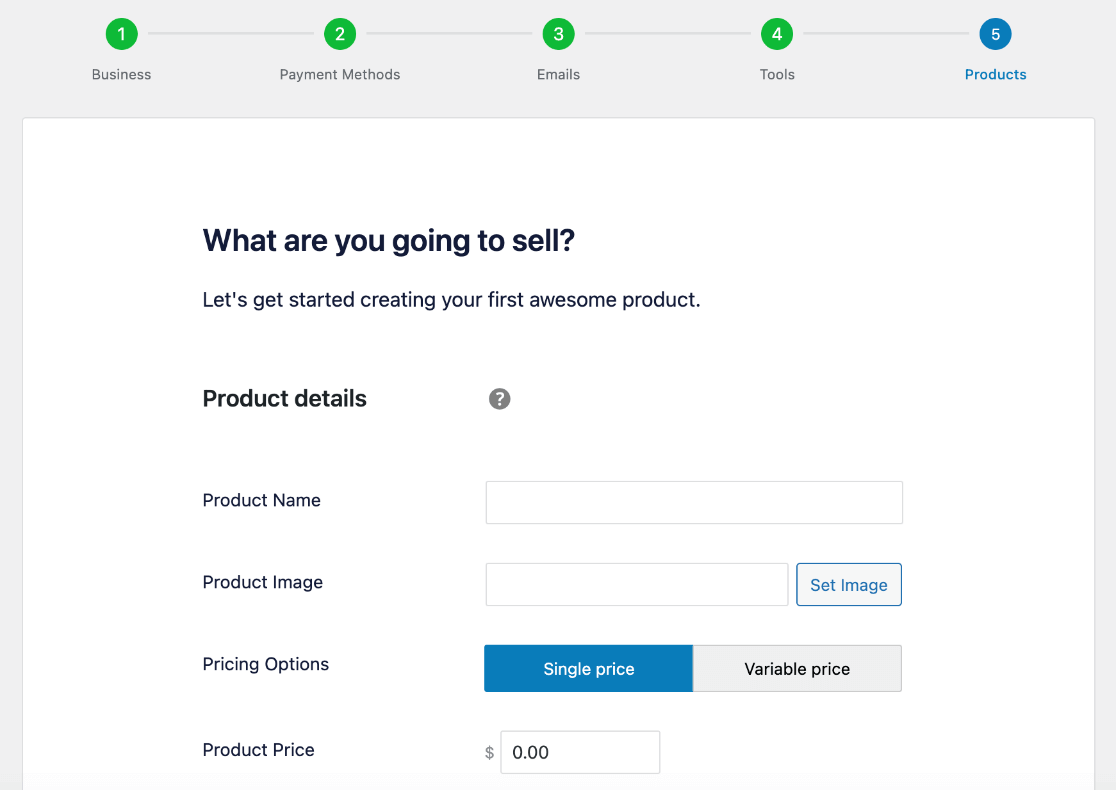
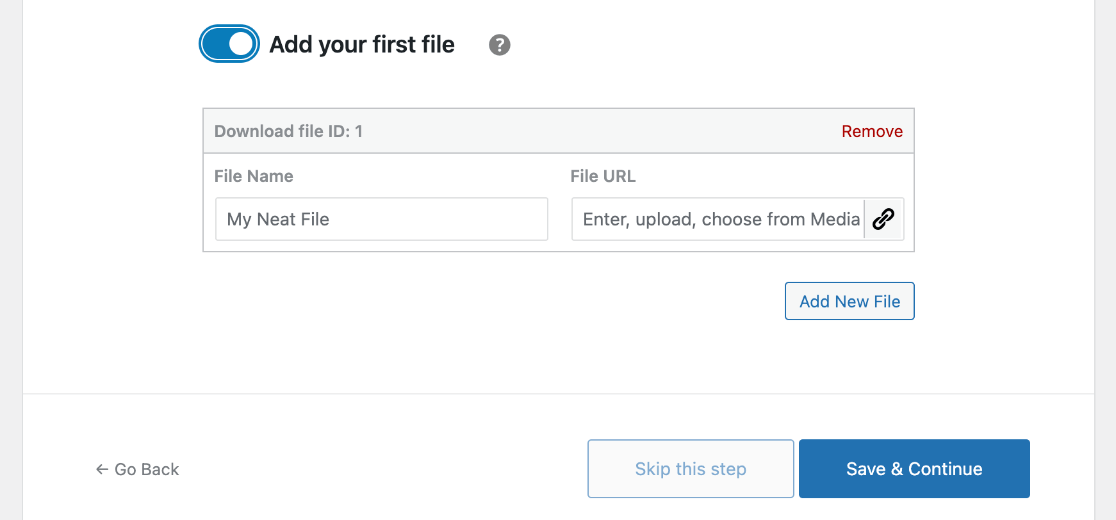
You can toggle on the Add your first file option to go ahead and upload the digital content you’re selling. Fill out the File Name and enter the URL, or click the link icon to upload the file. To add additional files to the product, use the Add New File button.
Alternatively, you can leave this option toggled off and add your files later. When you’re finished, press Save & Continue.
Congrats, you just set up Easy Digital Downloads on your website!
To edit additional settings like enabling tax collection, adding other payment methods, or changing any of the settings you selected in the setup wizard, go to Downloads » Settings from your WordPress menu.
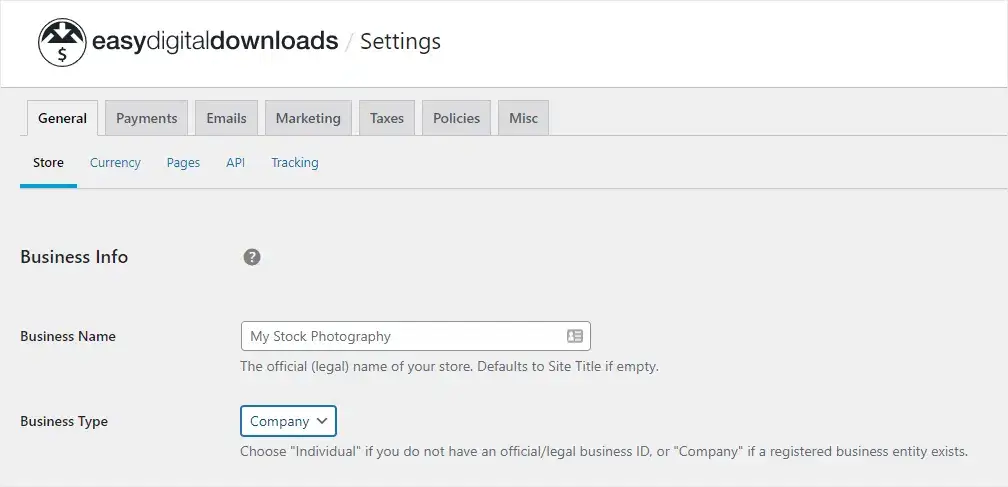
Using the tabs at the top of the Settings screen, you can navigate to different sections and further customize your online store’s functionality.
Step 4: Start Selling Digital Products
Now that you’re getting the hang of it, let’s see how we can add additional digital products to sell online and how to display them on your site.
How to Add New Digital Downloads
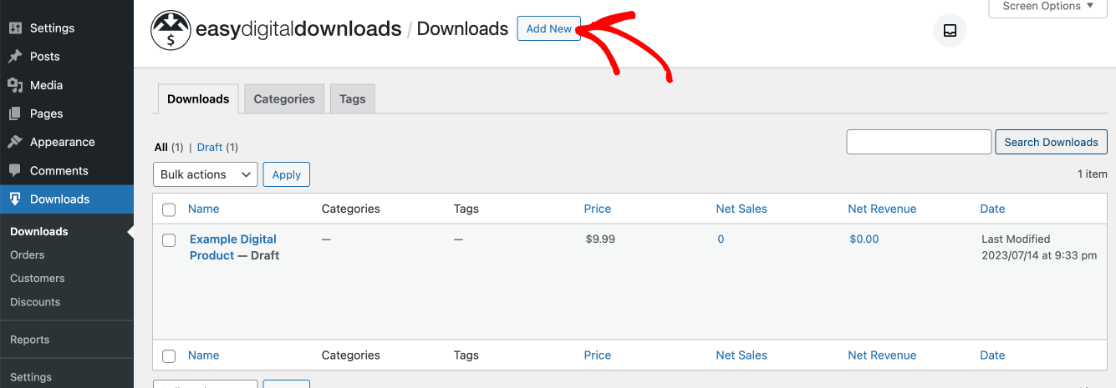
To add products to your store, go to Downloads from your WordPress admin. If you created a product in the setup wizard, you’ll see it listed here as a draft, just click to edit it.
To create a new digital download product, click Add New at the top.
You’ll be taken to the Download editor, which is very similar to the WordPress block editor. You can add blocks for text, images, and other elements to customize your product listing.
When creating a new downloadable item, the only required elements are the File Name (Stock Photo #1 in our example), Price, and the File URL.
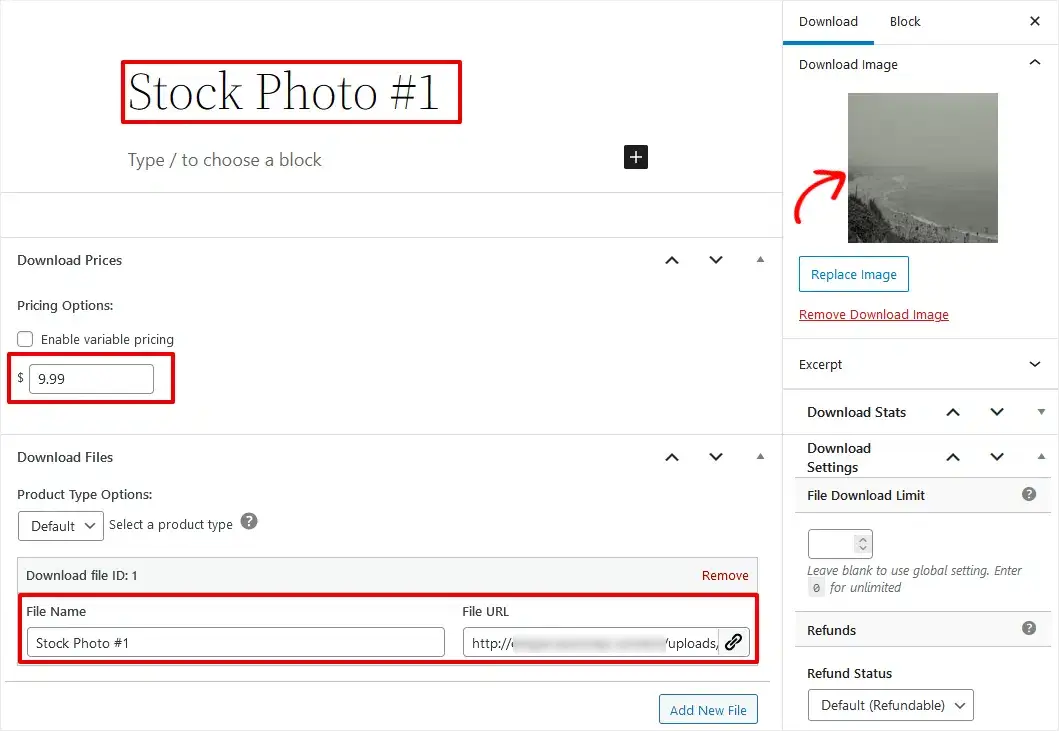
However, you may want to add a text block below the title to write a description of your product. You can click Set Download Image in the right sidebar, under Download Image, to add an image for your item such as an eBook cover or thumbnail.
Once you’ve customized the product listing to your liking, click Preview » Preview in new tab to see how your digital download listing would look as a full webpage. If you’re happy with the results, go ahead and click the Publish button.
How to Display Your Digital Products
To display your digital products for sale on your website, all you need to do is add the following shortcode to any post or page in WordPress.
[downloads]
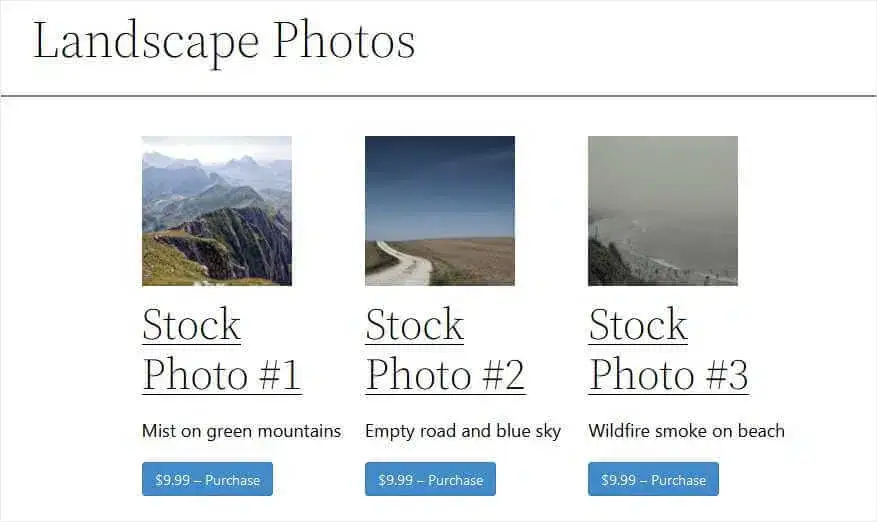
We’ve added the download shortcode to a page titled Landscape Photos, and the default display looks like this.
If a buyer clicks the Purchase button, the digital product will be added to their cart, which is automatically created by EDD along with a checkout page that looks something like this.
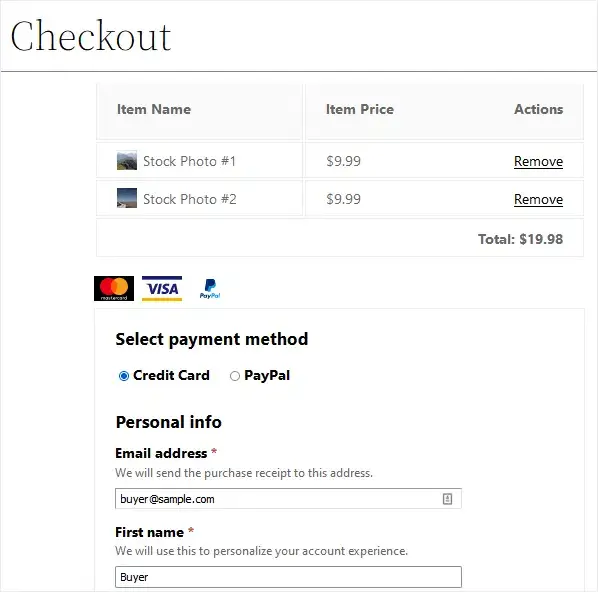
When the customer completes their order, they’ll automatically get a receipt and the download link. They’ll also receive an email with their confirmation and a link to download their digital content.
Another way to add digital products to your website with more advanced customization is by using individual EDD blocks. When you add a new block to a post or page and start typing EDD, you’ll see the available blocks.
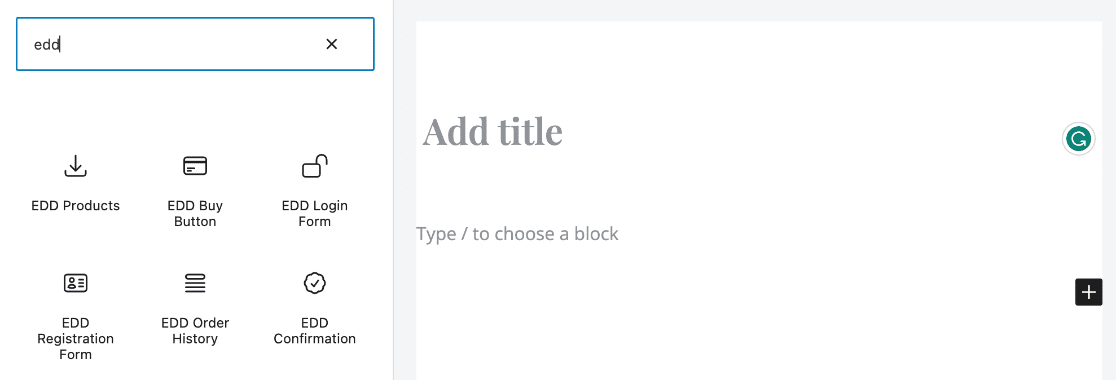
Click EDD Products to add a block that displays products based on customizations and parameters. You can use the EDD Buy Button to add a purchase button for any product, anywhere. For example, you could add a purchase button for the full eBook after a text excerpt on your website when you don’t want to display the full product listing.
You can also add other EDD blocks to do things like display the shopping cart in additional places, display order history for logged-in users, and more.
All that said, if you’re just getting started with WordPress and selling digital content online, we recommend using the regular shortcode method to start. To learn more about adding digital products and using Easy Digital Downloads, check out EDD’s resources and documentation.
You just learned how to sell digital products online! There’s only one step left – start tracking your orders and users to optimize your store and make more sales.
Step 5: Track Your Site Visitors and Sales
After you’ve created an online store and added your digital products, you’ll want to track how visitors are using your site and interacting with products. That way, you can optimize the user journey and checkout process to turn more visitors into buying customers.
The easiest way to track eCommerce and user journeys on your website is with ExactMetrics, the best premium WordPress Analytics plugin.
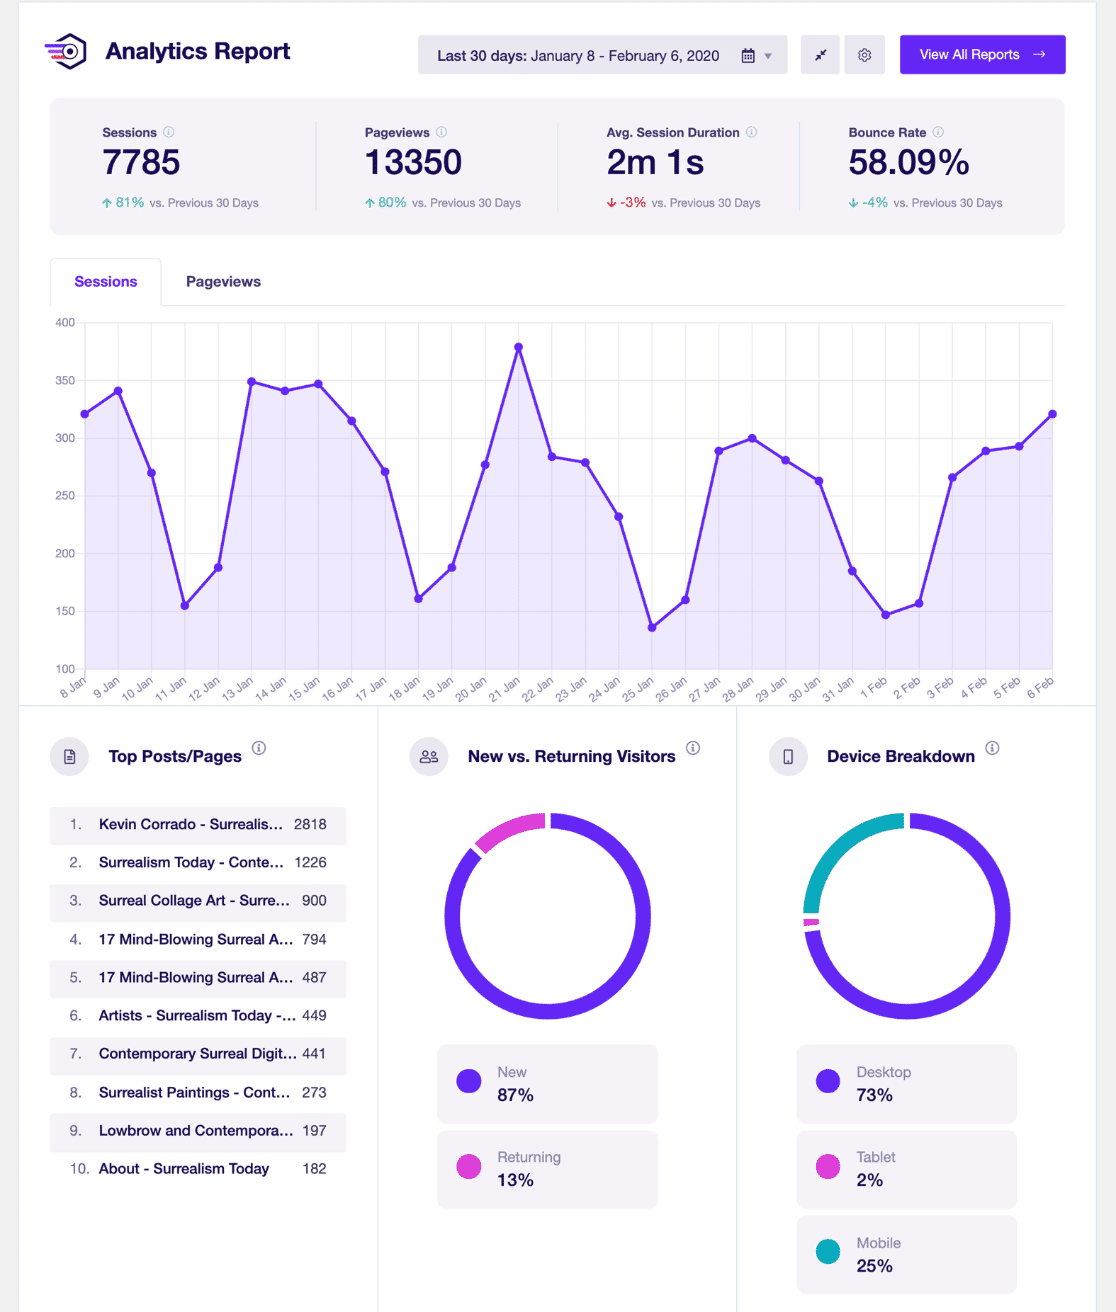
You’ll get standard metrics like traffic, page views, and engagement in your WordPress dashboard along with advanced tracking for eCommerce, user journeys, forms, custom dimensions, conversion tracking for Google Ads, and lots more.
See exactly what customers do on your site and how your digital content is performing without having to touch a single line of code. To learn more about tracking eCommerce check out our Guide to eCommerce Customer Journey Analytics in WordPress.
That’s it! We hope you enjoyed our tutorial on how to sell digital products online.
Not using ExactMetrics yet? What are you waiting for?
Don’t forget to follow us on Twitter and Facebook to see all the latest reviews, tips, and Google Analytics tutorials.


