Are you wondering how to track add-to-cart eCommerce events in Google Analytics and WordPress?
Tracking how many times your “Add to Cart” button gets clicked is an important step in learning how your visitors interact with your eCommerce site. What products are they the most interested in? How many people are adding items to their carts and following through with checkout?
You’ll be able to answer those questions and more when you set up add-to-cart event tracking in Google Analytics and WordPress. Let’s get started.
Google Analytics eCommerce: The Basics
Before we dive into add-to-cart events, let’s quickly look at eCommerce tracking in Google Analytics.
Out of the box, Google Analytics will track sessions, engagement rates, traffic channels, and other basic metrics. For many websites, this is all they need. For online stores, though, they would really benefit from some other tracking that’s specific to stores. That’s where eCommerce tracking comes in.
Once you set up eCommerce tracking, Google Analytics will see that your website is a store, not just an informational site or blog. It’ll be able to track your products and sales. You’ll be able to track things like which products are viewed the most, which products are bringing in the most revenue, how much visitors tend to spend when they arrive from different channels, and much more.
So, if you don’t have eCommerce set up yet and you run an online store, it’s definitely worth it to get it going and get those awesome eCommerce metrics, like add-to-cart events.
How to Track Add to Cart in WordPress & Google Analytics
In order to track add-to-cart events, you’ll need to set up eCommerce tracking in Google Analytics. Without using a tool that will do this for you, it’s pretty complicated and involves either coding and a developer or a complicated Google Tag Manager setup.
To avoid doing that, you can simply use the ExactMetrics plugin. In this tutorial, we’re going to go over how to set up eCommerce on WordPress in just a couple of clicks and zero coding.
Let’s get started.
Step 1: Install ExactMetrics
ExactMetrics is the most powerful Google Analytics plugin for WordPress, without the high costs. In addition to the eCommerce tracking we’re going to be setting up here, you’ll get a whole list of features that will help you grow your business with analytics.
To start, head to the Pricing page and get started with ExactMetrics at the Pro level in order to access eCommerce. Once you complete checkout, download the plugin.

Next, upload it to your website.
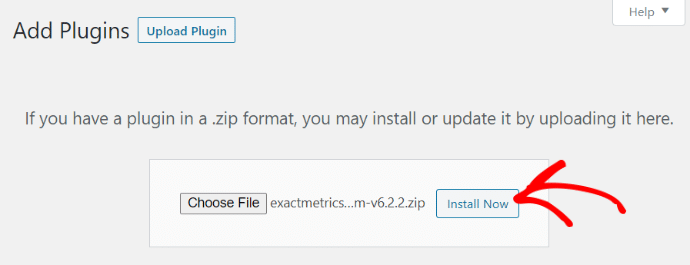
Remember to activate the plugin after it’s been installed.
Step 2: Add Your License Key and Connect to Google Analytics
Now that you have ExactMetrics installed and activated, you can add your license key and connect your Google Analytics account.
To get set up, click on ExactMetrics under your WordPress Dashboard and click the green Launch the wizard! button.

Once you’re in the wizard, you’ll get to this page where you can add your license key and connect with Google Analytics:
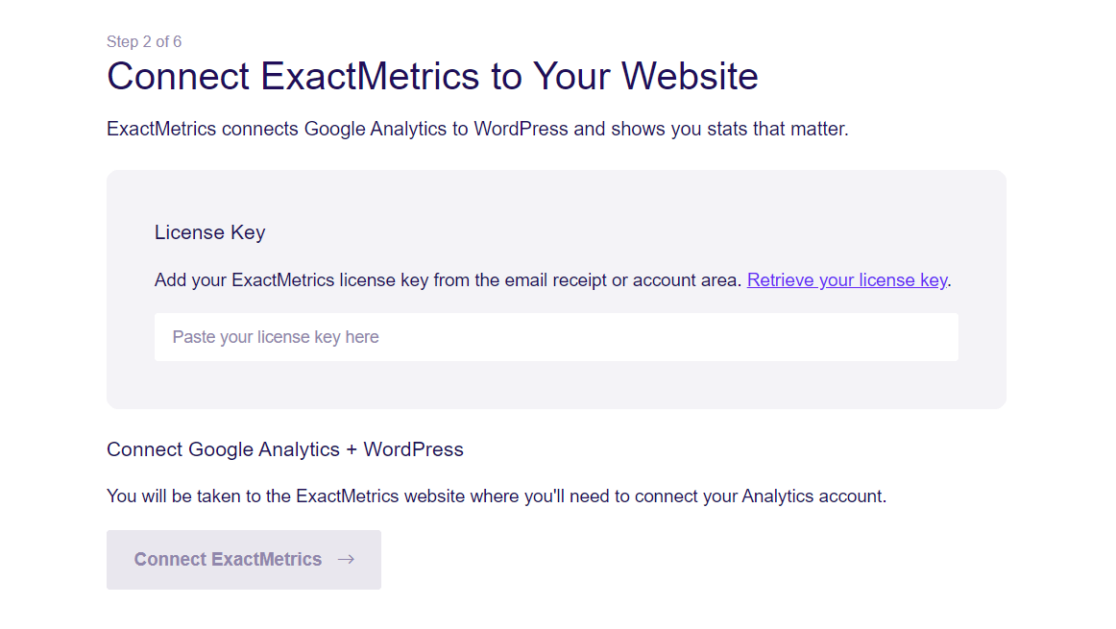
After that, just keep following the setup prompts, answering questions about your business, until setup is complete.
If you need a full tutorial on setting up ExactMetrics, check out Adding Google Analytics to WordPress: Step-by-Step Guide.
Step 3: Install the ExactMetrics eCommerce Addon
Now, head to ExactMetrics » Addons in WordPress and install the eCommerce addon.
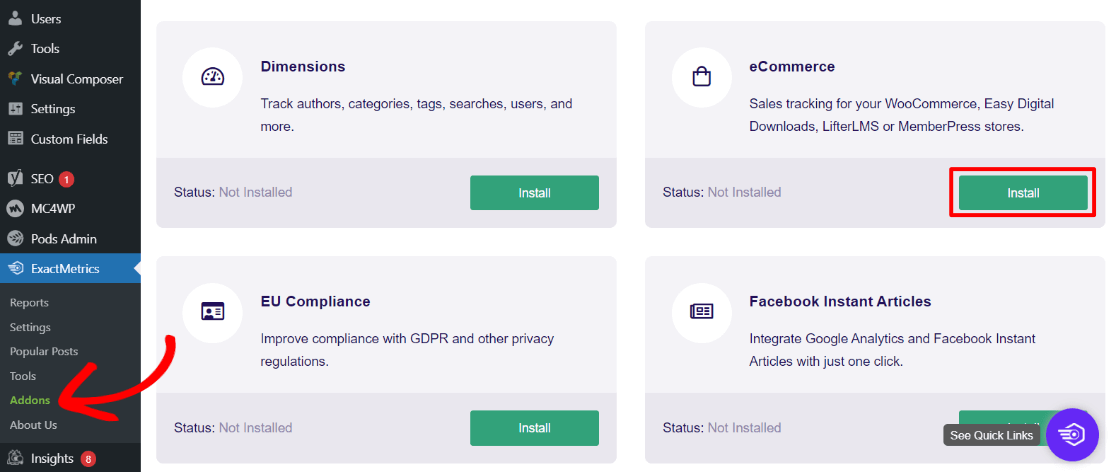
That’s it!
Now that you have eCommerce tracking set up in Google Analytics and ExactMetrics, you’ll start seeing great reports that give you an overview of your store’s health.
Where to Find Add to Cart Metrics in ExactMetrics
With ExactMetrics installed along with the eCommerce addon, you’ll have access to our comprehensive eCommerce report. The report includes a bunch of helpful information about your store, including add-to-cart events! Let’s take a look.
When you navigate to your eCommerce tab in your Reports section, you’ll see your overview metrics and top products right at the top:
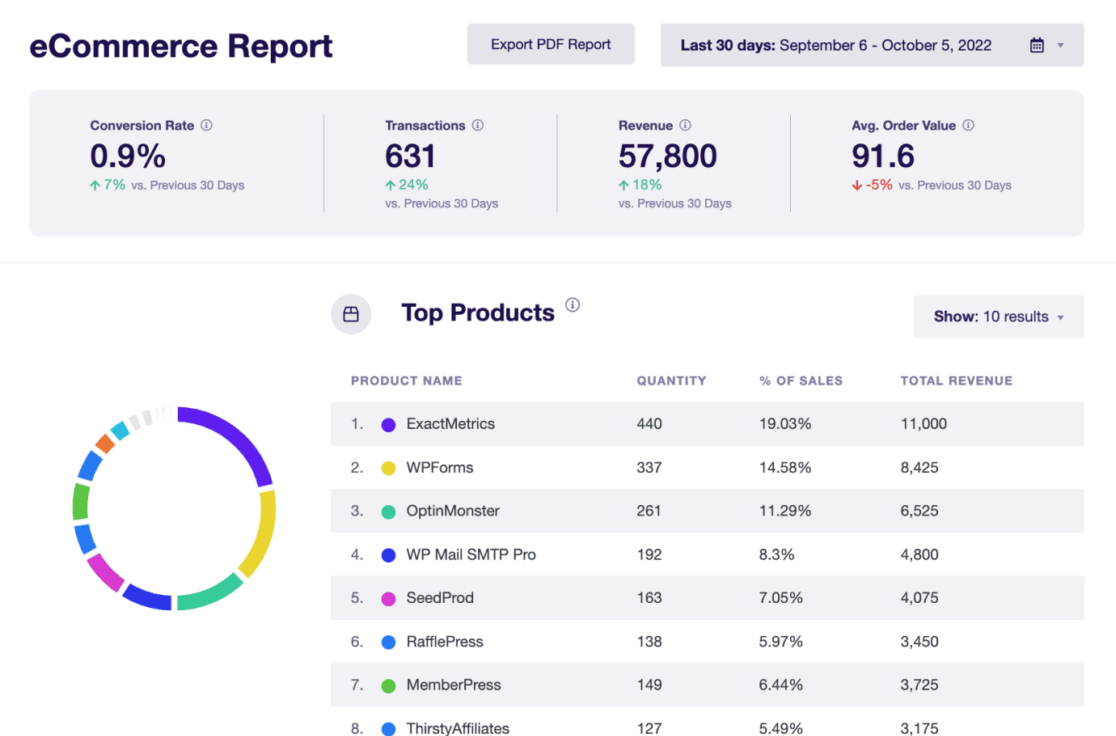
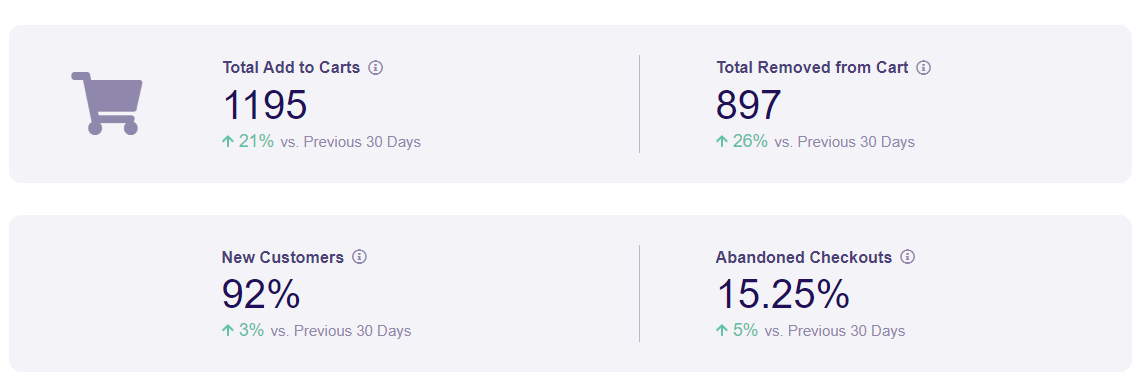
Scroll down just below the Top Products table to find your Add to Cart and Removed from Cart metrics:
Furthermore, you have an eCommerce funnel report available to see where users are dropping off in your shopping process.
To view your eCommerce funnel report, simply head to ExactMetrics » Reports » eCommerce » Funnel:
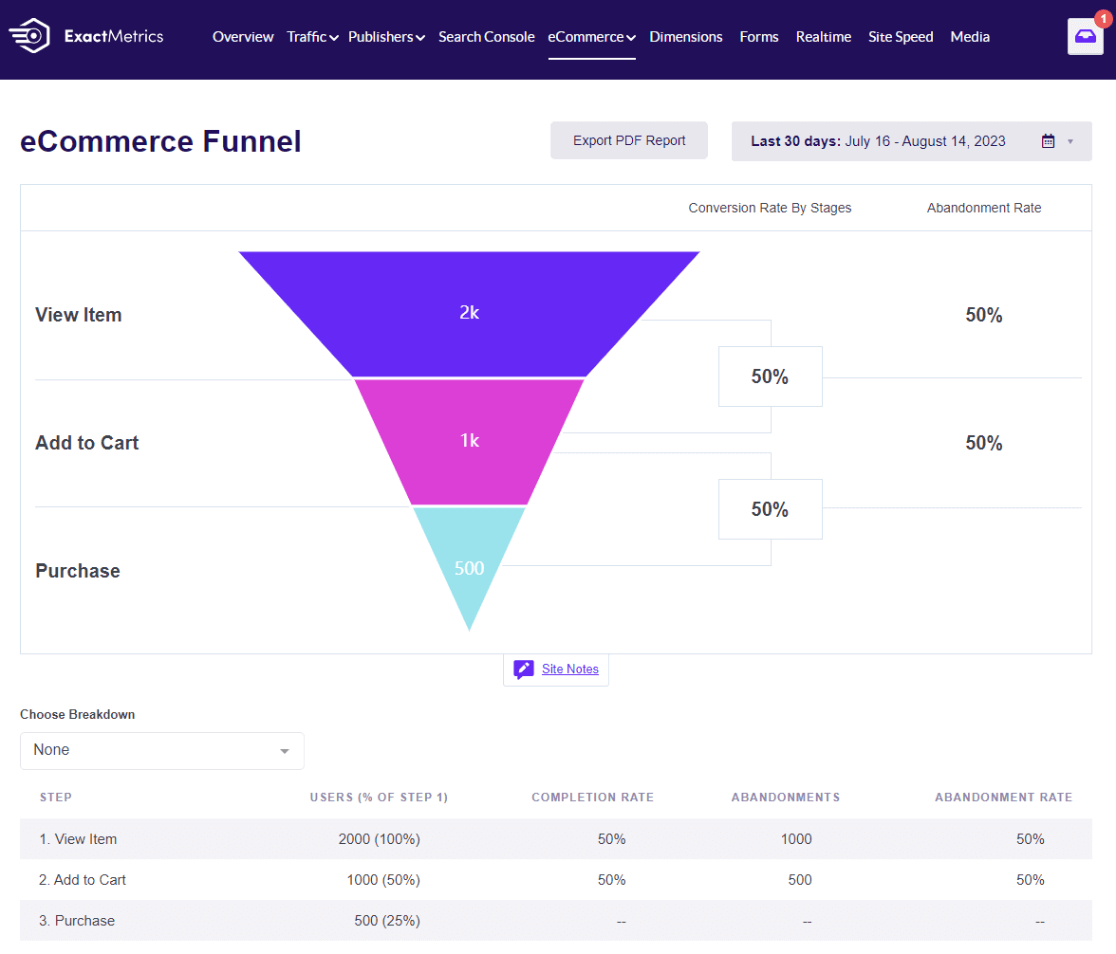
Use the eCommerce funnel report to see where users are dropping out of your funnel and where you should focus your efforts.
For instance, if you see that many visitors are viewing your items but not actually adding them to your cart, you might need to update your product pages.
Or, if many visitors are adding products to their cart but not buying, you may need to rethink your checkout process.
Next, let’s take a look at eCommerce data inside GA4.
Where to Find Add to Cart in Google Analytics 4
Now that you have eCommerce reporting turned on, let’s see how can you view add-to-cart events in Google Analytics.
To see how many times each of your products was added to users’ carts, open your eCommerce report in ExactMetrics and click on the View Full Top Products list at the bottom of the Top Products report.
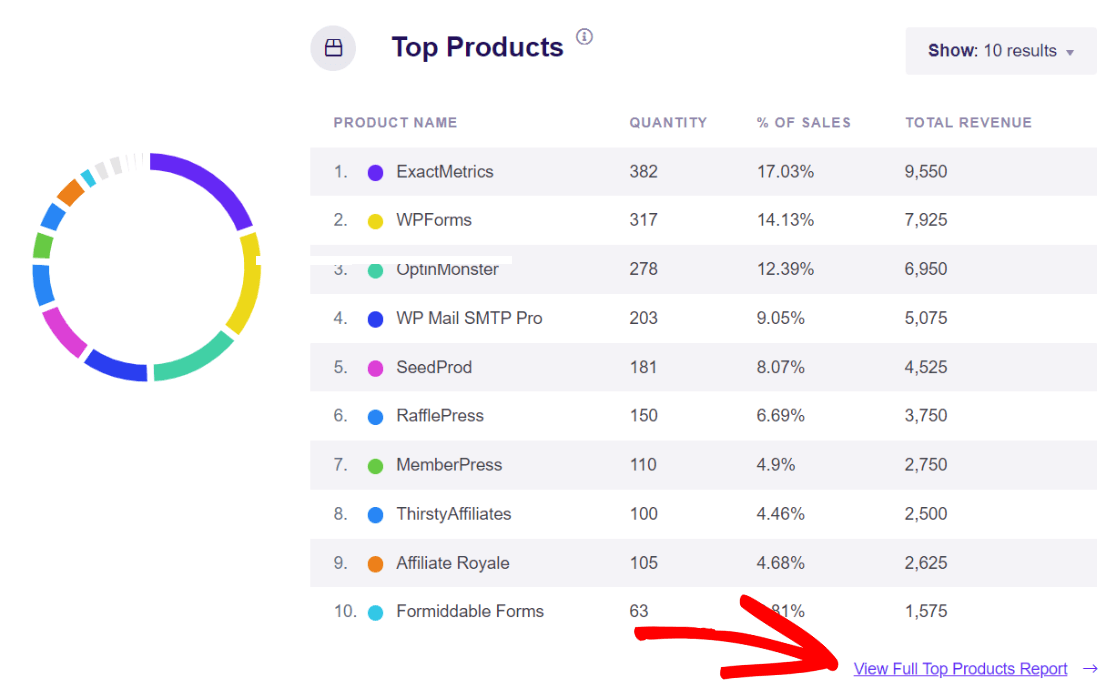
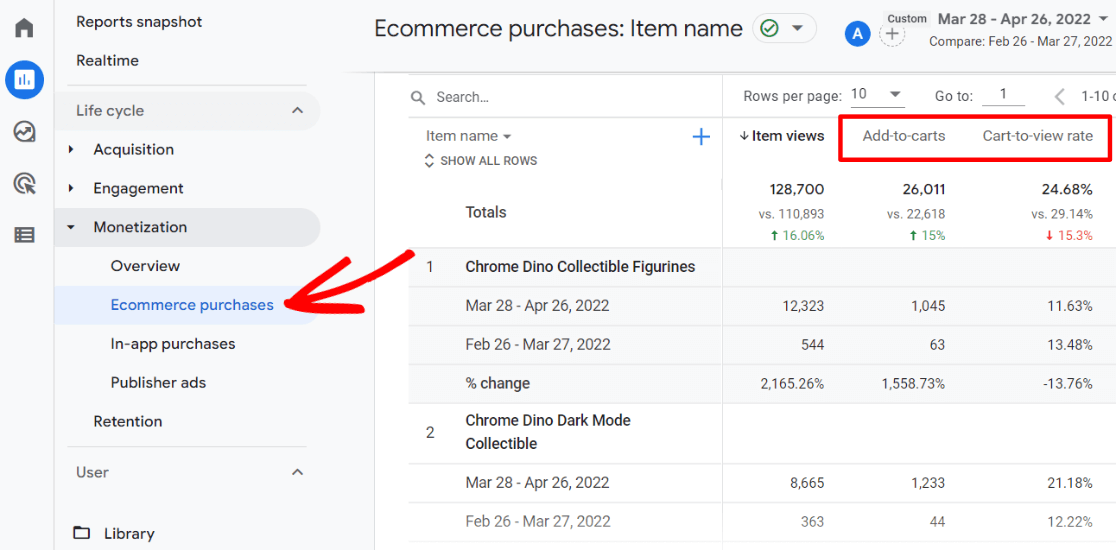
That link will open up your Monetization » Ecommerce purchases report in Google Analytics. Scroll down to the table to see Add-to-carts and Cart-to-view rate per item. This metric shows you how many times your product was added to a cart divided by how many times it was viewed overall.
This is a really handy metric to use when you’re working on improving your product pages. If a product has a low cart-to-view rate, look at the page and its content to figure out why people are interested in and looking at your product but not buying it.
You might notice that Google Analytics does not have a standard funnel visualization report like the one in ExactMetrics. So, you will need to create your own.
Here’s how.
GA4 eCommerce Funnel Exploration Report
In Google Analytics, go to Explore in the slide-out navigation, then choose the Blank option.
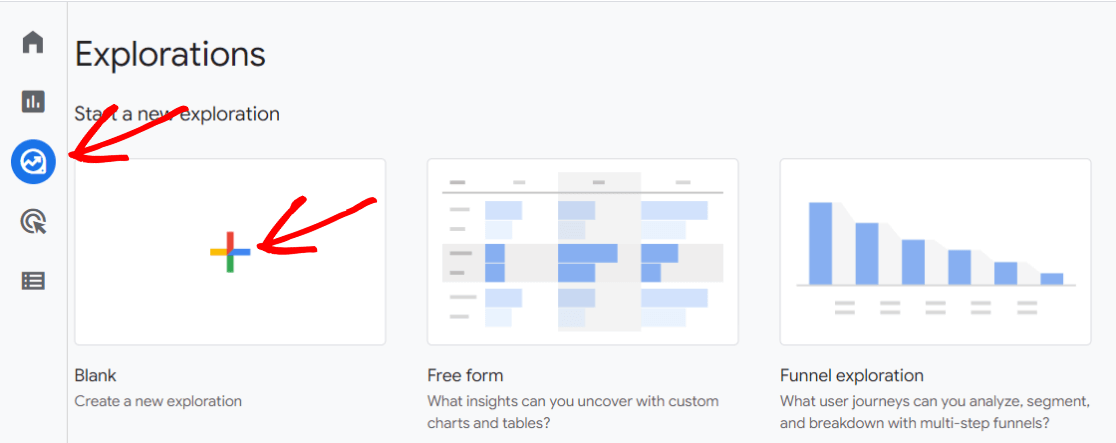
Now, go ahead and give the report a name like Shopping Funnel and, in the Technique selector, choose Funnel exploration.

Next, click the pencil icon next to Steps:
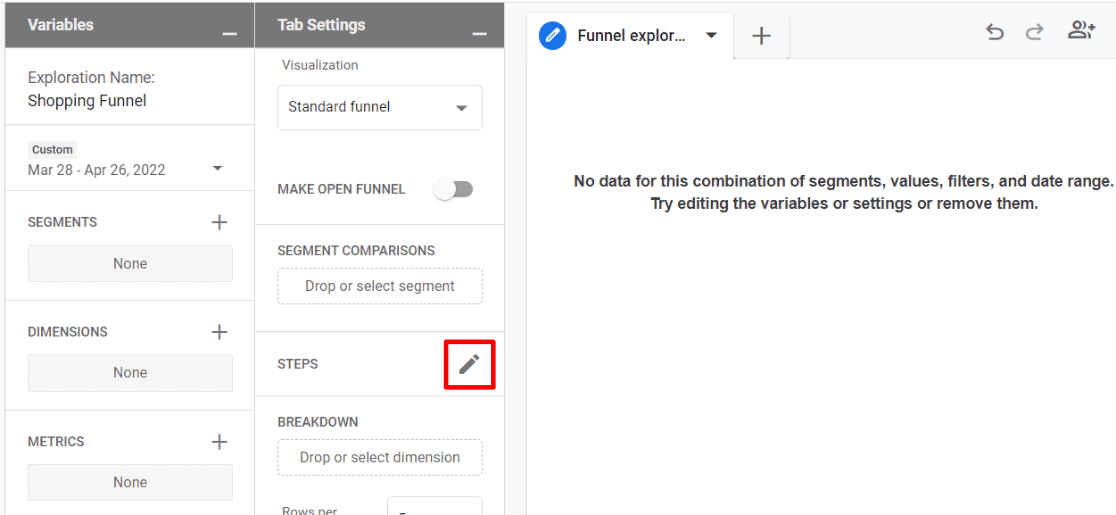
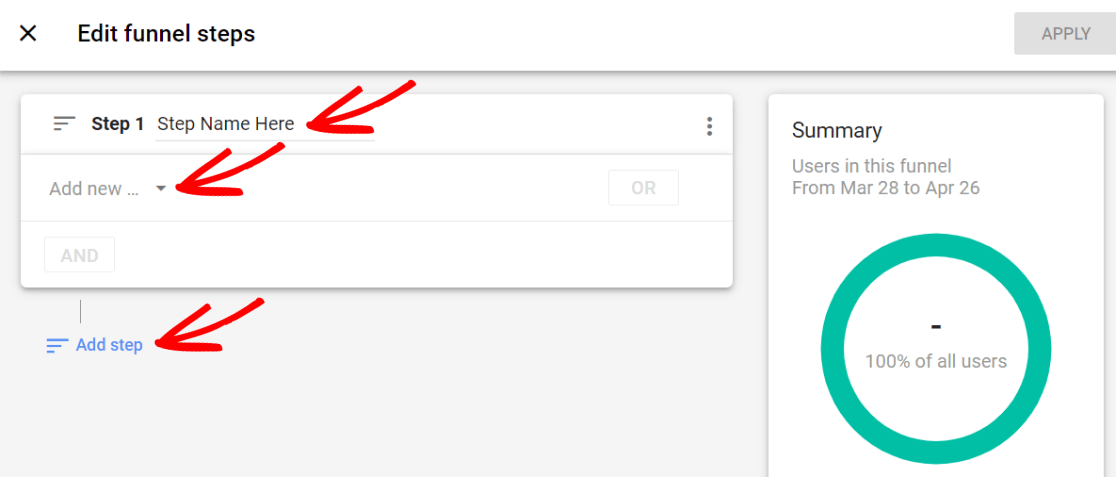
Now, you need to create 3 steps.
The screen to create steps looks like this. You’ll update the Step Name, use the drop-down to Add new condition, and then press the Add step button to add the next steps.
For Step 1, name it View Item and choose view_item as the condition.
For Step 2, name it Add to Cart and choose add_to_cart as the condition.
For Step 3, name it Purchase and choose purchase as the condition.
Here’s what that looks like:
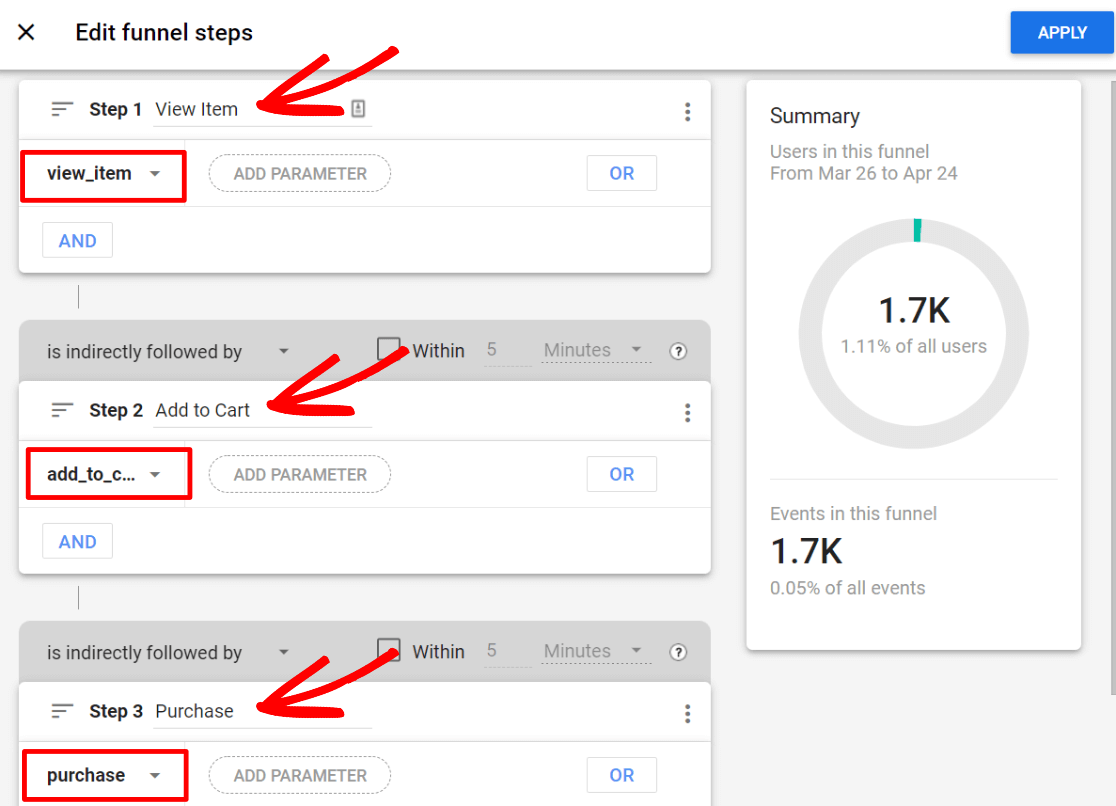
Now, click the blue Apply button in the upper right to see your funnel report.
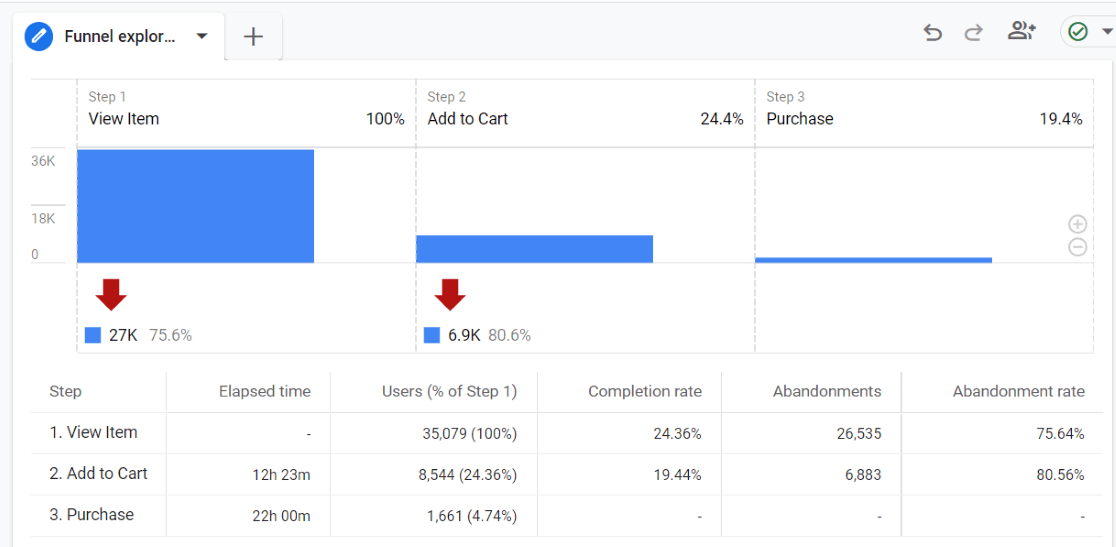
That’s it! We hope you found this add-to-cart tracking tutorial helpful.
You might also like 16 Simple Ways to Boost Your eCommerce Conversion Rate.
Not using ExactMetrics yet? What are you waiting for?
Don’t forget to follow us on X and Facebook to see all the latest Google Analytics tutorials.

