Do you need to set up redirects on your WordPress site because you’ve moved content or changed URLs? It’s quite easy to setup a WordPress redirect when you use the right method.
In this post, we’ll show you how to create a redirect in WordPress with a handy plugin. This allows anyone to create redirects and keep search engine page rankings intact when they move content.
Setting up redirects also keeps links from other sites working. You don’t want to lose traffic from these backlinks, or the SEO value that comes with them.
What Is a Redirect?
A redirect is an instruction that tells a web browser that a webpage has moved to a new location. A website owner creates a redirect when they want to change a webpage’s URL, move a website to a new domain, or for other reasons.
There are different types of redirects used for different purposes. However, the most commonly used redirect is called a 301 redirect. This tells web browsers and search engines that the content at a web address has permanently moved to another location.
You can also think of creating a redirect as similar to forwarding mail when you move your postal address. Or, like having calls forwarded to a new phone number when you change numbers. Unlike these, 301 redirects never expire. As long as you own the forwarded domain, your redirects will continue to work forever.
Why Use a WordPress Redirect?
Website owners use redirects so that online visitors can find webpages after they move. Redirects are also critical for maintaining search rankings.
If your website has been around for awhile, the content and URLs have been indexed by Google and other search engines. If you change the location of your content, you want to let everyone know where the new content can be found.
How to Set Up a WordPress Redirect with AIOSEO
Step 1. Install All in One SEO
To get started, you’ll need to get the All in One SEO plugin at the Pro level or above. This plan includes the Redirection Manager addon, which makes creating redirects incredibly simple.
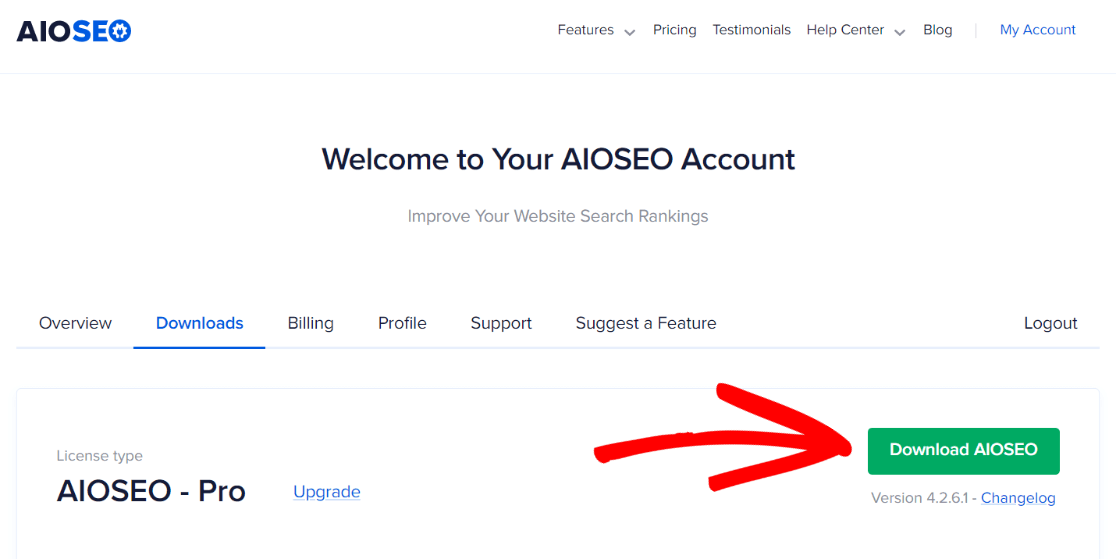
After you purchase your AIOSEO subscription, click on the Downloads tab on the My Account page. Then, click the Download AIOSEO button to save the plugin to your computer in a ZIP file.
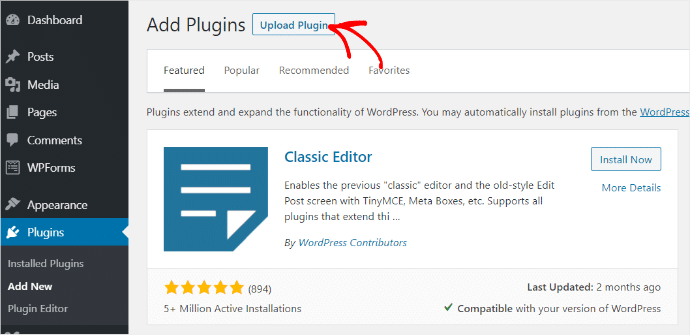
Now, you’ll need to log into WordPress and click the Plugins » Add New item from the dashboard menu. When the Add Plugins page opens, click Upload Plugin.
At this point, you’ll select the ZIP file you downloaded from AIOSEO previously. Then click on the Install Now button, and AIOSEO will install itself.

Once the installation process finishes, just click Activate Plugin and AIOSEO is ready to go!

You can configure your basic site SEO settings now by going through All in One SEO’s setup wizard, if you like.
If you need more help, check out this AIOSEO installation tutorial and video.
All right, let’s move on to our next step. If you already use WordPress you’ll find this incredibly easy….
Step 2. Create a New WordPress Page or Post
Now, when we say create a new page or post, you may simply be changing the URL (or slug in WordPress terms) without changing any content on a page. Maybe you’ve changed the focus keyword for a page and want the URL to include that keyword.
Or, you may be completely rewriting a webpage to improve the content, but it’s still covering the same topic as your original page.
In either case, you need to make a copy of the original page or post. Let’s go ahead and open a page titled How to Create a Table of Contents in WordPress, with the URL slug /how-to-create-a-table-of-contents-in-wordpress/. For this example, we want to change the title of the page to How to Make a WordPress Table of Contents, and also revise the URL.
In order to copy a page using the WordPress block editor (aka Gutenberg editor), click the dots at the top right of your page to access the Options menu. Now, click Copy all blocks.
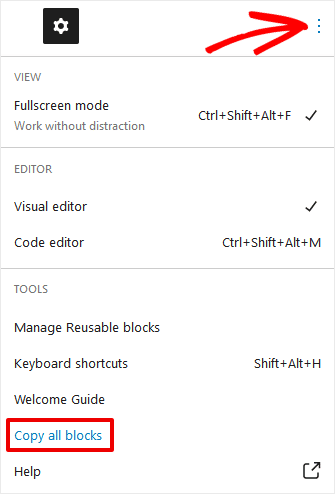
All right, you’ve copied all of this page’s content onto your clipboard. Now you’ll need to paste those blocks into a new page.
Click Pages » Add New (or Posts » Add New if you’re copying a post) to open up a blank page editor. Here, you can simply paste your copied blocks using your mouse, control+v, or command+v as appropriate.
Change the new page’s title and URL slug as needed. In the block editor, click on the URL in the settings sidebar to edit the slug. In this case, we want our URL to change to /how-to-make-a-wordpress- table-of-contents/, so you’ll type that in.
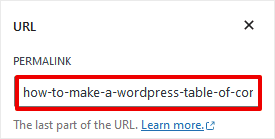
Since you’re only changing the title and URL for this page’s content, go ahead and click Save Draft. You don’t want to publish the page before your redirect is set up, though. That might cause indexing issues with Google.
If you’re still using the classic page editor in WordPress, open the Text tab and copy all of the HTML code from the page. Then, paste that code into the Text tab on your new page. Everything else should work the same.
That’s it for this step!
Step 3. Redirect Your Page or Post in WordPress
Okay, after you have a new version of your page or post created in draft mode, go back and open the original source page. Scroll down to the AIOSEO settings below the text editor and click the Redirects tab.
The slug for the original page should be pre-filled in the Source URL field. You’re going to redirect that URL to the new URL you used for the new page you created in step 2.
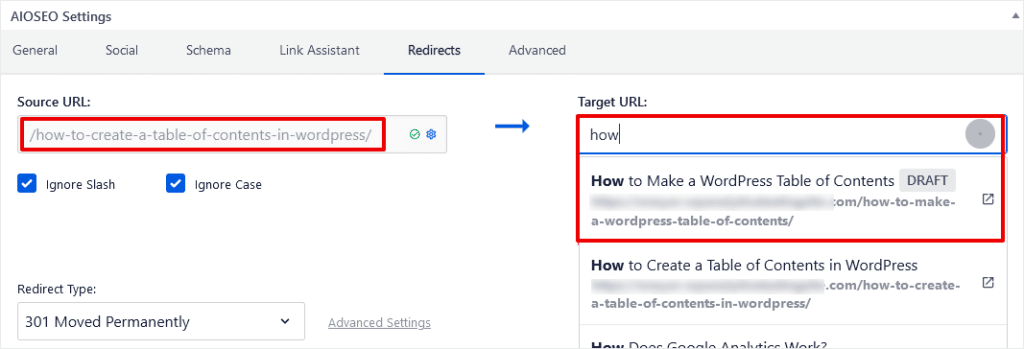
Start typing the title of your new page in the Target URL field, and you’ll see a list of your existing pages. Click the page you want your redirect to point to, in this case the duplicate page we just created. We’ll leave the default Redirect Type set as 301 Moved Permanently.
Next, you can just click Add Redirect and your new 301 redirect is all set up!

One last thing. If you’re making a redirect to a brand new page and URL like in this example, you must immediately publish the new page after setting up the redirect. Otherwise, your 301 redirect will lead to a draft that most people won’t be able to access.
Other Methods of WordPress Redirects in AIOSEO
We’ve described how to redirect a single page or post when you change the content and URL. What about other common scenarios like moving to a new domain, or setting up auto-redirects for 404 page errors?
Although we can’t cover all the reasons why you’d want to create a redirect, you should know about a couple other ways to use All in One SEO’s Redirection Manager.
How to Move Your Website to a New Domain
If you want to move your entire website to a new domain, for example from OldSite.com to NewSite.com, it’s easy with AIOSEO. This is a fairly serious step to undertake, so make sure you know what you’re doing and why.
This process is for moving a site with all of its pages and structure intact. In other words, you only want to change the root domain, and all other navigation and content will remain the same.
First, go to AIOSEO’s Redirection Manager at AIOSEO » Redirects and click the Full Site Redirect tab. Click the Relocate Site switch to enable the full site redirection feature.
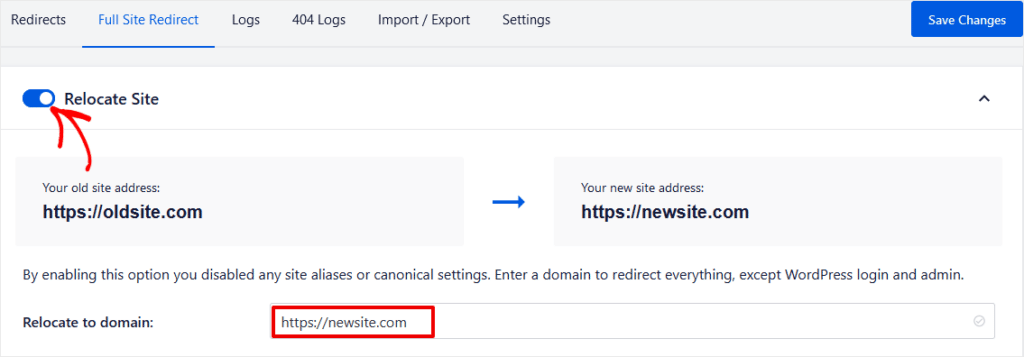
Now, you’ll enter the new domain in the Relocate to domain: field and click Save Changes. All of your existing webpages will be redirected to new URLs with the new domain as the root. So, anyone who types in an old address like OldSite.com/Home will now be redirected to NewSite.com/Home.
For more details on moving your site from one domain to another, please check out this guide to performing a full site redirect.
How to Redirect 404 Errors Automatically in WordPress
One other handy feature included in AIOSEO is the ability to automatically forward browsers that encounter 404s to an existing page. You can quickly set up an automated redirect that sends these visitors to your home page or to any other URL on your website.
Again, make sure you have a good reason for setting up an automated redirect. If someone is looking for a webpage that used to exist on your site, it’s better to create a 301 redirect to some similar content, not simply send that user to a generic page.
In order to create a 404 auto-redirect in AIOSEO, go the the Redirection Manager and click the Settings tab. Then, scroll down to the Advanced 404 Settings at the bottom.
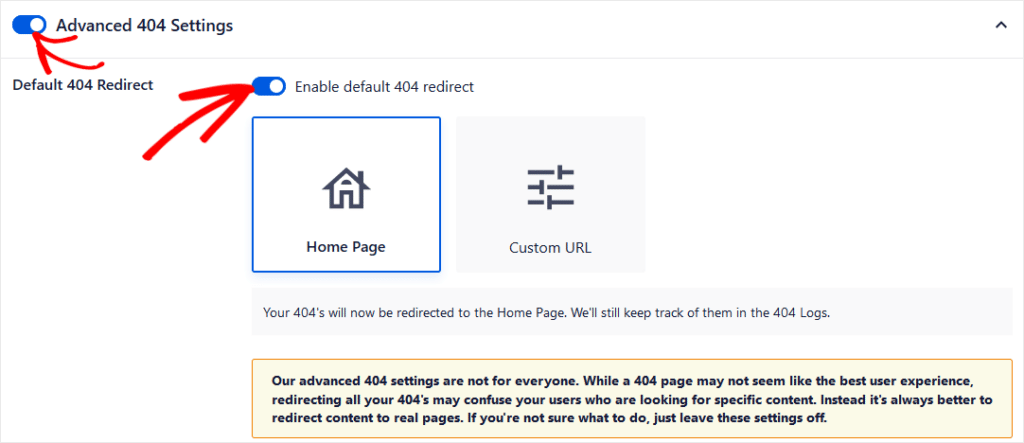
Click the Advanced 404 Settings and Enable default 404 redirect toggle switches to enable this option. Then, you’ll have two choices: you can set all 404 error pages to redirect to your home page, or you can enter a custom URL where all 404 errors will redirect.
For this example, you can leave the default setting at Home Page, then click the Save Changes button.
That’s it, any human visitors or search crawlers that encounter a 404 error will now get sent directly to your home page.
WordPress Redirection Tips
While you can fix any errors you make in redirecting a URL by adding another redirect, try to avoid more than one redirect for any particular URL. Sending a user or search bot through multiple redirects may affect their experience negatively, and potentially your search ranks as well.
You must set up a redirect before you publish a new webpage. Otherwise, search engines might crawl the new page and index the content as a brand new. That means any Google rankings you had for the original page won’t be transferred to the new URL.
Don’t forget to update your sitemap and exclude old URLs, so that Google doesn’t continue to crawl those pages. Search crawlers are limited in how many pages they crawl per session. You don’t want them to use up resources crawling non-existent pages.
Okay, that’s all for our post on how to set up WordPress redirects the easy way with All in One SEO!
If you want to learn more about search engine optimization, check out these essential WordPress SEO tips.
And don’t forget to follow us on Twitter and Facebook to see all the latest product reviews and Google Analytics tips and tutorials.

