Wondering how to track keywords in Google Analytics to see which organic keywords you rank for? Google Analytics keyword tracking isn’t a default feature, but you can easily set it up to start getting that data!
In this article, I’ll show you step-by-step how to track keywords in Google Analytics. You can see where each search query is ranking, as well as their conversions, impressions, and click-through rate (CTR).
Let’s get started!
Why Track Keywords in Google Analytics 4?
Many marketers often believe that if their website appears in search results for specific keywords, their SEO strategies are successful. However, this is not always the case.
The primary aim of SEO should be to increase sales and revenue through organic traffic.
If visitors from organic search aren’t converting into customers, your SEO strategy may need some tweaking. It could mean that your website ranks for keywords that are not relevant, or the site isn’t optimized well for conversions.
It is essential to monitor organic keywords and the conversion rate of organic traffic through Google Analytics to accurately assess the return on investment and effectiveness of your SEO efforts.
So, without further ado, let’s get into how you can do so.
How to Track Keywords in Google Analytics
To track keywords in Google Analytics, follow these steps to set up Search Console, connect it to Google Analytics, and get your reports.
- Step 1: How to Enable Search Console in Google Analytics
- Step 2: An Easy Way to Track Keywords in WordPress
- Step 3: See Keyword Data in Google Analytics
Google Search Console connects with Google Analytics to let you see how your website is performing in search and which keywords you’re currently ranking for.
Additionally, you can find and fix a lot of different errors on your website using Search Console, such as getting Google to index your pages or resolving security issues.
Step 1: How to Enable Search Console in Google Analytics
To enable Search Console data in Google Analytics, you’ll first need to set up Search Console and then connect it to your Google Analytics account. I’ll show you step-by-step how to do it.
- Add a New Property to Google Search Console
- Verify Your Website in Google Search Console
- Connect Google Analytics to Your Search Console
How to Add a New Property to Google Search Console
The first step in setting up Google Analytics keyword tracking is to add your website to Google Search Console and verify it. To do that, go to your Google Search Console account.
If you haven’t created a property yet, you’ll see the Welcome to Google Search Console screen:
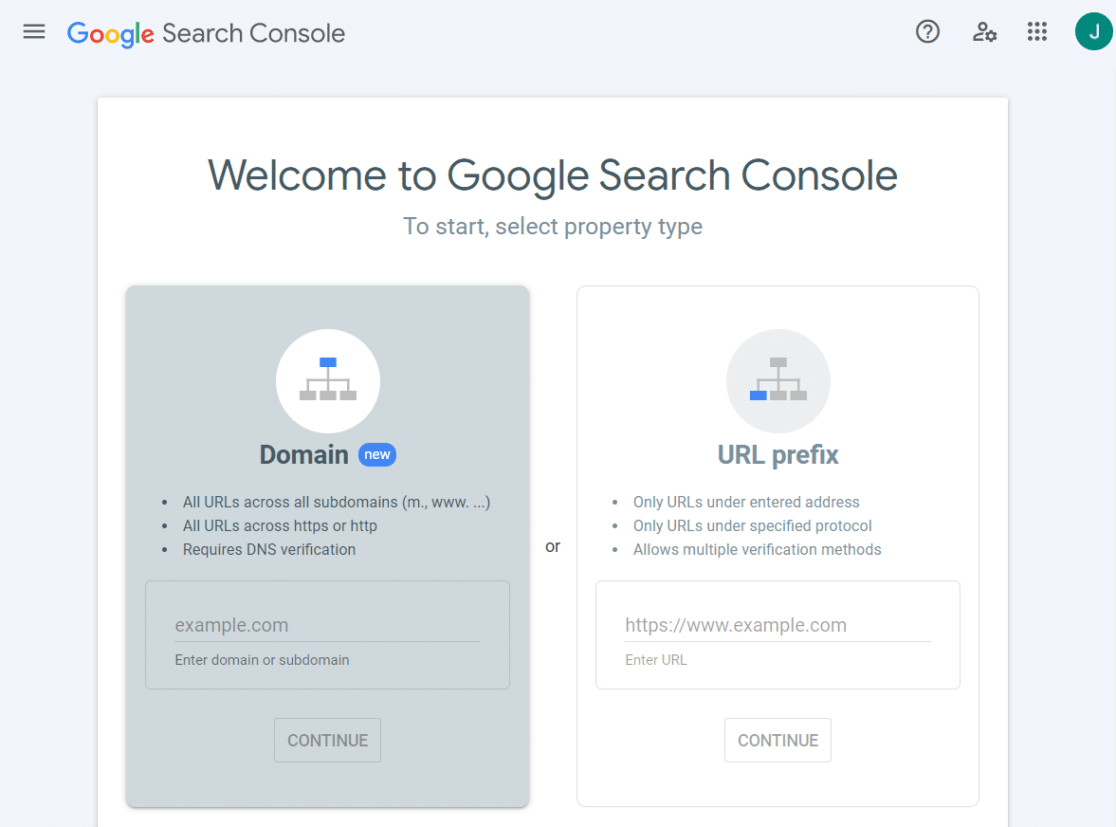
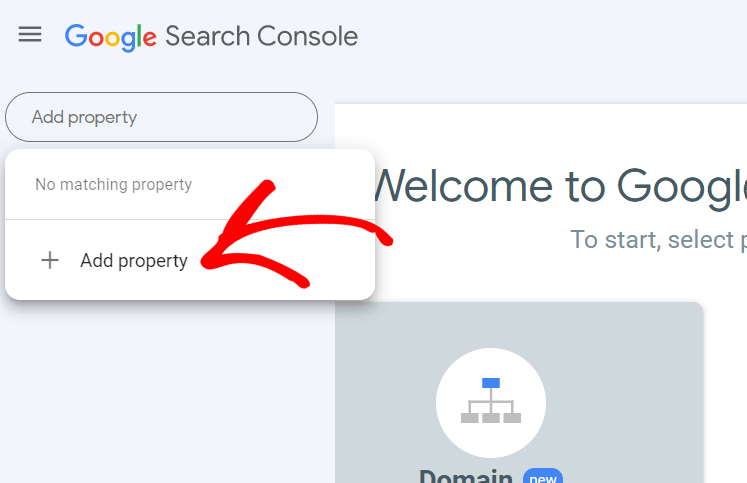
If you have a property (or several) set up and you need to add a new one, click the dropdown at the top left and click Add a Property.
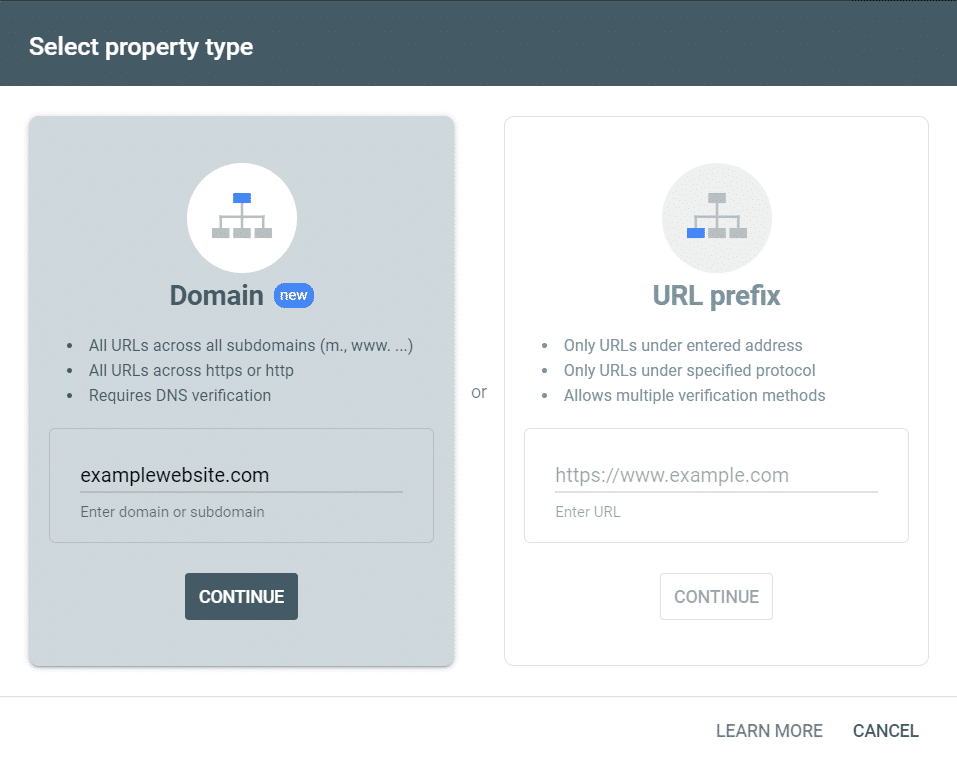
Now, you’ll see two options for setting up and verifying your site. I highly suggest going with a Domain property, and I’ll use that option for this tutorial.
How to Verify a Website in Google Search Console
To verify your site via a Domain property, you just need to verify that you’re the owner of the domain (not just the URL).
So, you’ll need to verify through your DNS (Domain Name Service) provider. Your DNS provider is whomever you bought your domain name and/or hosting services from. Some popular providers include Bluehost, Siteground, GoDaddy, and Namecheap.
To get started, paste in your domain name (your URL without the www) and click Continue:
Now, Google provides specific directions for a few DNS providers in their dropdown. You can pick Any DNS provider for the instructions that work for any site:
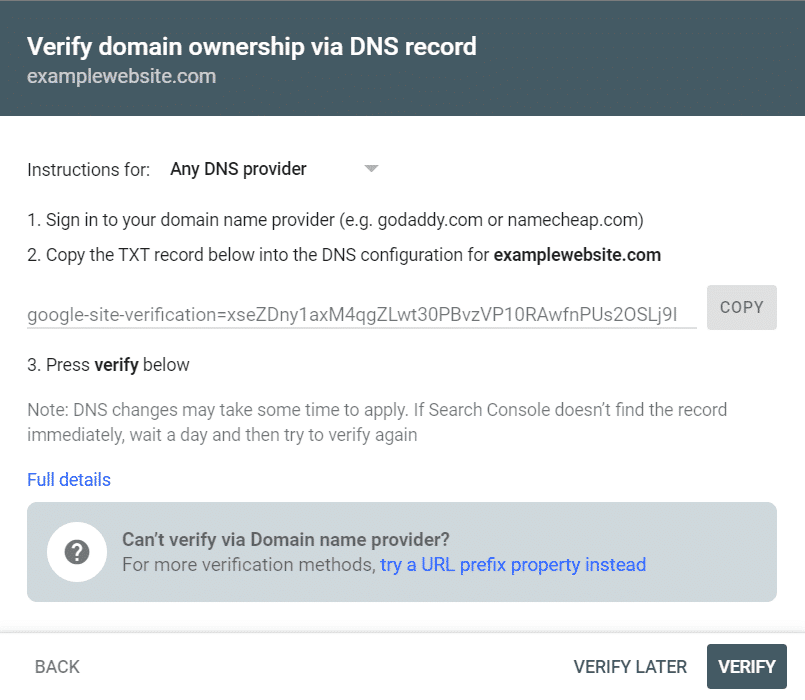
Next, copy that string of code (the TXT record) and paste it into the appropriate spot in your DNS. Where you add a TXT record is different for each provider, but once you figure it out, it’ll generally look like this Siteground example:
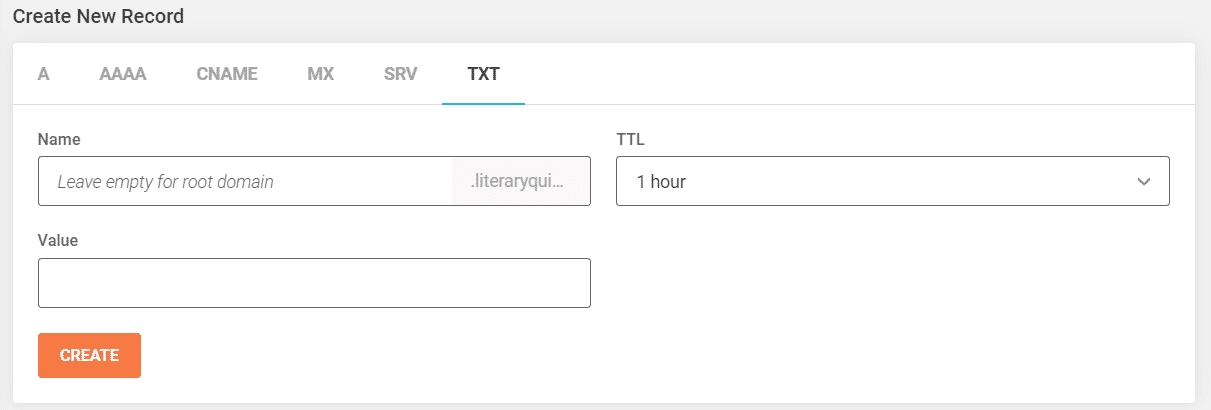
All you would do here is paste the code from Search Console into the Value field and click Create.
If you can’t find where to create a TXT record, just search “how to create a TXT record in (DNS provider here)”.
Now you can go back to your Search Console tab and click Verify. Hopefully, you’ll see a success message!
For more help with verifying your site, visit Search Console Help.
That’s it! You’ve connected your site with Search Console and you’ll now be able to see all the valuable data inside it and connect it with Google Analytics.
How to Connect Google Analytics to Search Console
Once you’ve verified your website, you’ll have to connect Google Search Console to your Google Analytics account.
In Google Analytics, go to the Admin cog:
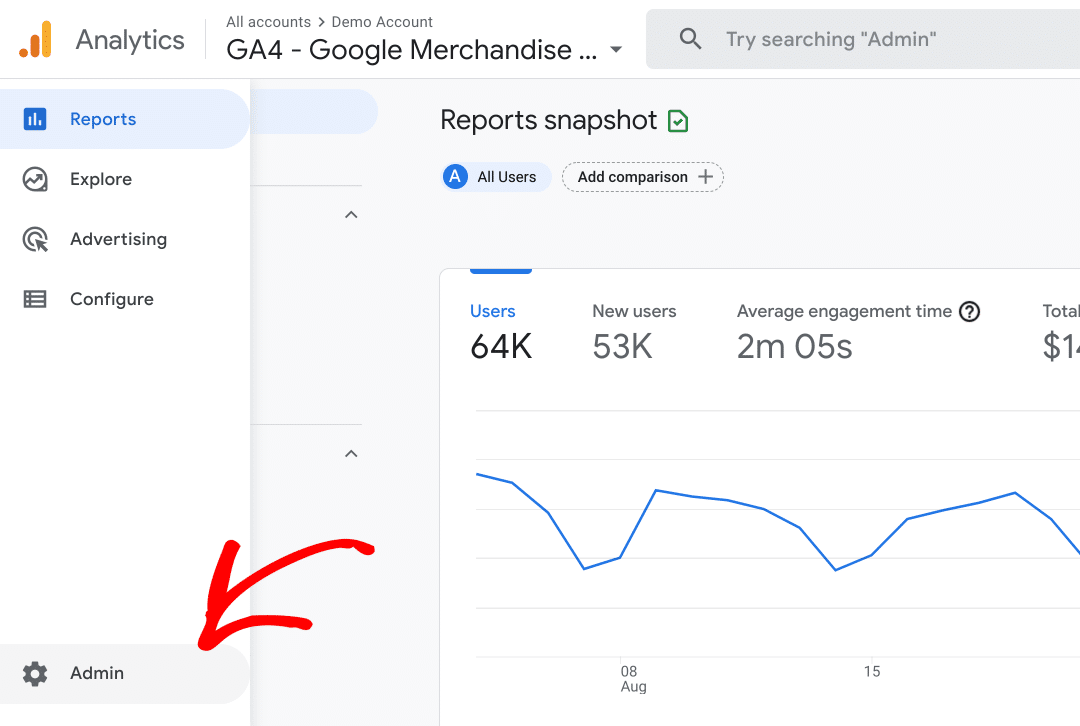
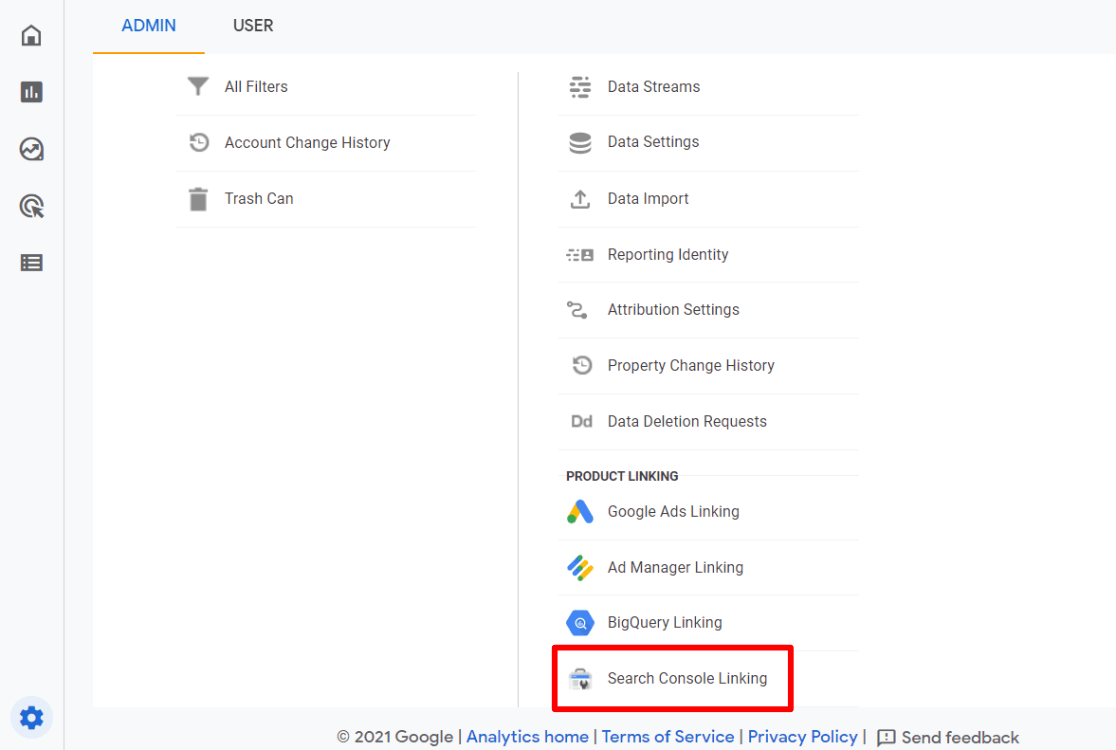
Now, click the Search Console Linking button near the bottom of the Property column:
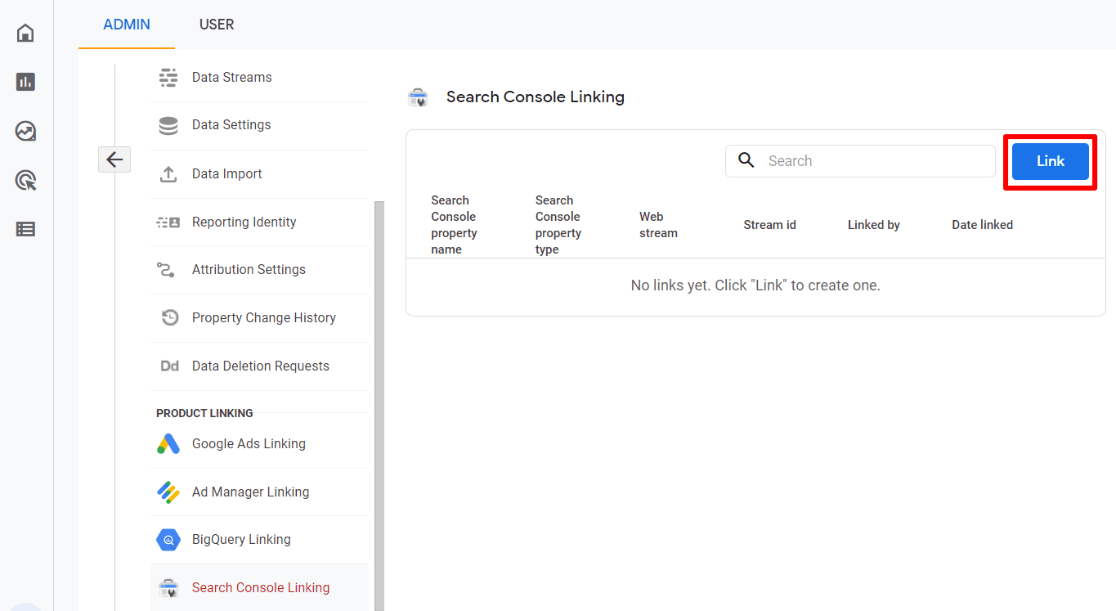
Next, click the blue Link button:
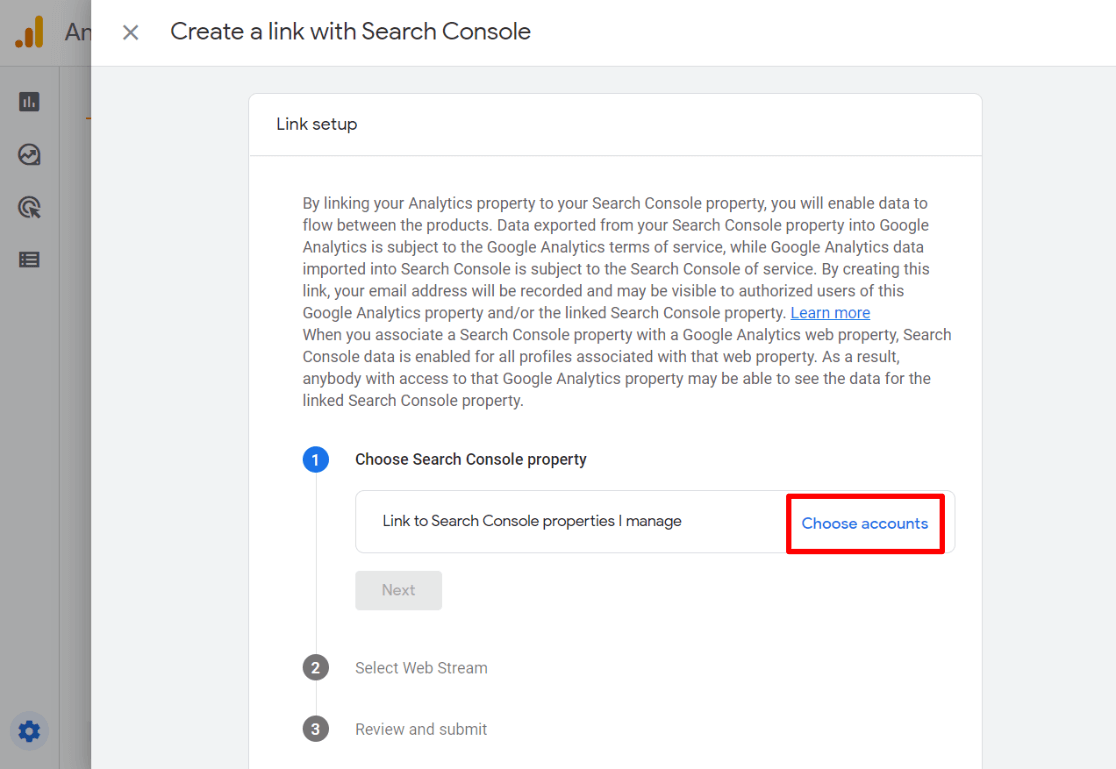
Then, click the blue Choose accounts link.
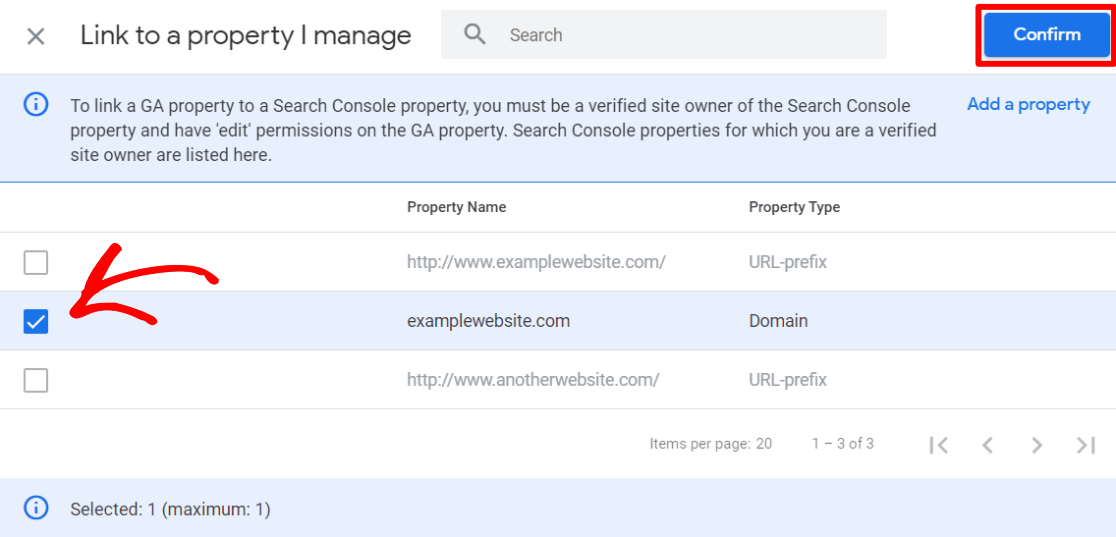
Next, click the checkbox next to the correct property that you want to link with, and then click the Confirm button.
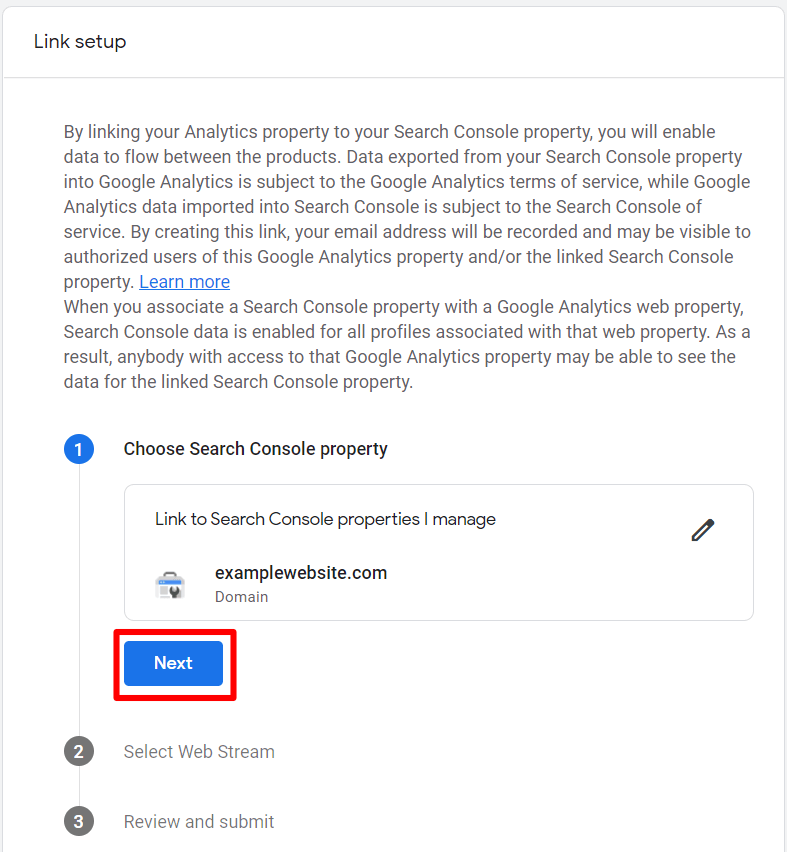
Click Next.
Click Select.
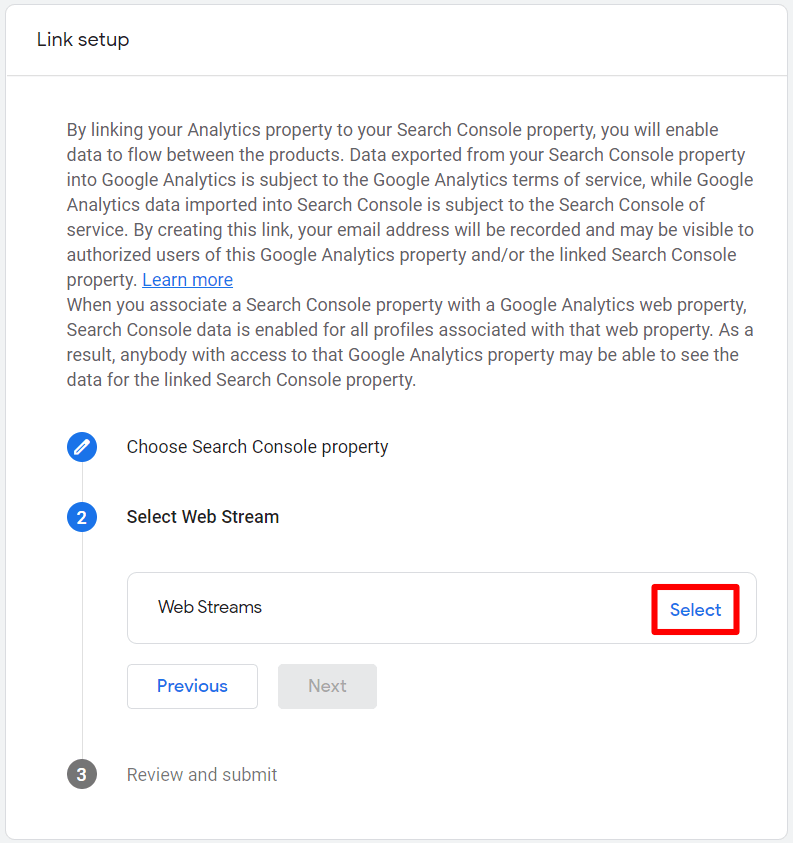
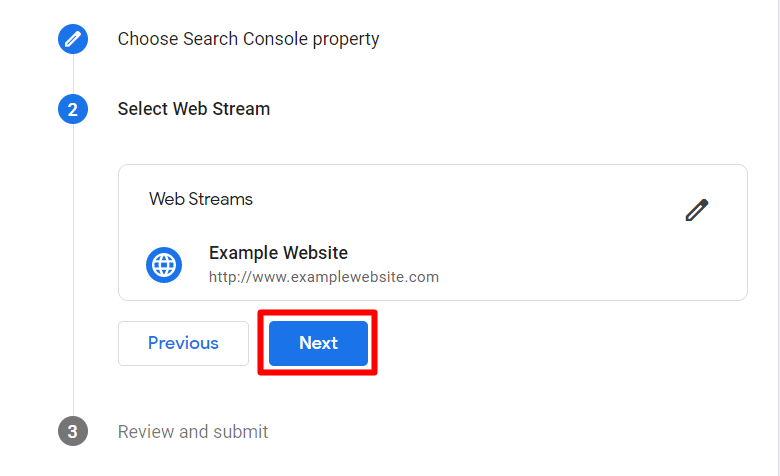
Now, click the Choose button next to the data stream (Analytics property) you want to connect to:

Then, click Next.
Finally, make sure everything is correct and click Submit.
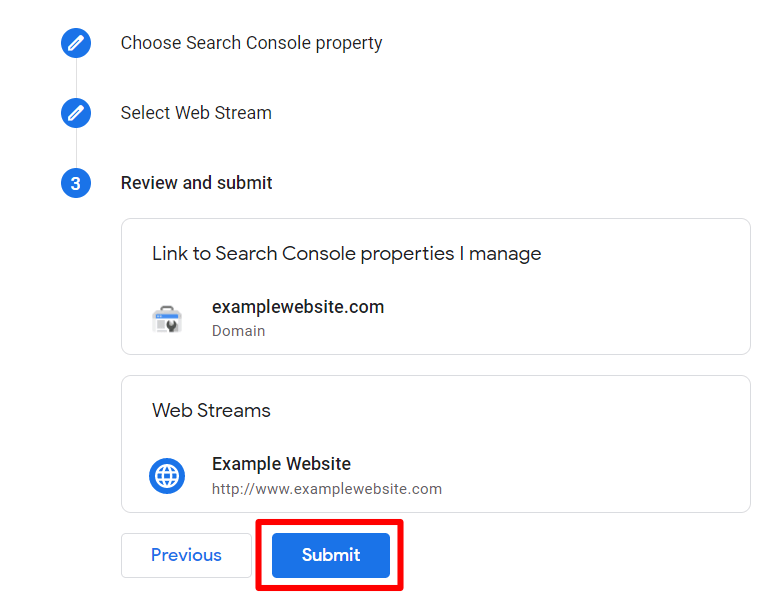
That’s it; your link has been created!
You’re not done yet, though. To see Search Console data in Google Analytics, you’ll have to turn on the reports.
I’ll show you how to do that in a minute, but first, I want to show you a super easy alternative for WordPress users.
Step 2: Easily Track Keywords in WordPress
If you’re a WordPress user, there’s an easier way to see your top search queries right inside your WordPress dashboard. Just use ExactMetrics!
ExactMetrics is the best premium WordPress Analytics plugin that makes it super easy to use Google Analytics and set up advanced tracking, such as eCommerce tracking, forms tracking, media tracking, and much more in just a few clicks. You can view all your most important website statistics right inside your WordPress dashboard.
Simply install the WordPress plugin on your website to start tracking your keywords. Make sure you’ve selected a Plus license or higher to access the Search Console report.
For further instructions on getting set up with ExactMetrics, read How to Add Google Analytics to Your WordPress Site.
As long as you have Google Analytics and Search Console connected, ExactMetrics will have a Search Terms report ready for you.
To view the report, log in to your WordPress site. Then, go to ExactMetrics » Reports. Now, select Search Console from the top menu.
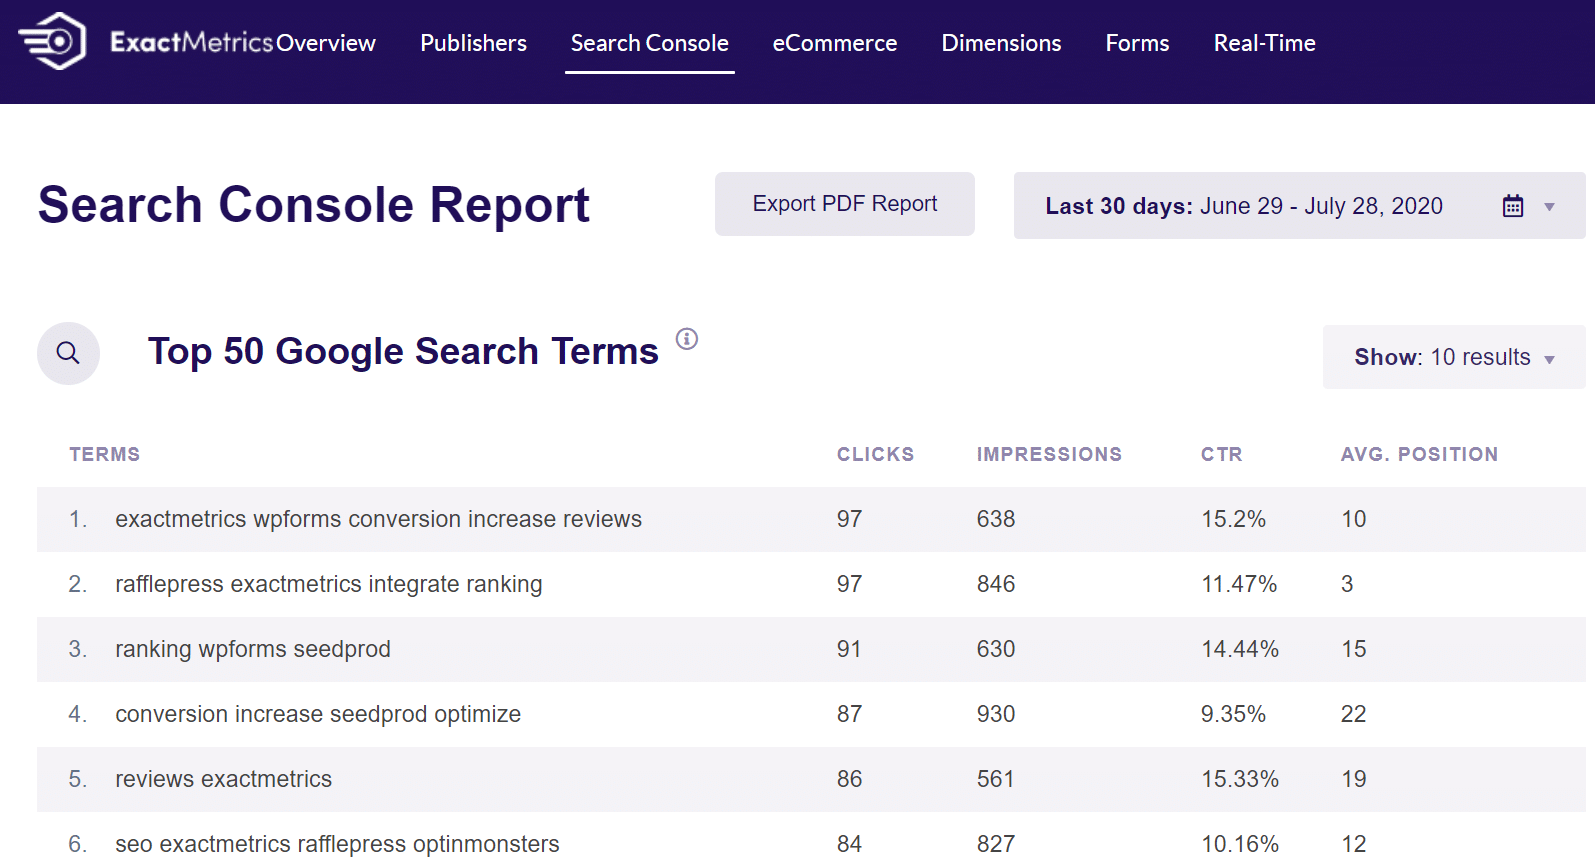
The report shows you the top 50 Google search terms your website is ranking for. And for each search term, you can view its clicks, impressions, CTR, and average position.
Using the data from the report, you can clearly see which keywords are ranking high and generating organic traffic. Besides that, you can also see which keywords require more optimization if they’re not ranking on the first page.
You can also find new keyword ideas and content ideas from this report. For instance, if you see a search term that’s on the first page, then you can look for more keywords like it and cover them on your website.
Now, I’ll cover how to see your keywords in Google Analytics.
Step 3: How to See Keywords in Google Analytics
To see keywords in Google Analytics, you’ll need to add your Search Console report to your Google Analytics navigation. Then, you’ll be able to see the report with your keyword queries.
Just follow the steps below to learn how to do it:
How to Add Search Console Report to Google Analytics
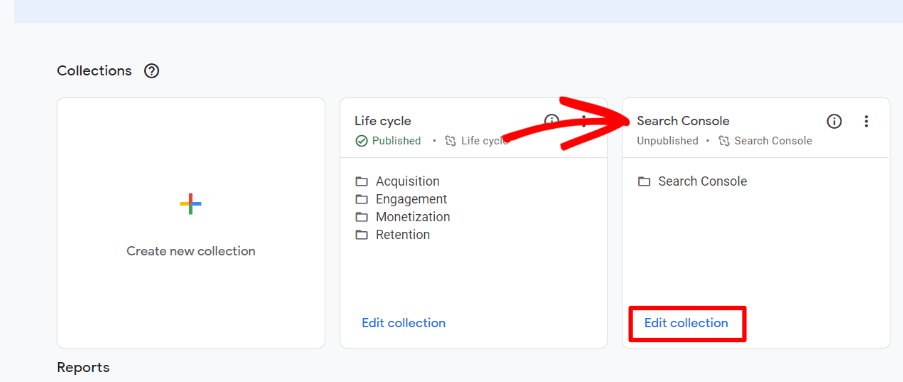
After connecting Search Console to Google Analytics in the previous steps, you’ll want to be able to find keywords in Google Analytics. To add the Search Console report to Google Analytics, click on Library:
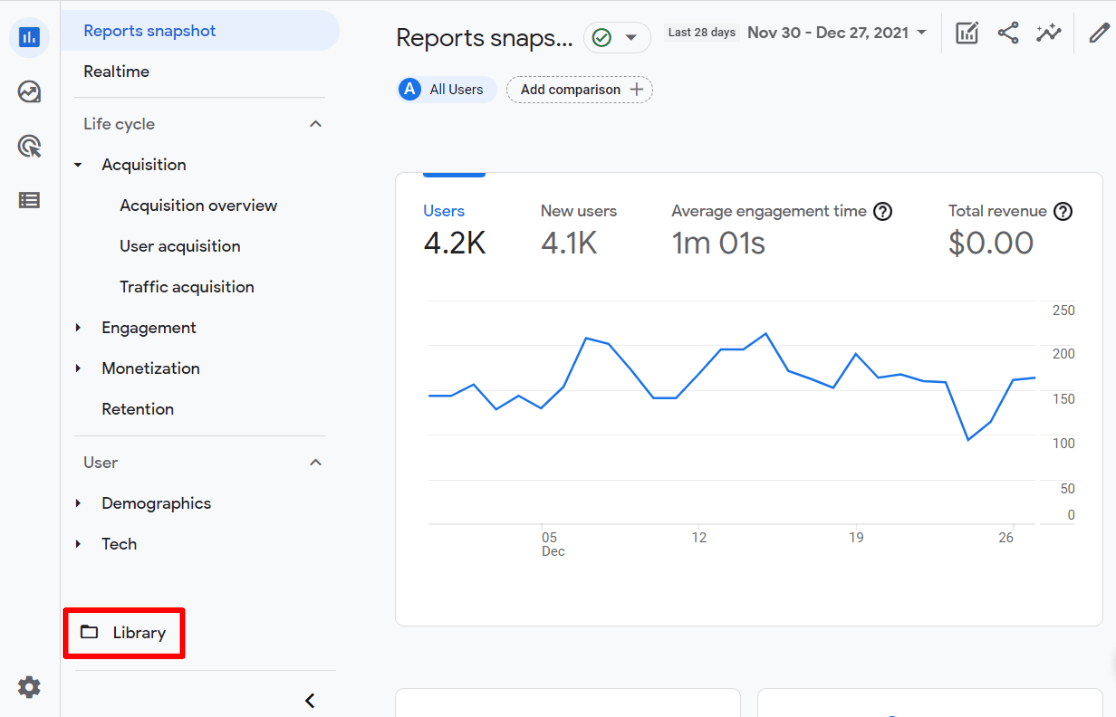
Next, locate the Search Console card and click on Edit collection.
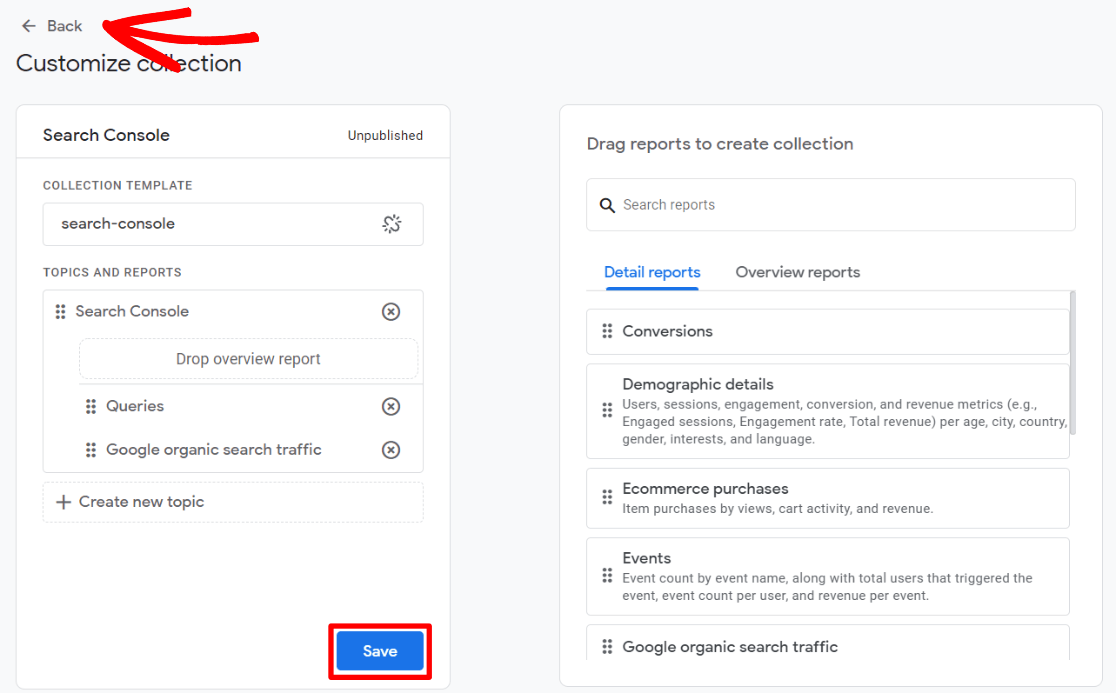
Click the Save button, then Back.
Now, click on the three dots on the Search Console card, and then click Publish.
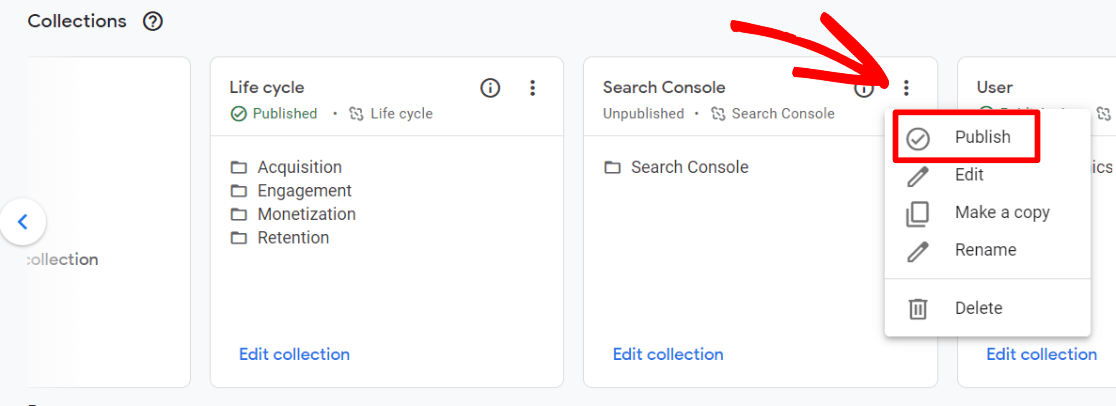
That’s it!
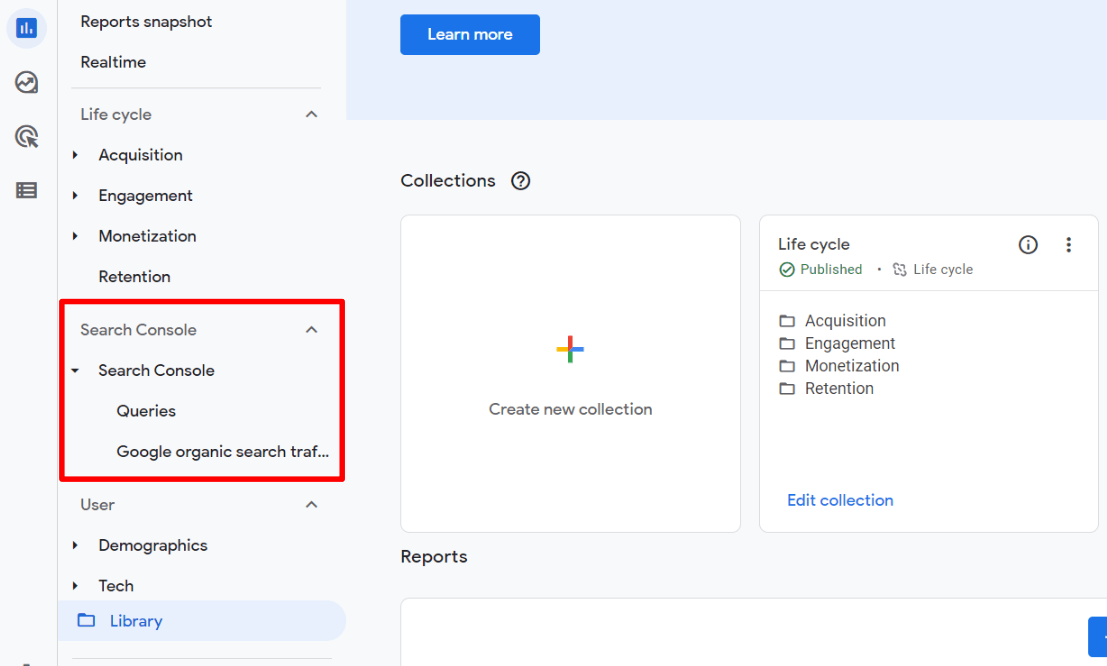
A new Search Console reports section should now show up in your sidebar:
How to Find Keywords in Google Analytics
To find keywords in Google Analytics, head to Search Console » Queries to see a report of which queries your site appeared for in search.
For each term, you get clicks, impressions, click-through rate, and average search position (rank).
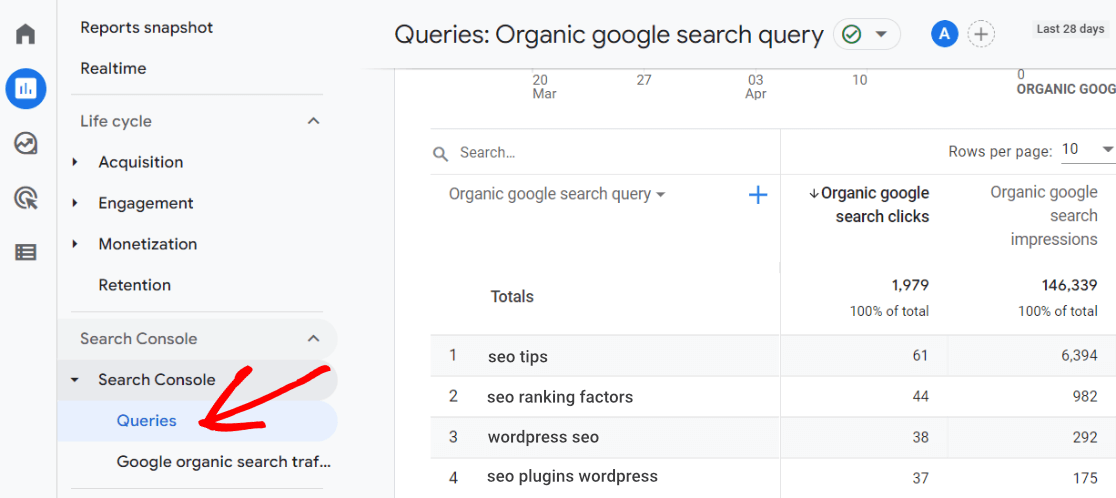
The Google organic search traffic report gives you the same report, except with your landing pages instead of the queries used to find you.
Now that you have your Search Console reports set up in Google Analytics, you can see:
- Which keywords you’re ranking for in Google, and what their position is
- Which keywords are sending traffic to your site
- Which pages are ranking in Google searches
- Click-through rate
FAQs About Tracking Keywords in Google Analytics
Below, I will answer some common questions about tracking keywords and SEO performance with Google Analytics:
Can you track keywords with Google Analytics?
Yes, you can track keywords in Google Analytics by connecting it to Google Search Console. This integration allows you to access valuable insights about the keywords driving traffic to your site, helping you understand which search queries are most effective for your SEO efforts.
Why does Google Analytics not show keywords?
By default, Google Analytics doesn’t show keywords due to privacy policies, as search engines often encrypt this data. Most keyword information appears as “not provided.” To overcome this limitation, you can integrate Google Search Console with Google Analytics to retrieve keyword data.
How do I measure SEO performance in Google Analytics?
To measure SEO performance in Google Analytics, you can track organic traffic, conversion rates, and user engagement metrics. Integrating Google Search Console provides additional insights into search queries and landing pages, helping you evaluate the effectiveness of your SEO efforts and optimize your strategies accordingly.
And that’s it!
I hope you liked our article on how to track keywords in Google Analytics. I think you might also like to read How to Track Link Clicks in Google Analytics and WordPress.
Don’t forget to follow us on X and Facebook to learn about the latest analytics tutorials.


Thank you for this page! Super clear and easy to follow instructions.