Do you need to enable WordPress maintenance mode on your website?
Chances are, at some point or another your site will need to undergo scheduled maintenance for redesigns, adding functions, and performing other routine updates that keep everything running smoothly. But, you definitely don’t want a glitchy site appearing to your visitors while you test and make changes.
Luckily, there’s an easy way to show visitors a user-friendly notice instead of a broken website by putting WordPress in maintenance mode.
In this article, we’ll show you how to enable maintenance mode in WordPress the easy way. You’ll be able to create an under-construction page or any other type of WordPress custom maintenance page in only a few steps!
Why Use Maintenance Mode in WordPress?
Maintenance mode comes in handy during times when you need to work on your WordPress website for a longer period. Switching to a new theme, redesigning your site with a page builder, fixing errors, and testing new plugins are all situations where maintenance mode is beneficial.
These changes can make your website look chaotic temporarily, so it’s better to make it unavailable while you work on it. It’s also important in preserving your SEO rankings by preventing search engines from indexing your incomplete changes.
WordPress maintenance mode allows you to make major changes without displaying a broken site to your visitors. Instead, you can create an under-maintenance page that provides helpful information about the updates.
Plus, customizing your maintenance mode page adds an extra touch. You can let visitors know when your site will be back, share your contact details, provide social media links, and more. This way, visitors can still stay in touch while you’re working on your website changes.
Fortunately, there is a super user-friendly way to create a maintenance page in WordPress without editing core files or using any code. Ready to learn how to put your WordPress site in maintenance mode? Let’s get started.
How to Put WordPress in Maintenance Mode
We’ll walk you step-by-step through how to add a maintenance page to WordPress easily. We’ll be using SeedProd to put our site in maintenance mode. It’s the best coming soon page and maintenance plugin for WordPress.

SeedProd is the best plugin for building landing pages, used by over a million websites, and it offers tons of features to enhance all your site’s current pages. You can also design new site pages, create stunning coming soon pages, customize 404 error pages, and build entire themes with its easy drag-and-drop interface.
This under-construction plugin is beginner-friendly, requires no coding, offers tons of customization options, and even provides page features to grow your email list, increase your social media following, and more, all while your site is under construction.

There is a premium version of SeedProd with 180+ professionally-designed templates, tons of features for building high-converting pages and themes, and advanced customization options. However, you can still use SeedProd’s free version in WordPress to create a maintenance page or add a coming soon page, which is what we’ll focus on in this tutorial.
Remember, coming soon pages are for new websites under construction, while maintenance mode is for established sites undergoing significant changes.
Note: Trying to put WordPress on maintenance mode without a plugin is not something we recommend unless you’re extremely comfortable navigating and editing your WordPress theme’s core files. It requires adding maintenance mode code to your functions.php file, and trying to mess with core files can easily break your site.
Plus, you won’t get any of the awesome customization options, but if you’re aware of the risk and would like the instructions, SeedProd provides a manual tutorial with the code you’ll need.
Now, let’s learn how to put WordPress in maintenance mode using SeedProd.
Step 1: Install SeedProd and Set Up Maintenance Mode
The first step is to install and activate SeedProd so that we can use the plugin to create our under-construction page and enable maintenance mode. For help installing and activating the plugin, check out this guide from SeedProd.
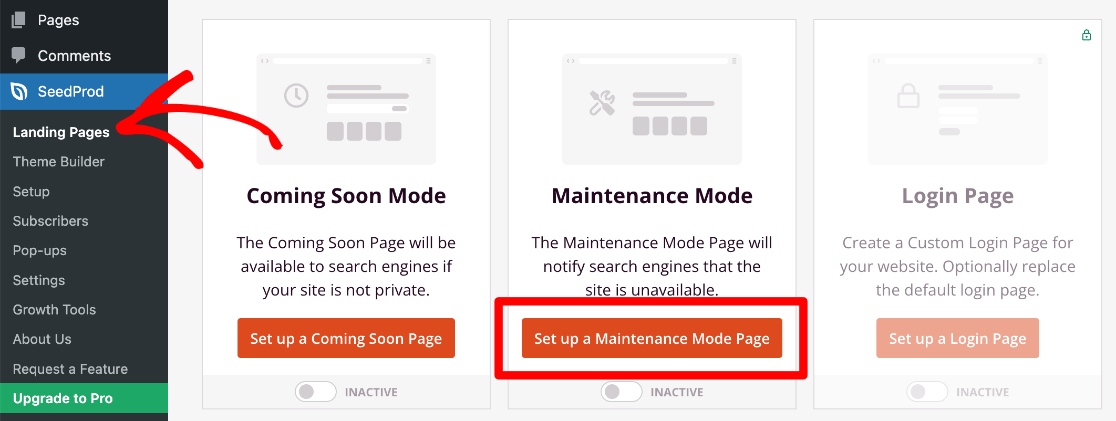
Once you have the plugin installed and activated, from your WP admin, navigate to SeedProd » Landing Pages and click on the button to Set up a Maintenance Mode Page.
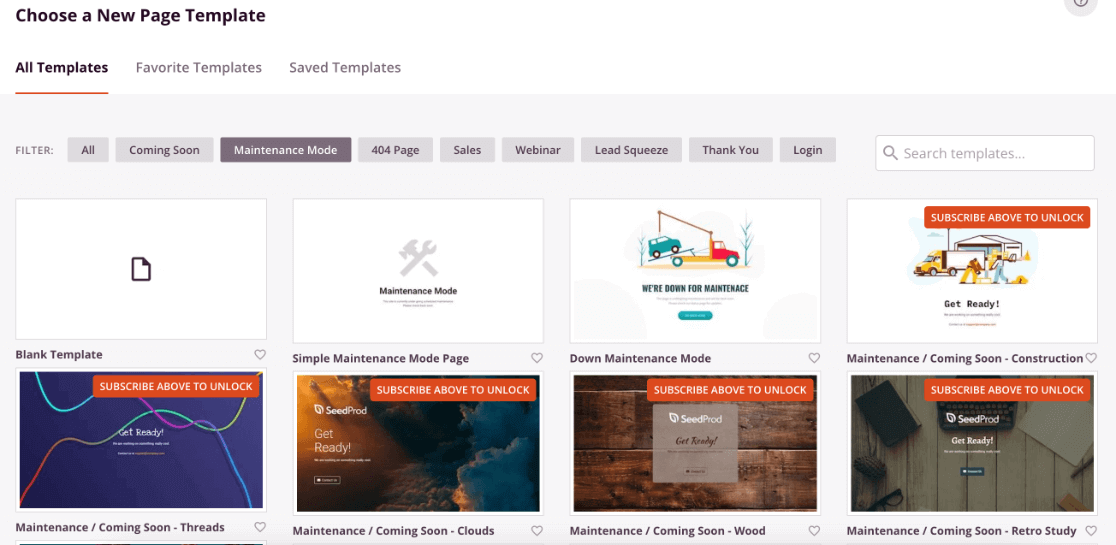
Now, choose a template for your maintenance mode landing page. If you’re using SeedProd premium, you’ll have access to lots of different options, and you can choose any design you like.
With the free version, you can choose to start from scratch with a blank page, use the simple maintenance page, or use the template that we’ll be using for the rest of the tutorial, called Down Maintenance Mode.
Step 2: Build Your WordPress Maintenance Mode Page
After you choose the template for your maintenance mode page in WordPress, you’ll be taken to the easy drag-and-drop page builder where you can customize your page.
If you’re using any of the templates, you’ll already have some blocks added to your page automatically to speed things along. To add more blocks just drag and drop them from the left side bar to the area you want. You can also delete any blocks by clicking the trash can icon above the block that appears when you hover over it.
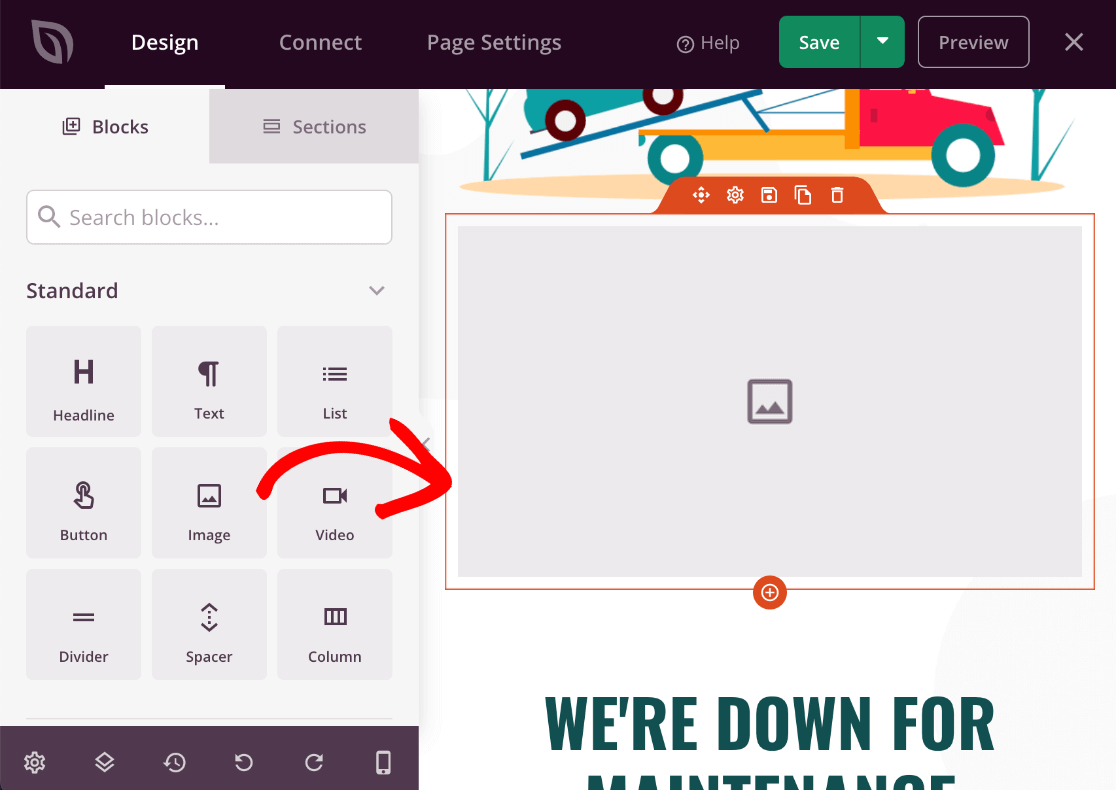
You’ll also notice that you may have more blocks available below the Standard ones. The blocks you have available depend on whether you have other integrated plugins installed or a purchased license level. For example, if you have WPForms installed, you can add a contact form. Or, if you have RafflePress installed, you can add a giveaway or run a contest on your maintenance mode page.
SeedProd also integrates with Stripe for payments (even with the Lite version), which means you could add a payment button to your under-construction page, which could be helpful if you run a donation website.
If you’re using a premium version of SeedProd, you’ll have tons of block options to choose from. You can add opt-in forms, countdown timers, social follow buttons, and so much more. Plus, depending on your license level, you can even add an opt-in form that integrates with your email marketing service like Drip, Constant Contact, Mailchimp, and others.
SeedProd Pro also has features to integrate with WooCommerce, so you can add custom product grids, checkouts, carts, and more. It even allows you to turn on WooCommerce maintenance mode, where you can create a WordPress maintenance page for your store and still keep the rest of your site up and running.
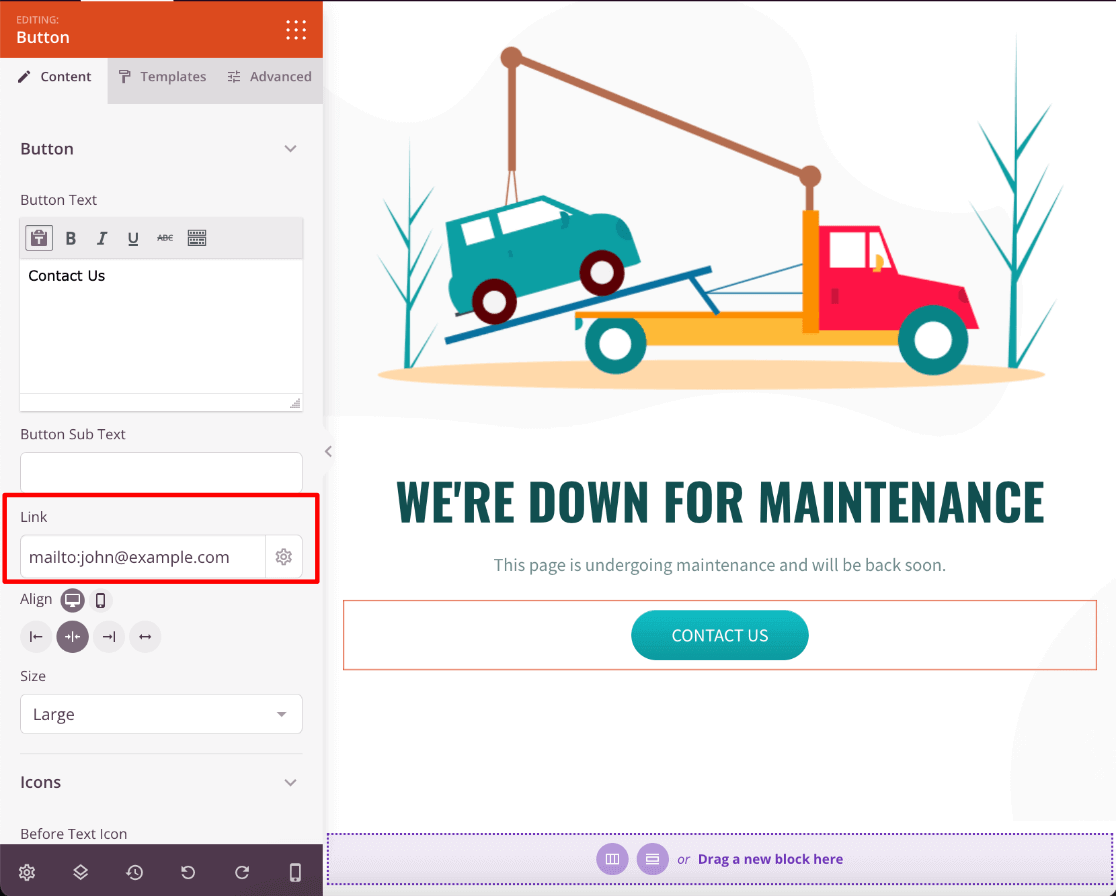
To customize any of your blocks, just click the block in your layout and use the settings in the left sidebar to customize it. For example, if we click the Contact Us block in our template, we can now change the text and add our own email address link.
You can also change other aspects of the block’s style and settings by using the options here and under the other block setting tabs, Templates and Advanced.
You can also click outside the individual blocks to edit the section, which is the entire maintenance mode page, such as adding a background image or choosing a color. If you’d like to see what the page looks like from a mobile device, just click the phone icon at the bottom of the sidebar.
Once you’ve finished creating your custom under-maintenance page, click the Save button in the top right.

Step 3: Enable Maintenance Mode in WordPress
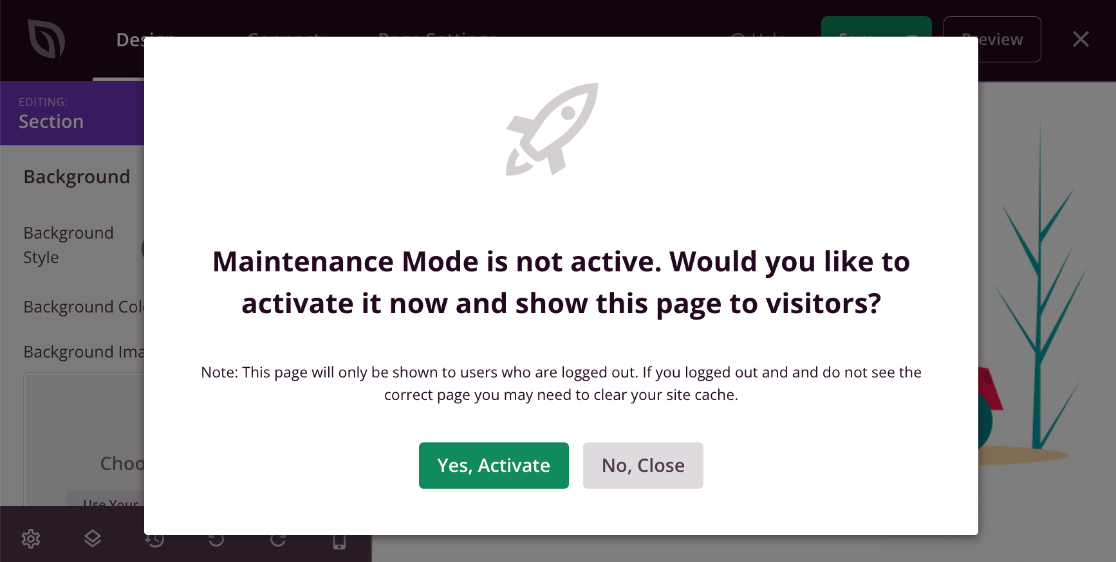
After you’ve saved your maintenance mode page, click the X in the top right corner. You’ll see a popup letting you know that WordPress Maintenance Mode is not active. If you’d like to turn it on immediately, go ahead and click Yes, Activate, or you can click No, Close to enable the maintenance page later.
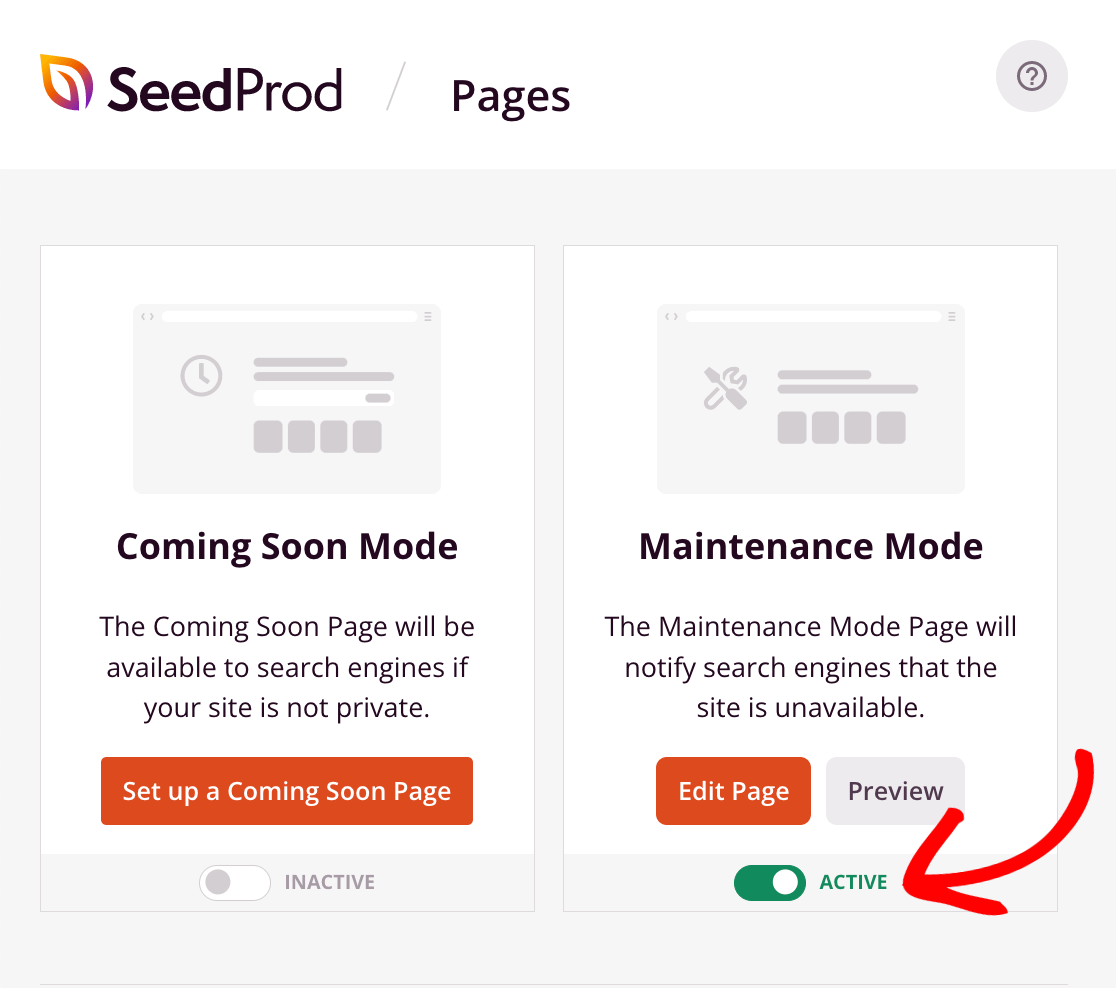
To put your website under construction at any time or to disable WordPress maintenance mode when you’re ready to relaunch your site, simply head back to SeedProd » Landing Pages and toggle the Active option under Maintenance Mode on or off.
You can also always go here and click Edit Page if you’d like to change something on your under-maintenance notice or click Preview to see how it looks to visitors.
By default, SeedProd will show your new WordPress maintenance mode page to all users who aren’t logged in. However, you may want to grant other permissions or adjust the users that are excluded. For example, you may have a business associate who doesn’t handle the website directly, but you want them to be able to see the progress.
Or perhaps you run a website where customers have membership accounts that they log into, but you want to disable the site for everyone except admin access. You can control who has access to the site while it’s in maintenance mode and customize which pages are in maintenance mode by purchasing SeedProd premium.
To change your maintenance mode access settings in WordPress after upgrading your license, navigate to the same area as the last step and click Edit Page. In the top toolbar click Page Settings. From there, you can click Access Controls and customize your maintenance mode settings.
Check out the final look of the WordPress maintenance mode page we made during this tutorial!

Congrats! You’ve learned how to put WordPress in maintenance mode.
Now, use ExactMetrics to track your landing page conversions and get all of your important Google Analytics metrics right inside your WordPress dashboard!
If you enjoyed this article, be sure to check out Best Way to Add a Facebook Pixel to WordPress (Step-By-Step)
Not using ExactMetrics yet? What are you waiting for?
Don’t forget to follow us on Twitter and Facebook to see all the latest reviews, tips, and Google Analytics tutorials.

