Want to learn how to add a Facebook pixel to WordPress?
If you want to run Meta (Facebook) ads and track their performance, you need to use something called a Meta pixel. It helps you see if your ads are effective by tracking what people do on your website after clicking your social media ad.
A Meta (Facebook) pixel is also necessary for remarketing strategies and ad retargeting. You can make more sales by using it to target people who have already visited your website and show them specific ads that might interest them more.
For WordPress users, there’s a really easy way to connect your WordPress account to Meta Ads (Facebook), and that’s what we’ll be showing you how to do today.
Before we dive in, let’s take a closer look at how a Meta (Facebook) pixel works.
How Does a Meta (Facebook) Pixel Work?
A Meta (Facebook) pixel is a small piece of code that you can put on your website if you’re using Facebook advertising. This code snippet allows Facebook to keep track of your website visitors and what they click on.
Similar to using a Google tag for Google Analytics, the Meta pixel tracking code also works as a retargeting pixel by tracking your page views. This lets you create custom audiences from the people who visit your website and use ad retargeting to get more sales from people who have already shown an interest in your website.
By adding a Meta (Facebook) pixel to WordPress, you’re able to track your eCommerce conversions and page views to see how well your Facebook ads are performing. Then, use that information to improve your ad campaigns and grow your business!
How to Set Up a Meta (Facebook) Pixel
Before you can head to WordPress to add a Facebook pixel, you’ll first need to create a pixel in your Meta account. It’s a quick process, and we’ll walk you through it.
Already created your pixel? If you just need to know where to find your Facebook pixel and how to add it to WordPress, feel free to jump down to How to Add a Facebook Pixel to WordPress.
Step 1: Connect Data Source for Facebook (Meta) Pixel
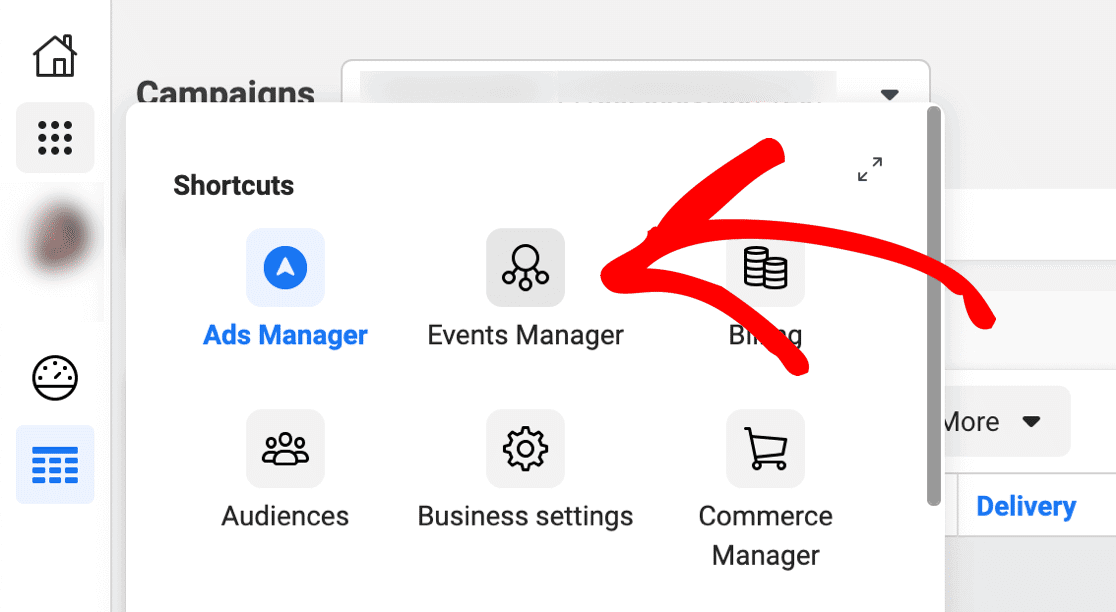
Head to your Facebook Events Manager account. You can also access Events Manager from the Shortcuts menu in your Facebook Ads Manager or from All Tools in Facebook Business Manager.
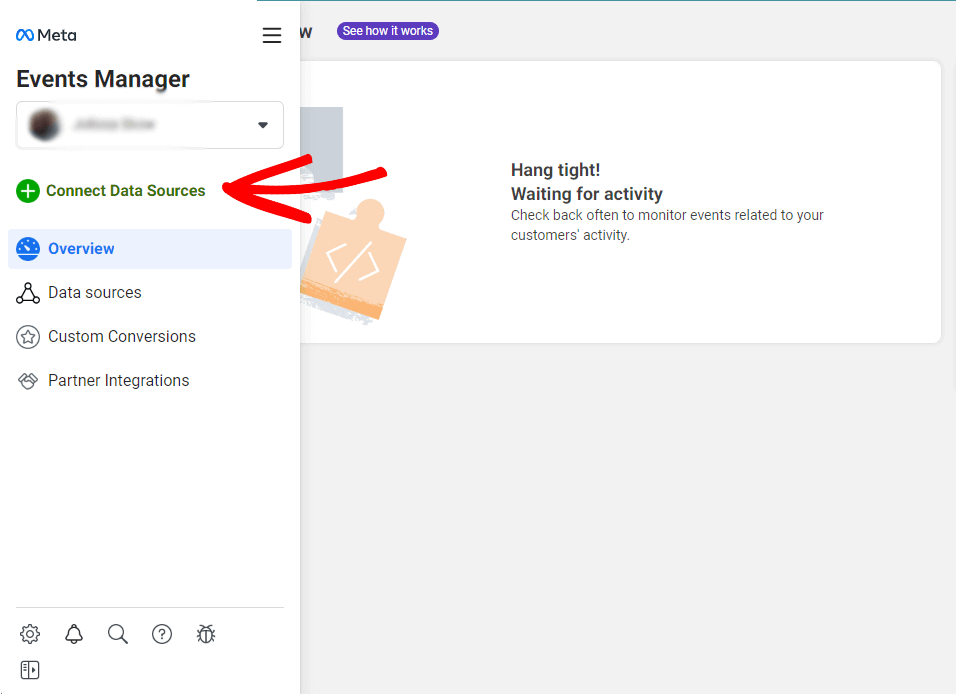
Once you’re in Events Manager, click on Connect Data Sources in the sidebar navigation:
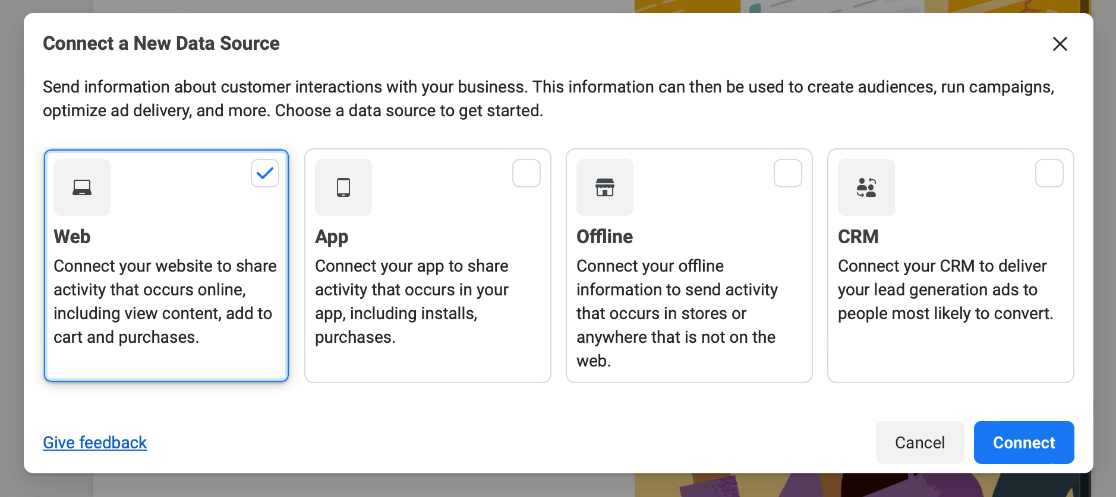
Now Select Web, and then click the Connect button at the bottom:
Step 2: Create a New Facebook Pixel
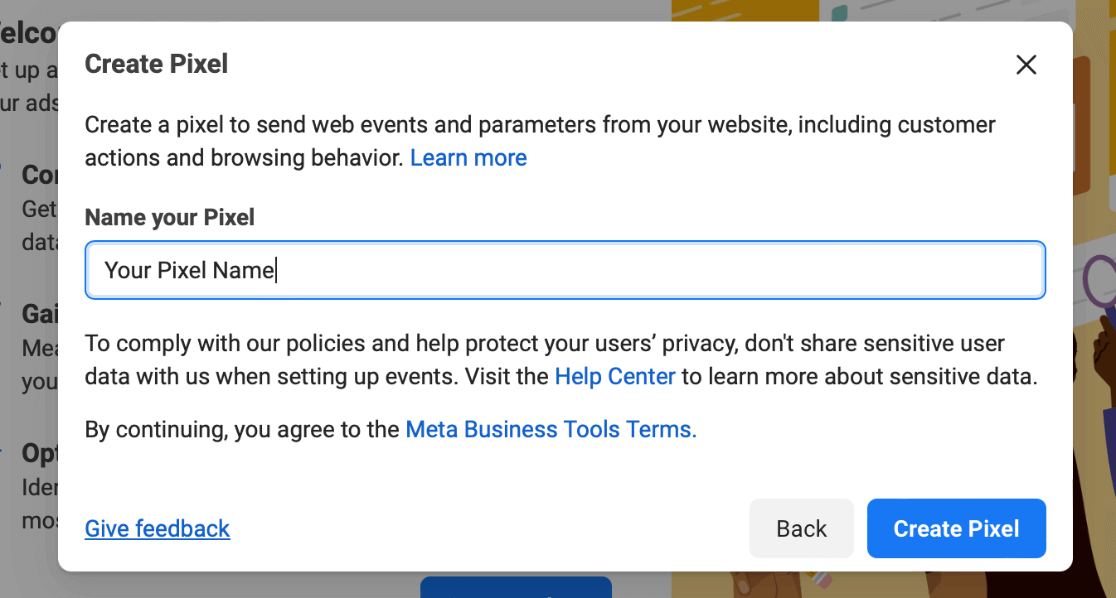
In the next step, fill in Name Your Pixel with whatever name you’d like, and press Create Pixel at the bottom:
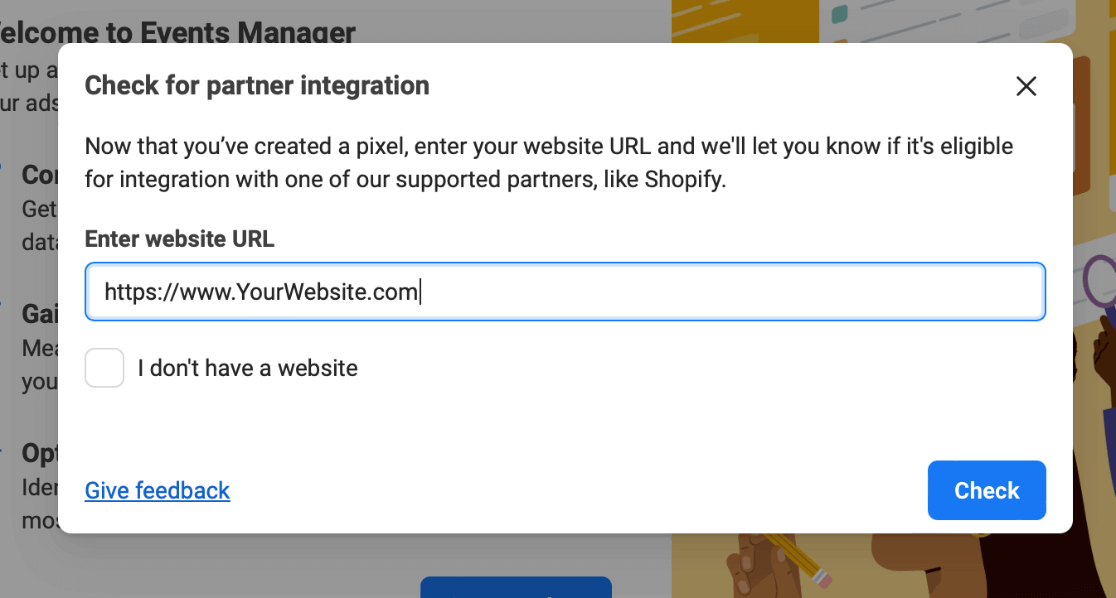
Now it will ask you to Enter website URL. Go ahead and enter the address of your website. Then press the blue Check button. It will quickly check your website, and the button will say Next. Go ahead and click it.
Step 3: Choose Your Pixel Install Method
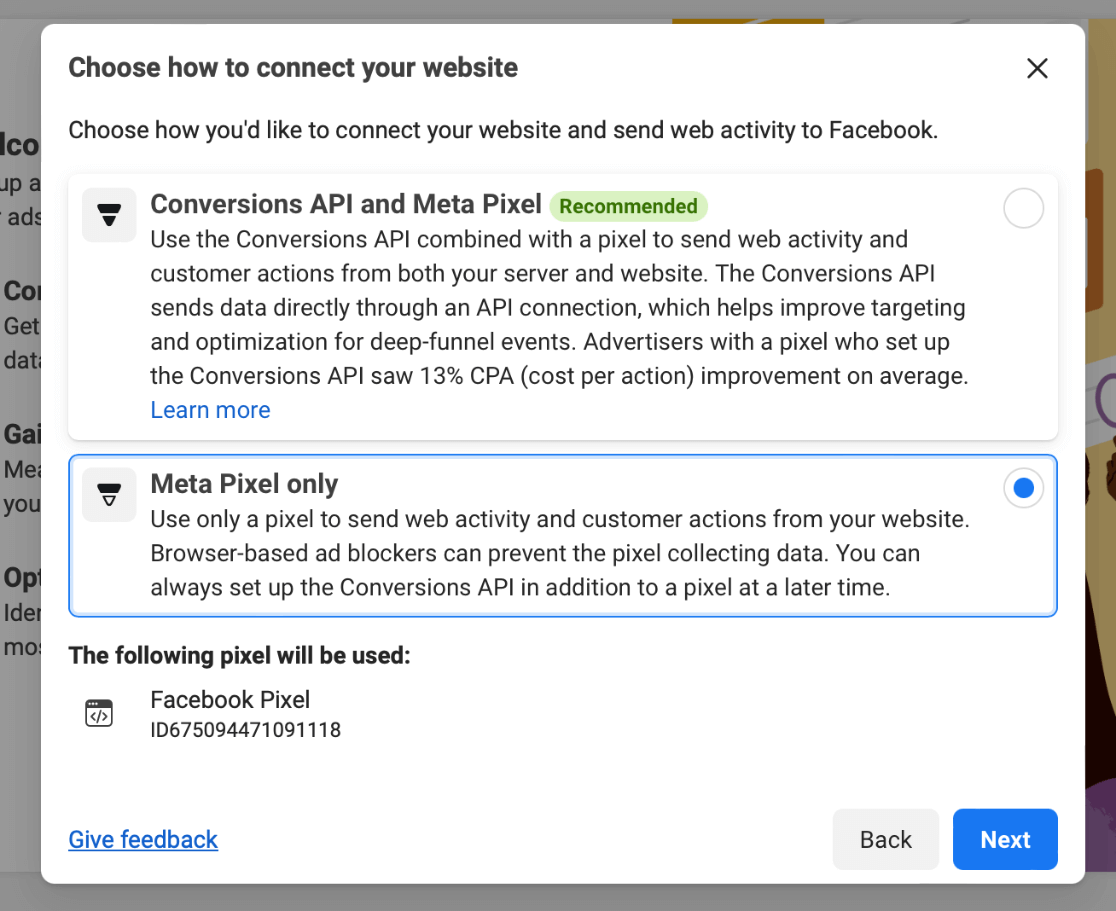
Next, it will show you 2 options for how to connect the Facebook pixel code, one with conversions API and one without.
Ready for the good news? We won’t actually need either of these options or any website code when we use ExactMetrics to add the Facebook pixel to WordPress. We’ll walk through it though.
Choose the Meta Pixel only option. If you want to, you can go ahead and write down the number portion of the ID under Facebook Pixel, since we will be using that later. Don’t worry though, we’ll still show you how to find it again when it’s needed in the next steps.
When you’re ready, click Next:
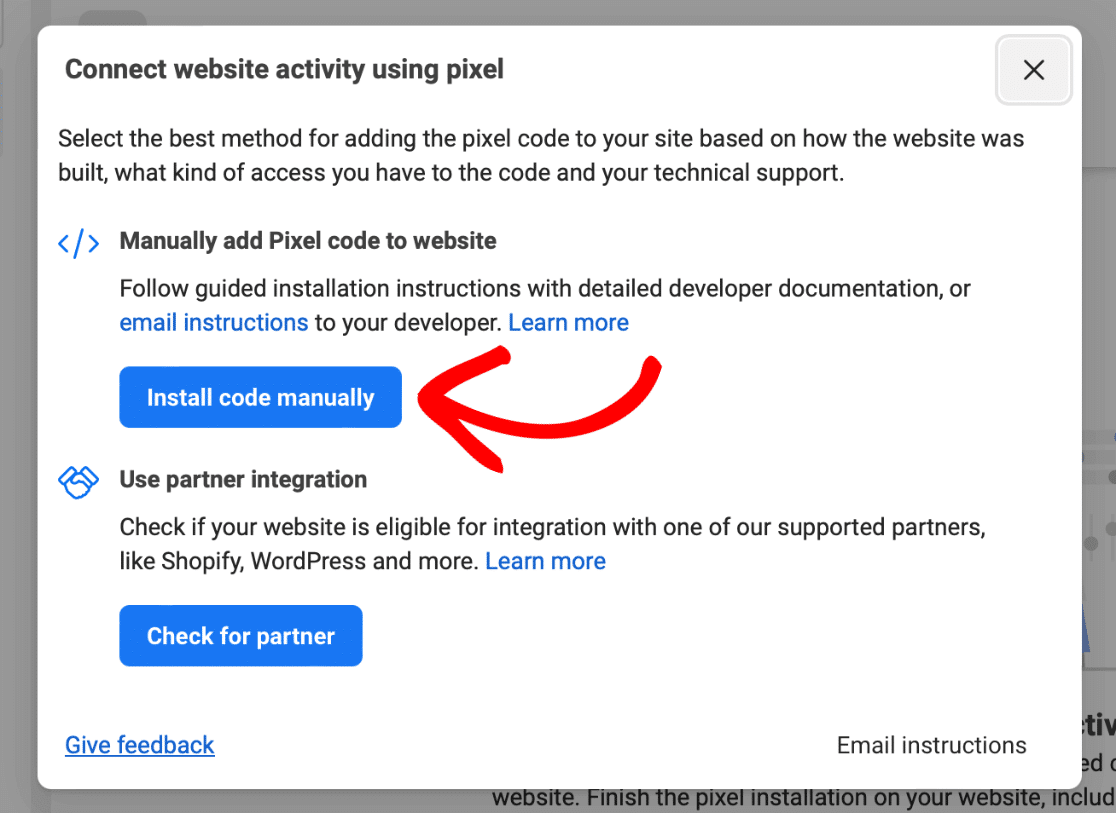
Now it will give you the option of how to install your Meta pixel. Click Install code manually.
Note: Curious about the second option? Even though it says WordPress under partner integration, that option will actually just show you a Facebook pixel plugin for WordPress that you can install from the WordPress plugin directory and use to assist you with installing pixel code on your website pages.
There are a number of different pixel helper plugins, but we recommend WPCode if you decide to go the manual route and need help adding code snippets to your site.
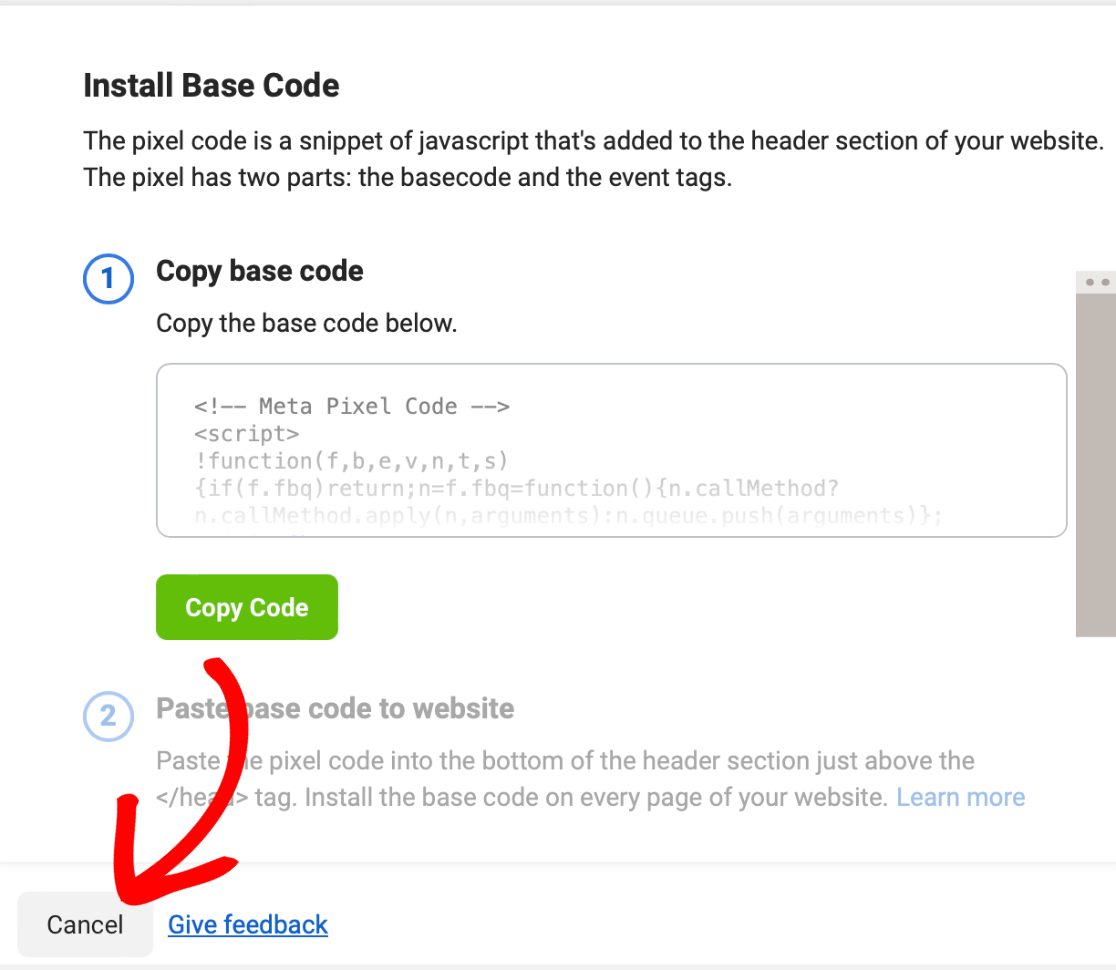
In the next step, you’ll be shown your base pixel tracking code. If you wanted to install it manually on your site, you’d press Copy Code and continue from there.
Since we’ll be using ExactMetrics’ no-code method, you can just click Cancel at the bottom and Confirm in the popup to get back to the main screen (it won’t delete your pixel, it’ll just let you get out of the manual install steps):
You did it! You successfully created a Meta (Facebook) pixel! Now it’s time to add it to WordPress.
How to Add a Facebook Pixel to WordPress
Now that you’ve created your new Facebook (Meta) pixel using the steps above, we’ll add it to your WordPress site using our simple, no-code method.
Adding your Meta (Facebook) pixel to your WordPress site is incredibly easy if you’re using ExactMetrics!
ExactMetrics is the best premium WordPress analytics plugin. With its PPC Ad Tracking feature, setting up conversion tracking for Meta (Facebook) Ads only takes a few clicks.
The ad tracking addon lets you easily track page views and purchase conversions from your Facebook Ads, and it integrates with a number of platforms:
You’ll also get all your Google Analytics data right in your WordPress dashboard and tons of other tools such as form tracking, Google Ads tracking, Bing Ads tracking, outbound link tracking, media and video play tracking, and more.
To use the PPC Ad Tracking addon and set up your Meta pixel with only a few clicks, you’ll need ExactMetrics Pro. Get started now!
For a full walkthrough of how to set up ExactMetrics, check out our guide for How to Add Google Analytics to Your WordPress Site.
Once you have ExactMetrics set up, keep reading to add your Meta (Facebook) pixel to WordPress easily.
Step 1: Activate PPC Ad Tracking
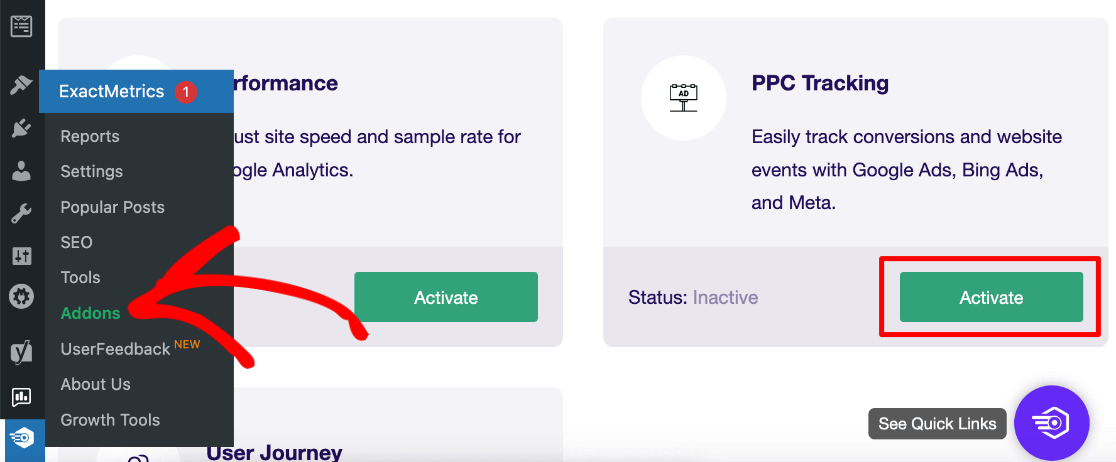
To start, you need to add ExactMetrics’ PPC Ad Tracking addon. You can do this by going to your WordPress dashboard and then clicking on ExactMetrics » Addons. Look for the addon named PPC Tracking and click the Activate button.
Step 2: Copy Your Facebook Pixel ID
Now we’ll show you where to find your pixel ID, which is all you’ll need in order to add a Facebook pixel to WordPress. If you already wrote down your pixel ID number when we were creating the Meta pixel, you can skip this step.
To find your pixel ID, head back to Facebook Events Manager. In the home screen, you’ll see your ID in the right corner, under the name of the pixel you created:

Copy the pixel ID number and head back to WordPress.
Step 3: Paste Your Meta Pixel ID in WordPress
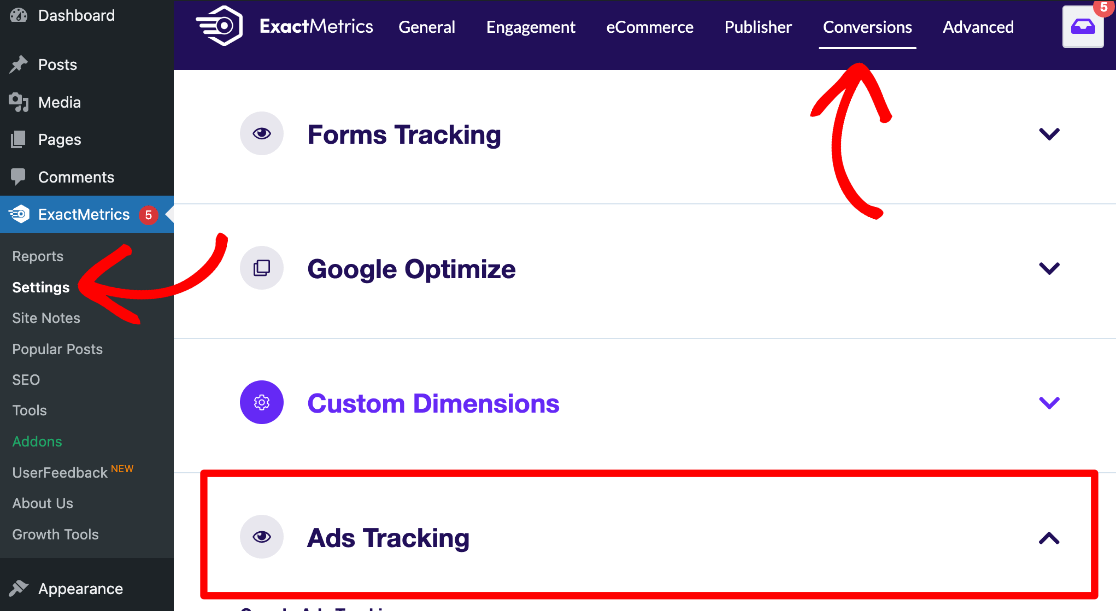
You made it to the last step! There’s only one thing left to do in WordPress to add a Facebook pixel to your site. Go to ExactMetrics » Settings. Then click the Conversions tab at the top. Now click to expand the Ads Tracking section:
Scroll down to where it says Meta Ads Tracking and paste your Pixel ID in the field:

You finished! Your Facebook conversion pixel is good to go in WordPress. No need to worry about code at all; it’ll immediately start tracking your page views and purchases.
Ready to learn how to set up conversion tracking for Google Ads next? Check out our Guide to Google Ads Conversion Tracking & GA4.
Not using ExactMetrics yet? Get started now!
Don’t forget to follow us on Twitter and Facebook to see all the latest reviews, tips, and Google Analytics tutorials.


