Do you want to learn how to build a WordPress website?
Figuring out how to make a website can seem intimidating, especially if you’re not super tech-savvy. You might assume that you need to hire a developer or web designer to create your site. But actually, anyone can build a website on WordPress pretty quickly!
In this article, we’ll answer some common questions and share our step-by-step tutorial for how to build a website with WordPress. Ready to get started?
- Can a Beginner Build a Website on WordPress?
- Why Use WordPress to Create Your Website?
- How to Build a WordPress Website
Can a Beginner Build a Website on WordPress?
Even as a beginner, you can absolutely build your own website. Our guide is perfect for any skill level. In fact, creating your website may turn out to be really fun as you’ll get to design exactly how you want your site to reflect your brand.
However, if you do want an expert’s help. WPBeginner is an awesome resource, and they offer free WordPress blog setups to get your business up and running quickly.
👉 Click Here to Get a FREE WordPress Website Setup 👈
How Long Does Building A Website Take?
It’s hard to put a time on how long it takes to build a website because a lot of it depends on the features and customizations you include. We recommend starting small and growing your site as your business grows to save money and avoid unnecessary spending.
With this tutorial, we’ll show you how to set up a basic website in less than an hour and some pointers for taking your website further in the future.
Do I Need Code to Build a Website on WordPress?
You DO NOT need to have any coding or web development expertise to build a fantastic, highly functional WordPress website. There are so many incredible plugins and tools that make it simple to add advanced designs and features quickly and easily.
We’ll walk you through building a website without touching a single line of code.
Why Use WordPress to Create Your Website?
There’s often confusion when it comes to website builders and WordPress. So, we’ll explain…
WordPress is a content management system (CMS) that powers nearly 43% of all websites on the internet (including this one), making it the most popular platform in the world.
There are lots of website builders that will help you set up a site, but you’ll be limited by the offerings of the platform you chose. It might not seem like a big deal now, but it can become a problem as your business grows.
One of the biggest mistakes beginners make when building their first website is choosing the wrong platform and then deciding to change it later on, which results in more time and effort.
So, that leads us to our next WordPress dilemma…
WordPress.com vs WordPress.org
Again, there’s often confusion here, but it refers to who is actually hosting your website. Hosting is where the files that power your website are stored, like your php files, style sheet, and more.
WordPress.org is a totally free, open-source software that comes with thousands of pre-built themes, extensions, and plugins. You’ll download the software, use it to create your website, and self-host your site with a hosting service.
It’s extremely flexible, works with almost every third-party tool and service available, and is used by the majority of sites. WordPress.org is often referred to as “the real WordPress.”
WordPress.com, on the other hand, is an all-inclusive option that provides WordPress software along with a managed hosting service. To have a custom domain name, use any plugins or extensions, and make more customizations, you pay for premium upgrades.
Our recommendation is to use a self-hosted WordPress.org site. Sure, it might be a couple of extra steps upfront, but it can save you tons of time and money in the long run since you’ll likely decide to switch down the line anyway.
How to Build a WordPress Website
Now that you know what to expect and are clear on which platform we’ll be using to show you how to build a website with WordPress, let’s dive in…
Step 1: Set Up Domain Name and Web Hosting
WordPress is free, but you’ll need to set up your hosting plan and purchase your domain name (the address to your website).
Domain names range in price but are typically around $15 / year. Hosting costs around $8 / month depending on the provider and the speed/processing power.
That said, if you purchase hosting using our link to WPBeginner’s partner, BlueHost, you’ll get a free domain name for the first year, a free SSL certificate, and hosting that starts at $2.75 / month, which is over 60% off.
Bluehost is one of the best WordPress hosting providers on the market and an official WordPress-recommended provider that’s been operating since 2005. It’s one of the largest hosting companies in the world and a very reliable option.
To get started, head to the Bluehost website and click the Get Started Now Button. Next, select the plan you prefer.
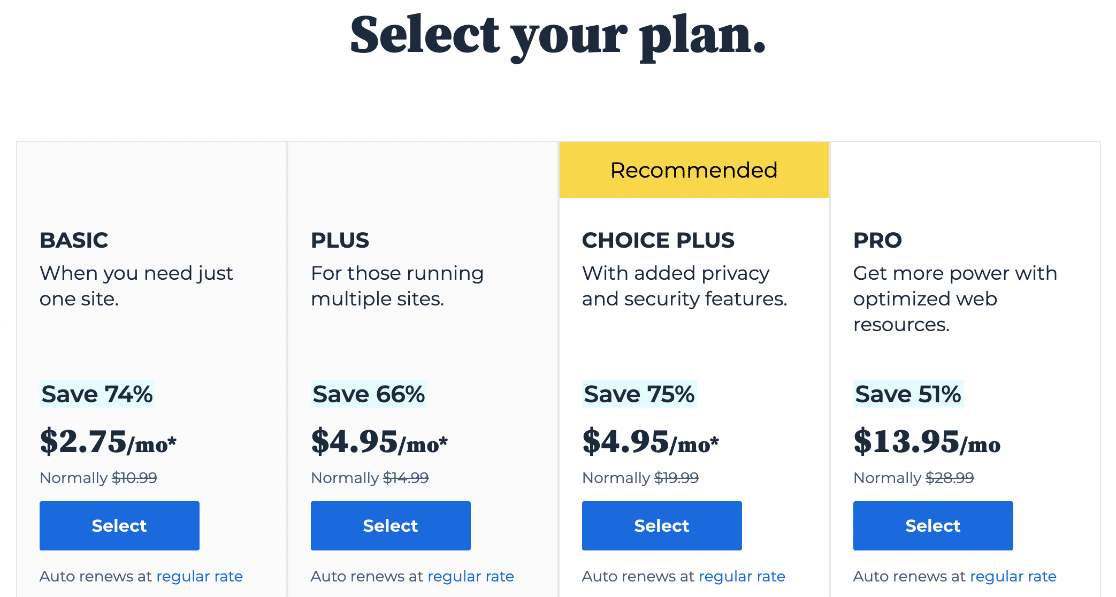
On the next screen, you’ll choose a domain (website name). Typically, you want to go with a .com address that’s easy to spell, fits with your business, and isn’t difficult for users to remember.
After you select your website domain, you’ll be asked to fill out your account information and offered some extras that you can purchase. We don’t usually recommend purchasing these extras upfront because you can always add them later if you decide you need them.
Finally, you’ll add payment information and purchase your hosting and domain. Next, you’ll receive an email with login instructions for your web hosting control panel (cPanel).
Your cPanel is where you’ll install WordPress and manage things like support and notifications.
If you’d like to check out other hosting providers, we also recommend SiteGround, DreamHost, HostGator, and Hostinger.
Step 2: Install WordPress
If you used the link we provided to sign up for Bluehost, you’ll automatically have a WordPress installation. So, you can just log into Bluehost with your new account details and click the button that says Log in to WordPress. (The button might be in a different area on your screen).

Alternatively, you can go to yoursite.com/wp-admin/ directly from your browser.
If you’re using a different web hosting provider, you may need to install WordPress manually. WPBeginner has a really handy comprehensive guide for how to install WordPress on a number of the most popular hosting services.
Step 3: Choose a WordPress Theme
Congrats, you successfully learned how to do the initial setup for a self-hosted WordPress site! Not so bad, right? Now you’ll need to choose a theme.
Themes are professional WordPress website templates that control the layout and provide different website designs, fonts, etc. Every WordPress site uses one, and your new website will have a basic one installed by default.
From the front-end, your site will look something like this.
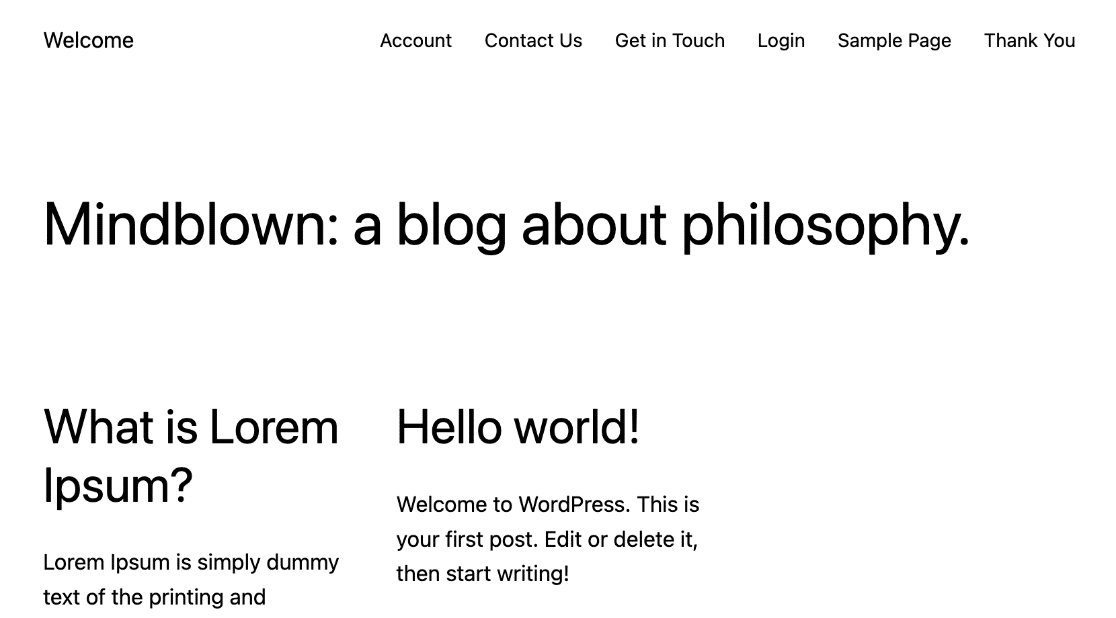
That probably isn’t what you imagined for your snazzy new site, but this is where the fun part comes in! WordPress has thousands of themes to choose from, and you’ll get to customize it to your liking, build pages, add media, and more. Even sites with the same theme installed typically look entirely different from each other.
To change your theme, go to Appearance » Themes from your WordPress admin bar. Then, click Add New at the top.
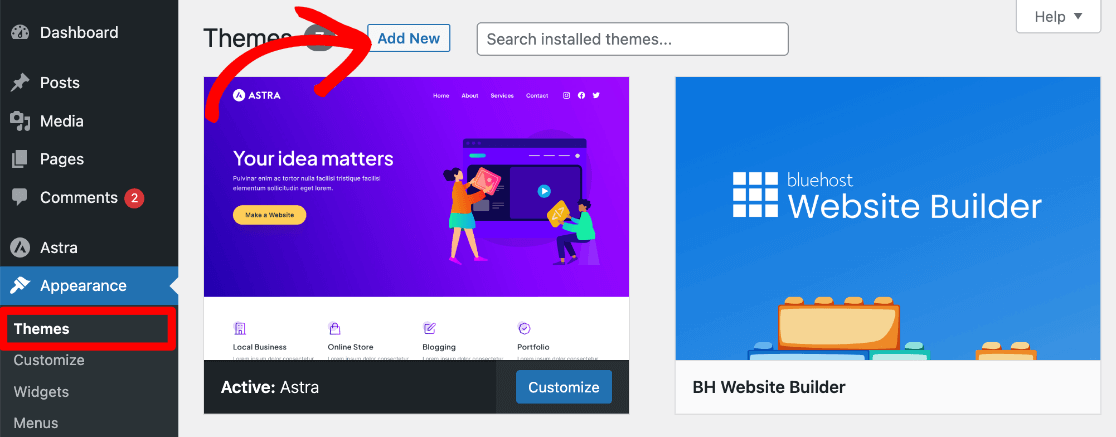
Next, you can search through the WordPress theme directory to find one you like. Type the name of a theme or click the Feature Filter tab to help narrow down your choices. For example, you can filter by types of websites, like business websites or blogger sites.
Once you’ve found a theme you like, hover over it and click the blue Install button. After it installs, the button will say Activate and you should click it.
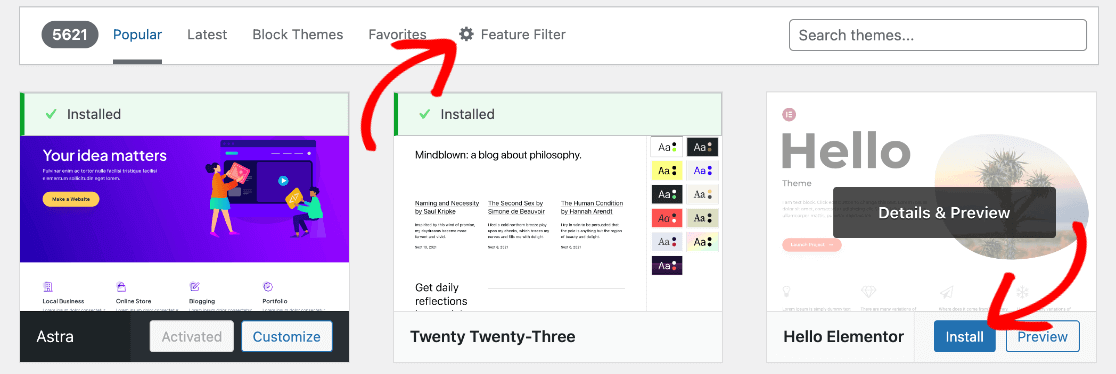
For the sake of this tutorial, we’ll be using the Astra theme. It’s an excellent multipurpose free theme that’s lightweight, comes with many design options, and integrates with popular page builders like SeedProd, Elementor, Divi, and Beaver Builder.
Need help with choosing a theme? Check out our list of the Best Free WordPress Themes. You can also purchase awesome premium themes from third-party websites and designers.
If you’re interested in creating your own custom WordPress theme without using code, check out our tutorial for The Easiest Way to Create a Custom WordPress Theme.
Once your theme is activated, we’ll move on to customizing it.
Step 4: Customize Your Theme
After your new theme is activated, click Appearance » Customize to launch the theme customizer. Here, you can change your theme settings while seeing a live preview of your site.
Note: Some themes support full site editing, in which case your site customizer may look different.
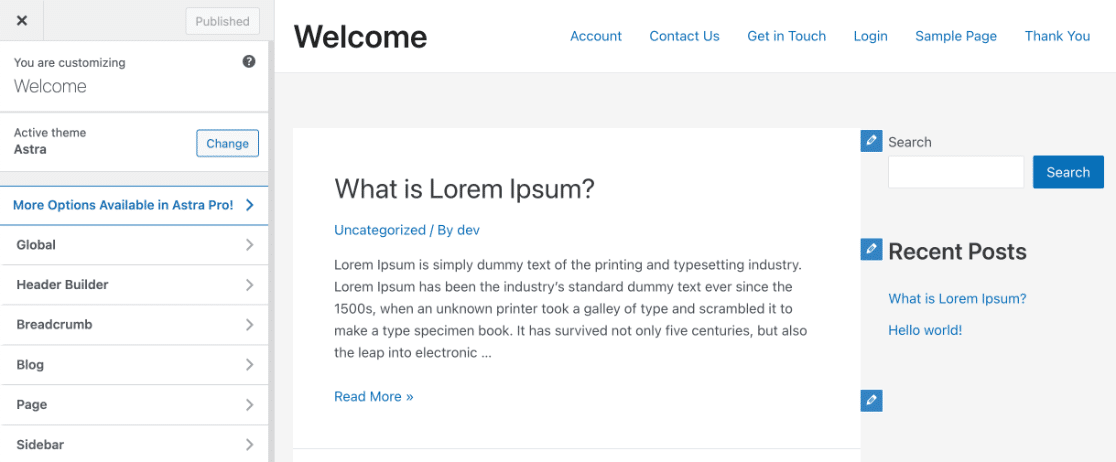
Using the customizer’s left sidebar, you can adjust different settings and layout options, add global colors, create your header and footer, and more. Note that the theme customizer doesn’t offer a drag-and-drop design appearance.
Because of that, many website owners and web designers opt to use a WordPress page and theme builder like SeedProd where you can build your web pages in a much more intuitive drag-and-drop builder, using advanced design elements without needing code.
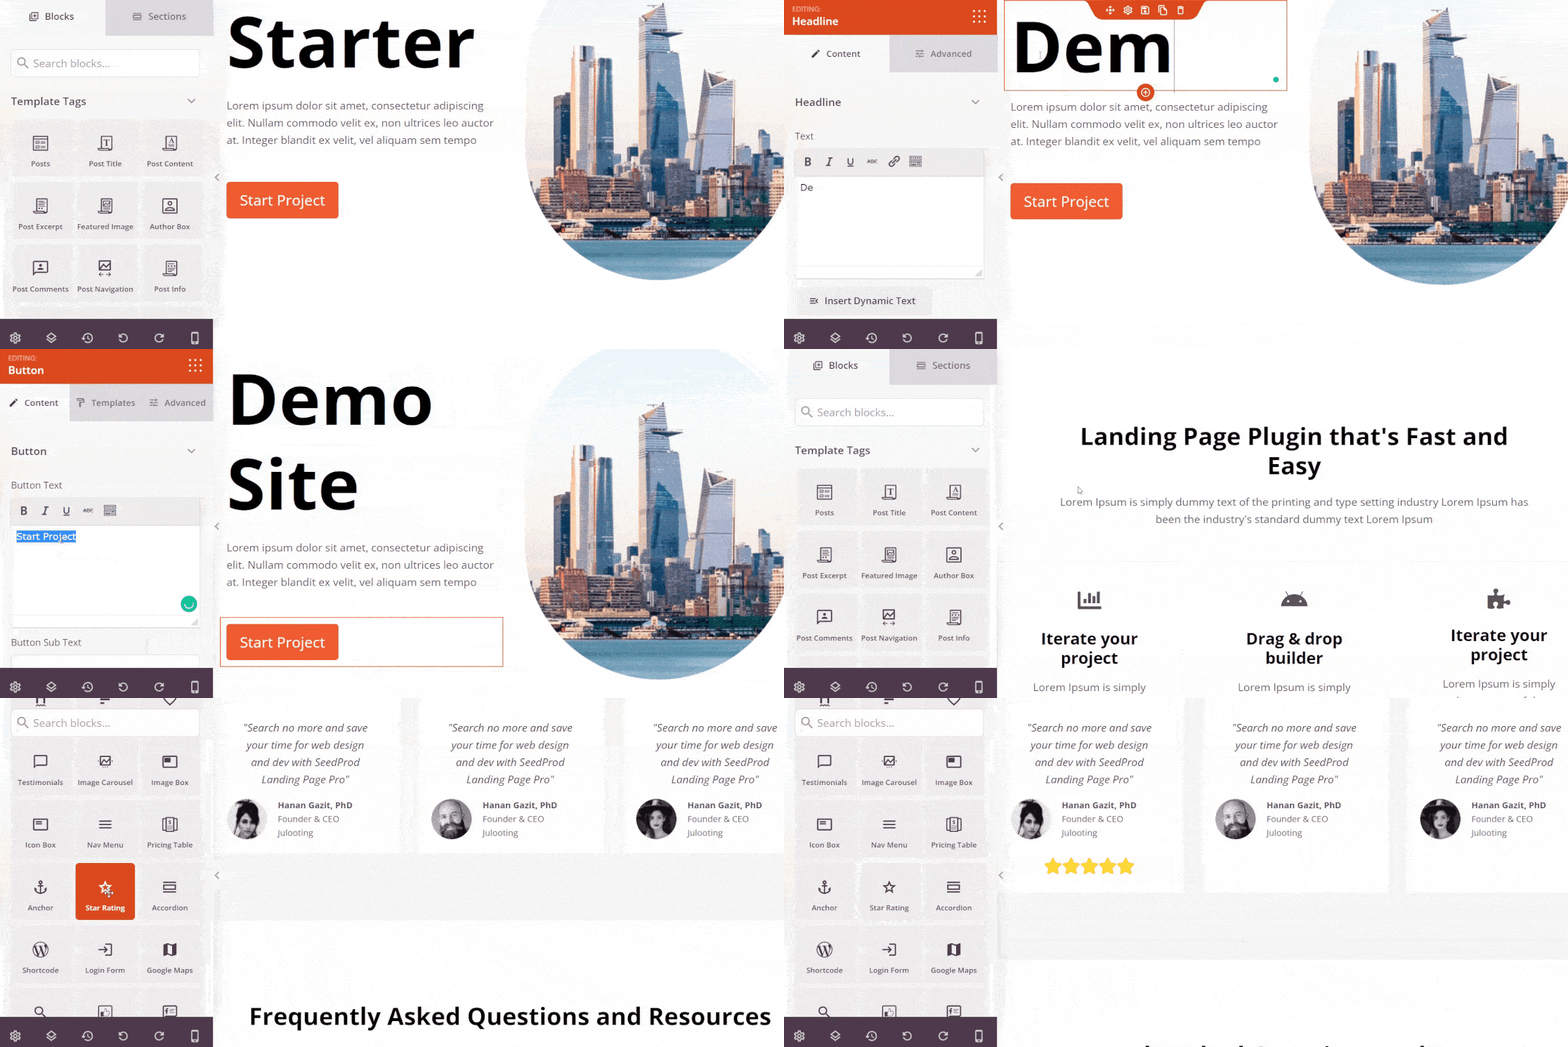
Keep in mind, you don’t need to decide on all your theme settings right now. It’s usually much easier to finalize your theme design once you have some content on your site, so we’ll show you how to add content next.
Pro Tip: When you’re working on customizing your theme, look up your theme’s website and refer to documentation and tutorials for help. Every theme is different and has its own design options so it’s best to follow along with the creator’s instructions.
Step 5: Add Content to Your Site
In WordPress, your site’s content will be displayed as either a page or a post. Pages are static content that’s not meant to change often, like your about page, custom landing page, contact page, and privacy policy.
On the other hand, posts are dynamic content that’s part of the blogging functionality of WordPress. They appear in reverse chronological order (newer content at the top).
Your posts will show on your homepage by default, but you can change your home to a static page instead. You can also create blog pages that show recent posts or news. Or, you don’t have to use posts at all if your website doesn’t have any reason to show recent content.
Note: There are also custom post types, but for now we’re going to stick to regular posts and pages.
To add a post to your website, go to Posts » Add New.
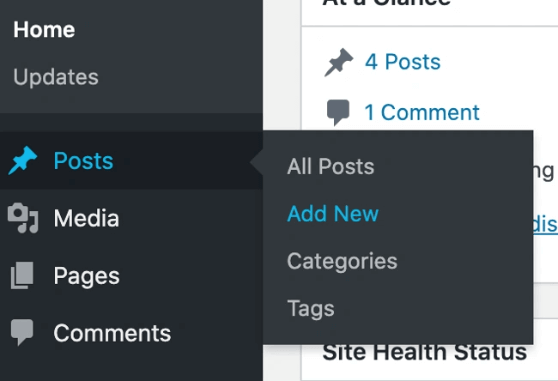
That will take you to the WordPress post editor where you can add a title, photos, text, and other elements using blocks and shortcodes. You can adjust the formatting using options in the sidebar.
You’ll also have the option to use categories and tags for posts. Use the buttons at the top to Save draft and Preview. Click Publish when you’re ready for the post to go live.
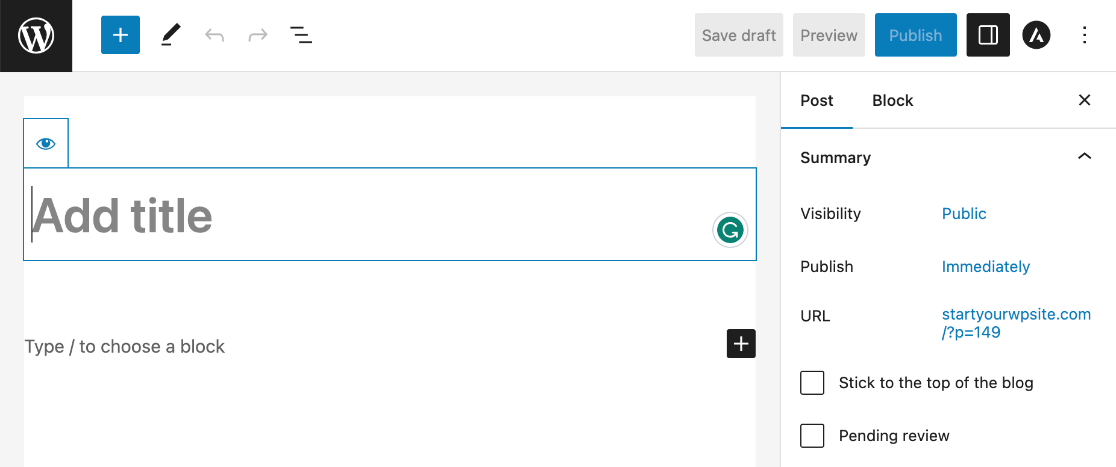
Similarly, if you want to create new pages, click Pages » Add New. You’ll be taken to the editor where you can add content, media, and other elements. Build and publish your pages in the same way as posts.
Step 6: Customize Your Site Settings
There are other places in your WordPress admin that you can use to customize your site further. Click Settings to find these options. For starters, select Settings » General. Here you can edit things like your site title, tagline, time zone, and more.
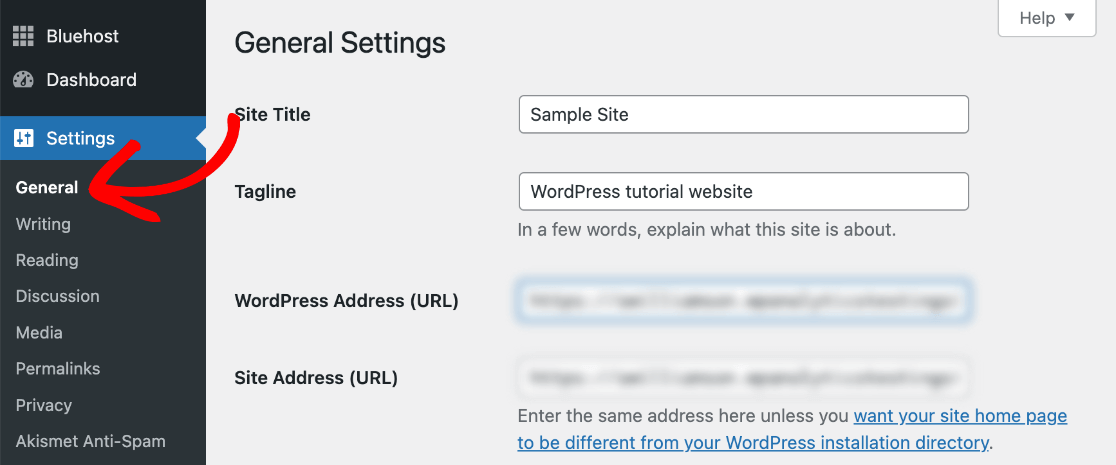
To change your homepage to display a static page and adjust other blog settings, click Settings » Reading. Don’t forget to press Save Changes at the bottom when you finish making adjustments.
You can also go to Settings » Discussion to set up your comment system. WordPress comes with a comment system in place, but it can be a big target for spammers so you’ll want to set up some moderation and adjust the settings.
Another thing you’ll want to note under settings is Permalinks. A permalink, or “permanent like,” is what shows up when users visit a particular page or post on your site. You’ll likely want to choose the Post Name option so that each post or page’s permalink will automatically be customized to match the title when you’re creating them.
If you want to customize your navigation menu, such as what pages are included, the titles that display, and the order of menu items, click Appearance » Menus.
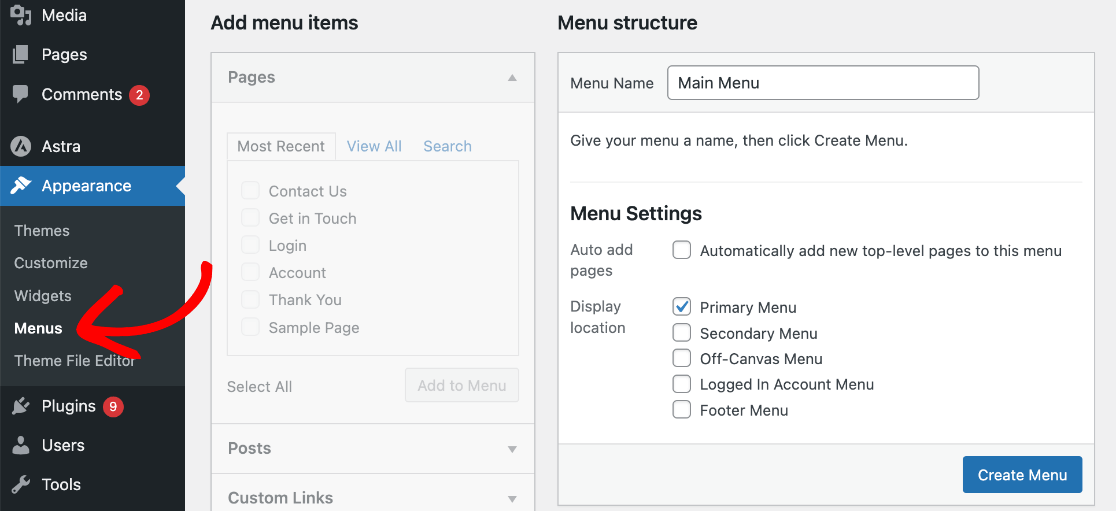
Right now, your menu is empty so enter a title next to Main Menu, choose where you want it to display it, and click Create Menu. Then, you can check the boxes next to the pages you want to include in the left column and press Add to Menu. When you’re done, press Save Menu.
You can visit your site to see your new menu working in the location you chose for it.
Step 7: Install Plugins
The easiest way to think about WordPress plugins is like apps for your website. They add features, functions, and design customizations to your website. There are almost 60,000 free plugins in the WordPress directory in addition to paid plugins that you can buy from third-party websites and developers.
Adding plugins to your site can help you build your WordPress website much quicker, improve the user experience, and grow your online business faster and easier. To add a plugin, go to Plugins » Add New. You can search, install, and activate plugins in the same way you installed your theme.
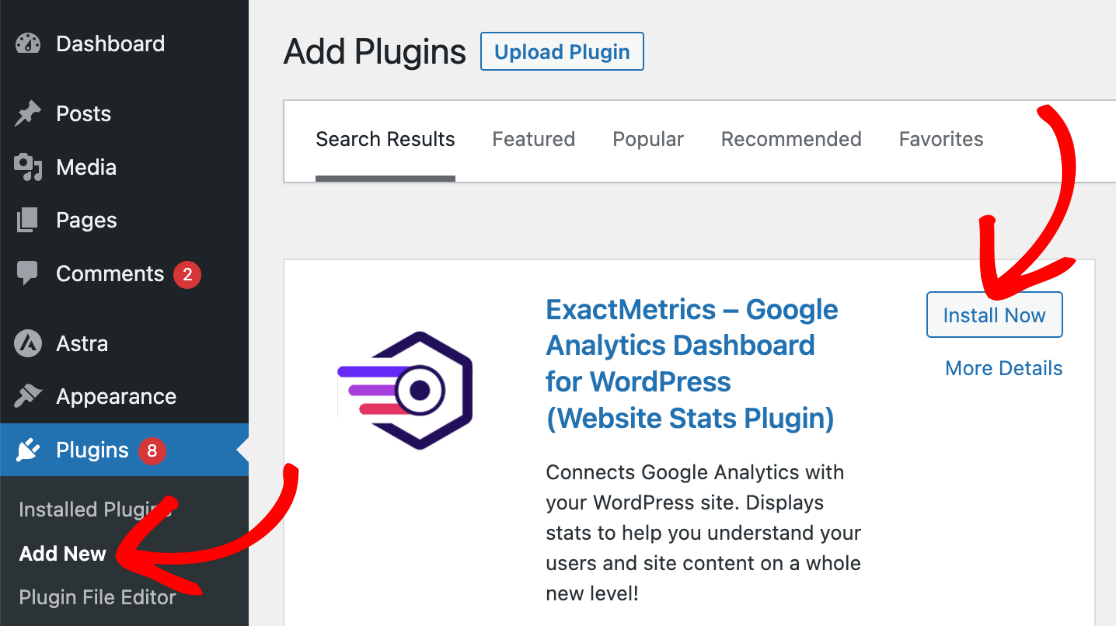
With that in mind, here is a list of some of the most popular must-use plugins to enhance your site. You can download all of them for free through the WordPress directory.
Functionality
- ExactMetrics – Connect your website with Google Analytics to find how visitors find and use your website, track conversions, and get user-friendly analytics reports in your WordPress dashboard.
- WPForms Lite – Add a contact form and other forms to your WordPress site.
- PushEngage – Increase website traffic by letting you connect with visitors after they leave your website through push notifications.
- Duplicator – Automatic site backups and site migrations.
Design
- SeedProd – Drag and drop page builder for creating completely custom designs & layouts.
- Smash Balloon – Add social media widgets for Instagram, Facebook, Twitter, and YouTube.
- Envira Gallery Lite – Add image galleries to your WordPress site.
Optimization
- All in One SEO – Improve your WordPress SEO to get more traffic from Google search engines. (Yoast SEO is another popular plugin for this).
- WP Super Cache – Free WordPress caching plugin that helps improve your website speed.
- Uncanny Automator – helps you set up automated workflows to streamline your small business and save time.
eCommerce
- WP Simple Pay – Easily accept credit card payments in WordPress.
- WooCommerce – Makes it easy to set up an online store and sell physical products.
- Easy Digital Downloads – Create an online store for digital products like eBooks, PDFs, and media.
- MemberPress – Create a membership site to sell online courses and digital memberships to subscribers.
The best advice we have is to keep playing around with WordPress, read tutorials, use plugins to your advantage, and take inspiration from other site designs. It can seem daunting at first, but there really are so many tools available that make building a site and running an online business possible for all skill levels!
That’s it, you successfully learned how to build a WordPress website!
If you enjoyed this article, be sure to check out How to Turn On WordPress Maintenance Mode (Step-by-Step)
Not using ExactMetrics yet? What are you waiting for?
Don’t forget to follow us on Twitter and Facebook to see all the latest reviews, tips, and Google Analytics tutorials.


