Do you want to add Google Tag Manager to WordPress but aren’t sure how to go about it?
Google Tag Manager is a great tool for connecting your WordPress website to digital marketing platforms and setting up advanced Google Analytics tracking. With GTM, you can manage and deploy your code snippets from one central location.
In this article, we’ll show you step-by-step how to set up Google Tag Manager for WordPress. Before we dive into the tutorial, there are a few things you should know about GTM…
What Is Google Tag Manager?
Google Tag Manager (GTM) is a free tool developed by Google, designed to help you add and update tags (HTML and Javascript code snippets) on your website, such as those for Google Analytics, Google Ads, Facebook Pixel, and more.
One of the benefits of using GTM is its flexibility. You can set up all of your different tracking codes from one user interface, without having to edit your website’s code. That said, for some users, it might not be necessary. So, before you dive headfirst into GTM, let’s find out if it’s right for your site.
Who Should Use Google Tag Manager?
If you need to track specific actions on your site and integrate tracking with other services, Google Tag Manager can help. It’s especially useful for those who want to implement advanced Google Analytics tracking on their site. GTM is often considered an invaluable tool by digital marketers, web developers, and many website owners. However, it’s not necessarily the best choice for everyone.
Why do we say that?
For starters, GTM has a high learning curve. If you’re experienced in web development or an Analytics professional, you might not find it too bad. However, most beginners or people without prior technical knowledge often find it rather difficult. Even though it doesn’t require coding, the tags, triggers, and variables you’ll need to set up can get really complicated.
Learning to use Google Tag Manager can be challenging and extremely time-consuming, and it’s prone to many errors if the tags aren’t set up exactly right. Plus, GTM tutorials are often extensive and rather complex, and any mistake in any step will result in inaccurate tracking.
A Simpler Way to Set Up Advanced Tracking
We’ll show you how to install Google Tag Manager in just a moment, but first… What if we told you there’s a much easier alternative that allows you to set up many of the tracking features GTM is used for?
With ExactMetrics, you can unlock a host of advanced tracking capabilities right out of the box such as eCommerce tracking, form conversion tracking, link and button click tracking, scroll depth tracking, and much more! No need to spend time on tricky Tag Manager processes; with ExactMetrics, a few clicks is all it takes.
In the next sections, we’ll guide you through the required steps to add Google Tag Manager to WordPress. We’ll also cover the ways you can use ExactMetrics as an easier alternative. Feel free to jump ahead to the section you’re interested in.
Set Up Advanced GTM Tracking the Easy Way
ExactMetrics is the best premium WordPress Analytics plugin and the best alternative to Google Tag Manager, allowing you to easily set up Google Analytics without editing any code.
There’s no need to spend time on GA4 configuration and learning how to use Google Tag Manager. You get advanced tracking right out of the box with an extremely user-friendly interface and Google Analytics reports right inside your WordPress dashboard.
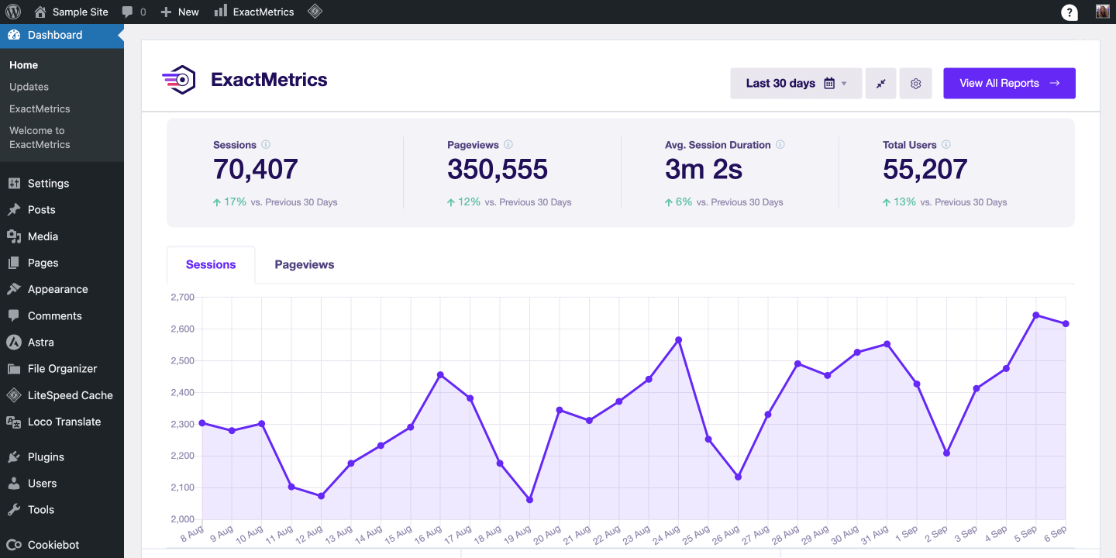
With ExactMetrics, you don’t need to insert individual code snippets on your site or create complicated tags in GTM. You can focus more on your content and less on the technicalities, and there’s no need to worry about tracking errors due to incorrect setup, placement, or missing tags.
Whether you’re a beginner interested in advanced tracking and a little overwhelmed by Google Tag Manager or a seasoned pro looking for a time-efficient solution to streamline your tracking, ExactMetrics can help.
Let’s take a closer look at a few of the things that make ExactMetrics a better alternative to Google Tag Manager.
Link and Button Click Tracking
Want to track the clicks on links and buttons on your site? Google Analytics doesn’t do this by default. That means you’d have to manually set up tracking for each link or button in Google Tag Manager or by adding individual pieces of code. But with ExactMetrics, tracking user interactions on your website is a piece of cake!
No need to fret over complicated tag implementation, you can quickly track button clicks and links without any additional setup. Take a look at some of the things you can track with ExactMetrics:
- Outbound links – Stay on top of which sites you’re directing traffic to
- File download links – Determine how many people are downloading your freebies, PDF files, or any other downloadable content, including custom file types.
- Click-to-Call or Email links – Know how many visitors are attempting to contact you through a mailto or tel link on your site.
- Affiliate links – Set up affiliate link tracking to monitor and grow your revenue.
- Add-to-Cart buttons – Find out which products are popular among visitors by tracking your add-to-cart button.
- Call-to-Action buttons – Improve conversions when you start tracking clicks on your CTA buttons.
- Video Play Tracking – Track YouTube, Vimeo, and HTML5 videos on your site and see a media report right inside WordPress with the number of plays, average watch time, average percent watched, and completion rate.
Form Submission Tracking
Google Analytics 4’s form conversion tracking has a number of limitations that make it pretty unreliable. So, most users resort to Google Tag Manager where they have to add tags for each form on their site.
It can take a lot of time to do that for every form on your site (contact form, order form, survey form, etc.). Not to mention, it can be a challenging process for beginners. Luckily, ExactMetrics provides a much better solution.
Just install the Forms Addon to get automatic form conversion tracking on all WordPress form types in 1 click. Plus, find out which forms are performing best in an easy-to-understand report right inside WordPress. Quickly see the number of impressions, conversions, and conversion rates for all your forms.
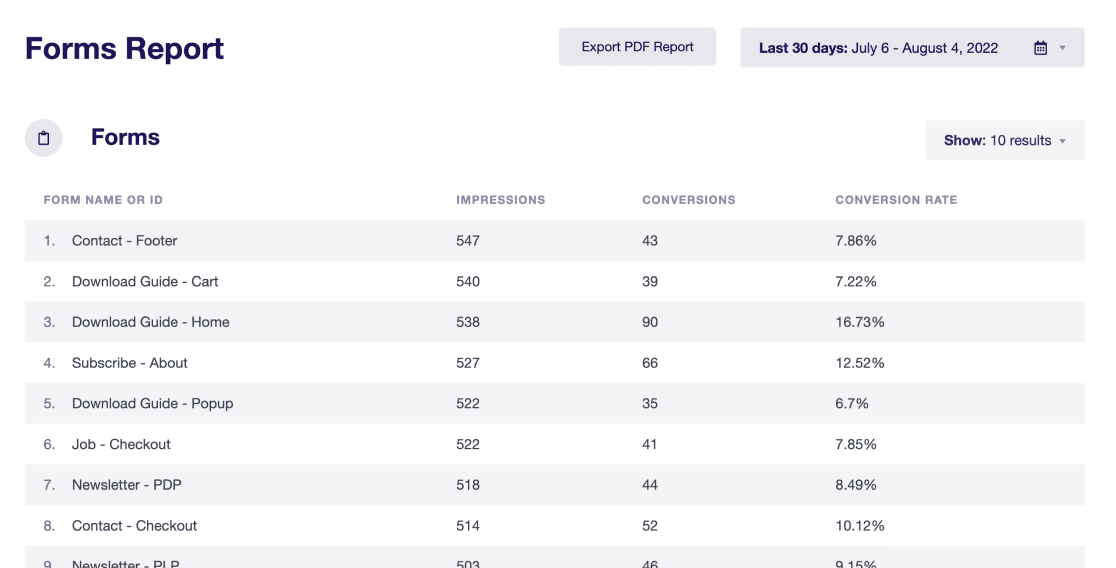
Head to ExactMetrics » Reports » Forms from your WordPress menu to access the Forms report. Want to find out where visitors who submit a form are coming from? Learn how to track your form conversion source.
Scroll Depth Tracking
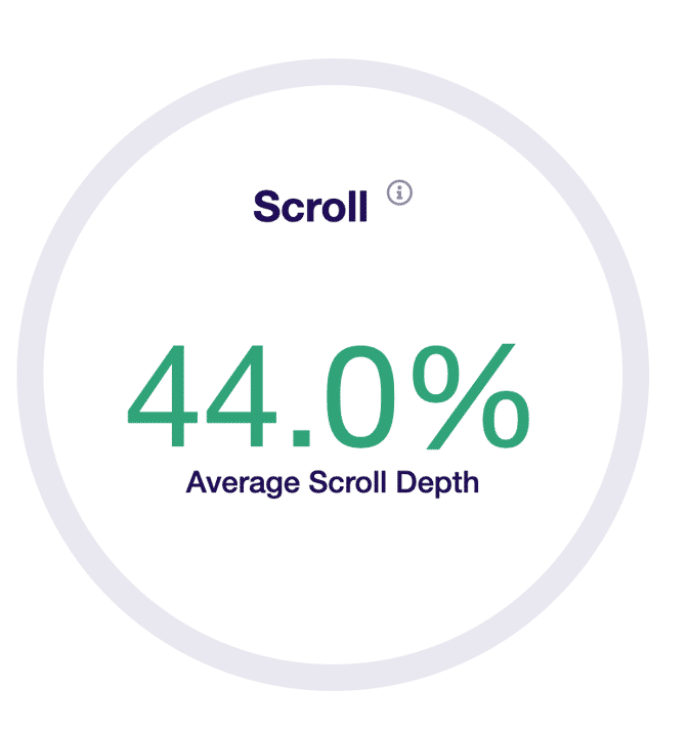
Knowing how far users scroll on your site can provide valuable insights into the effectiveness of your content and design. Use this data to optimize the location of your call-to-actions, understand what content keeps visitors on your web page, and identify pages where users leave quickly.
Thankfully, more precise scroll tracking is automatic when you use ExactMetrics. Use scroll depth tracking to get a better understanding of your visitors without the hassle of setting it up in Google Tag Manager.
1- Click eCommerce Tracking
Looking for a simple solution for tracking your eCommerce performance? With ExactMetrics, there’s no need for complicated coding or configuration. Just install the eCommerce Addon to get advanced Google Analytics tracking for your online store up and running in a matter of seconds.
Easily track top products, conversion rates, transactions, revenue, conversion sources, coupons, and more right from your WordPress dashboard reports.
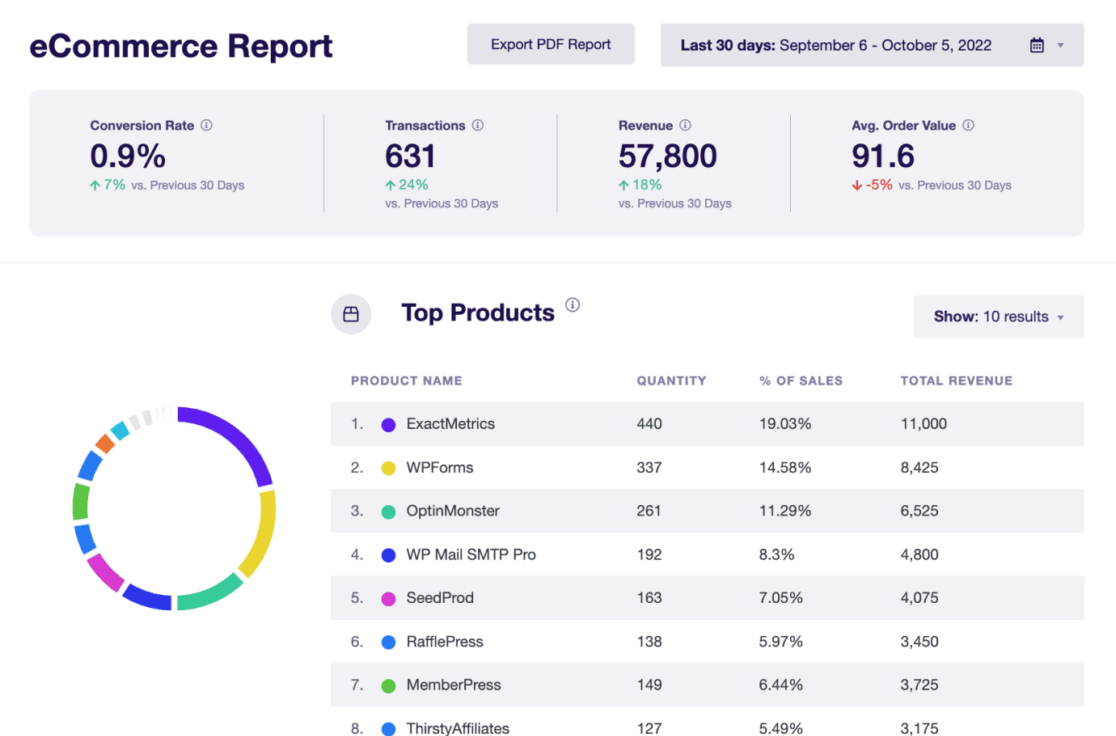
Plus, you’ll be able to uncover which pages customers visit, products they add or remove from their cart, abandoned checkouts, and more to better understand their behavior.
You can even use the User Journey report in ExactMetrics to see every step a visitor takes on your site before making a purchase and how long each step took.
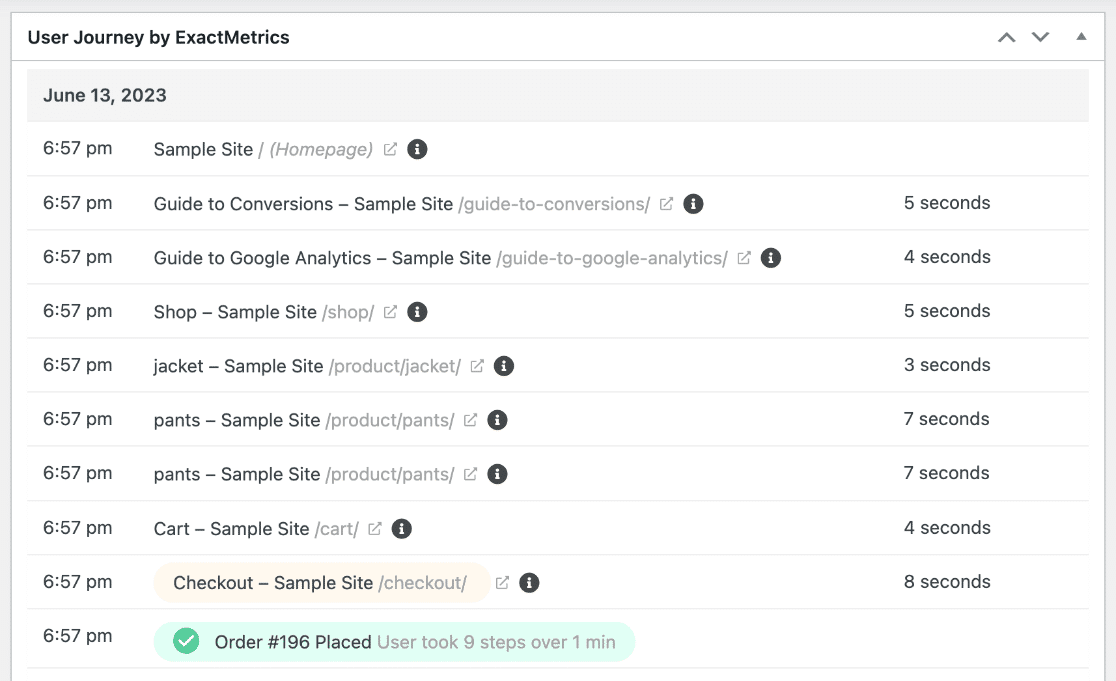
As you can see, ExactMetrics is a powerhouse for Google Analytics tracking on WordPress. Why fumble with codes and complicated setups if you don’t have to? Ready to skip Google Tag Manager and start tracking events the easy way?
How to Add Google Tag Manager to WordPress
Let’s jump right in and learn how to install Google Tag Manager in WordPress. Just follow the steps below to have GTM set up in no time.
- Step 1: Sign Up for a Google Tag Manager Account
- Step 2: Add Tag Manager Code to WordPress
- Step 3: Create a New Tag for Your Website
Step 1: Sign Up for a Google Tag Manager Account
The first thing you’ll need to do is sign up for a Google Tag Manager account. Head over to the Google Tag Manager website and click on Start for free.

Next, sign in with your Google account. Now, you’ll see Google Tag Manager’s create an account page. Click on the button that says Create account.
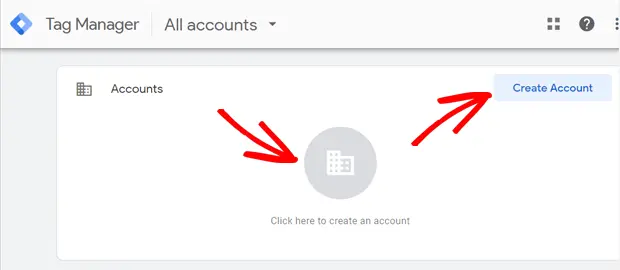
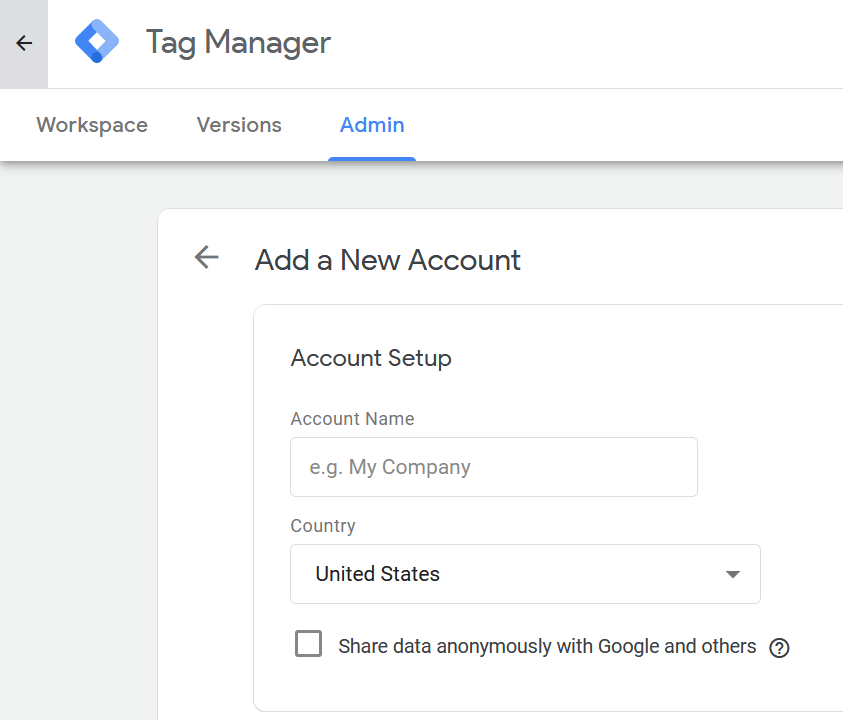
A new page will open where you’ll be asked to create a new GTM account. Enter an account name (this can be your business name) and select a country under Account Setup.
You can also check the option if you want to share your data anonymously with Google.
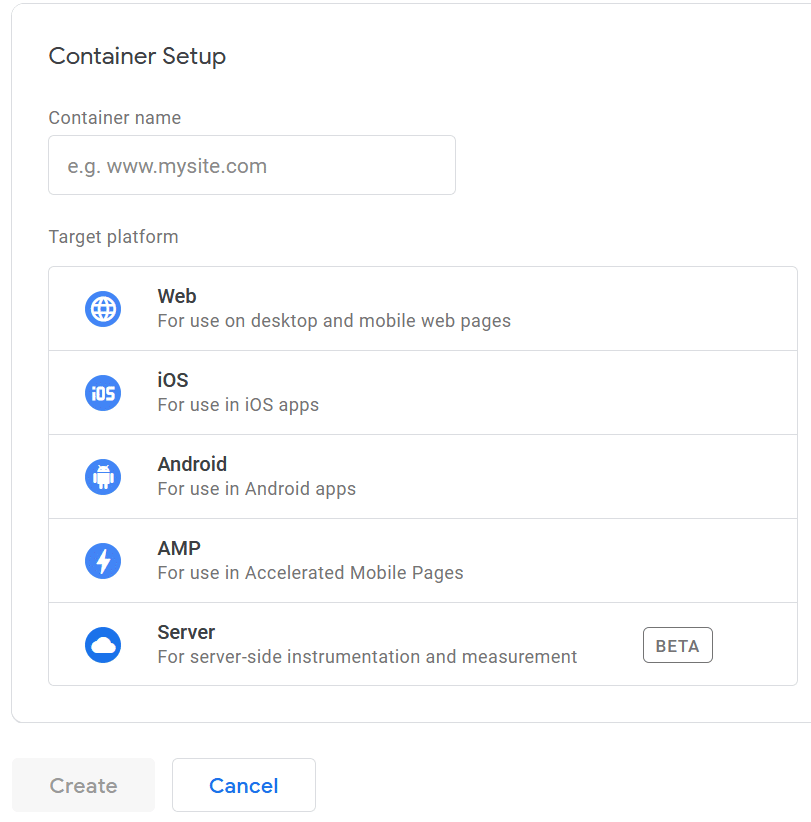
Next, you’ll set up your Google Tag Manager container. A container is the collection of tags, triggers, and configurations installed on a website, mobile app, or server.
Go ahead and enter a Container Name (the website where you’ll install Google Tag Manager). Since we’re setting up Google Tag Manager for WordPress, select Web as the option, and click Create.
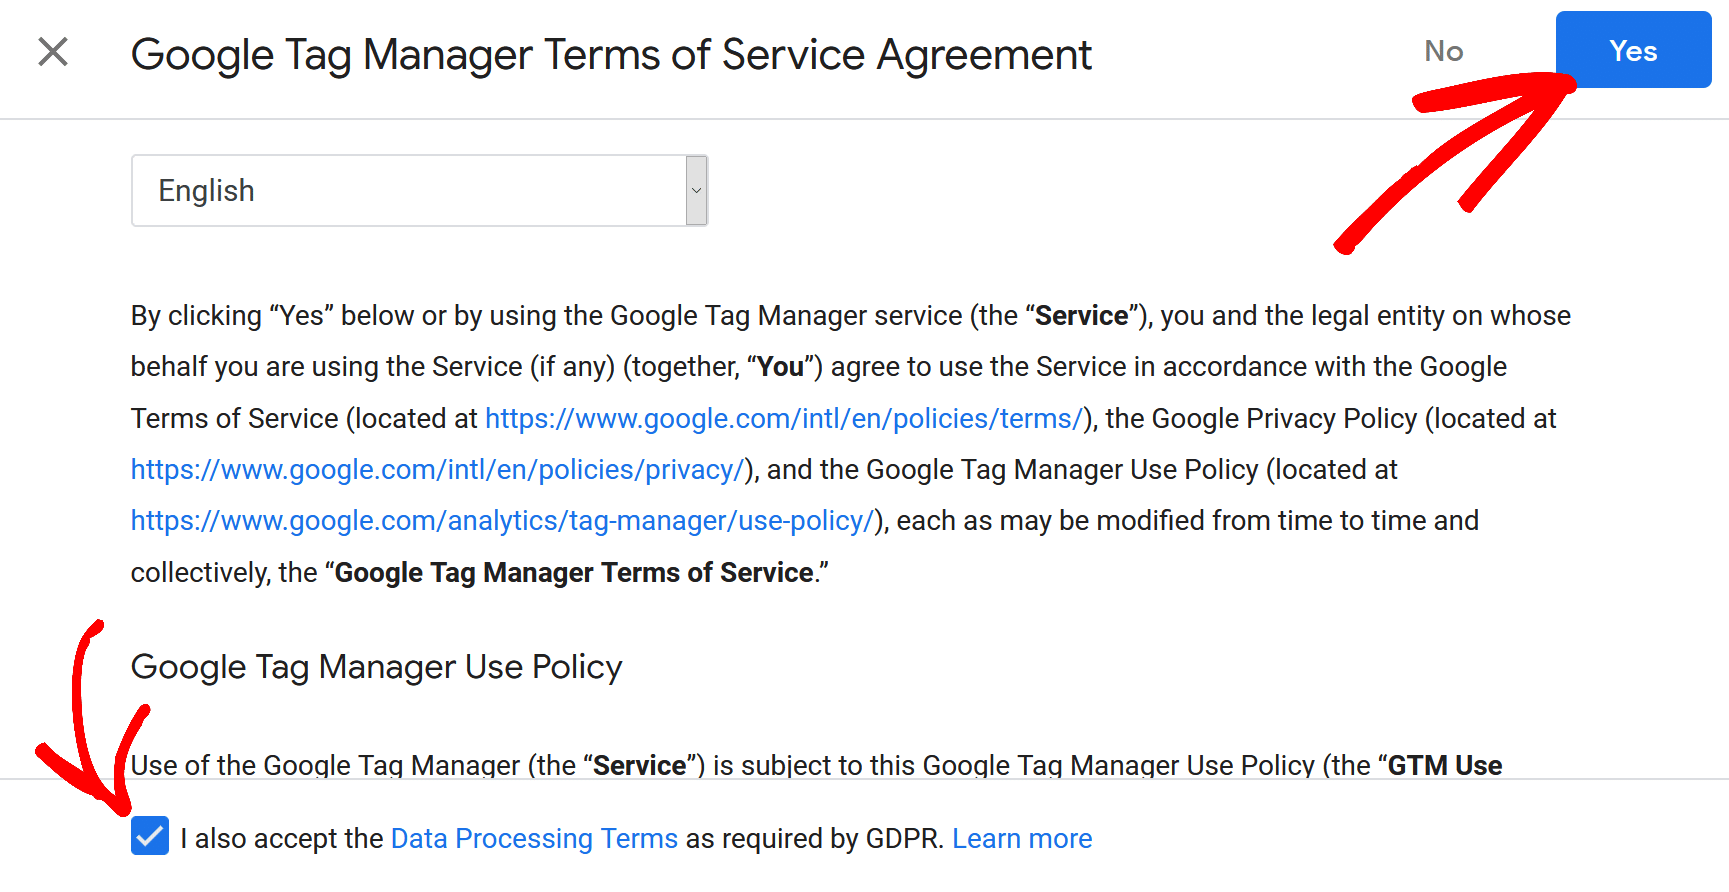
You’ll then have to agree to Google Tag Manager’s Terms of Service Agreement.
Simply check the box next to I also accept the Data Processing Terms as required by GDPR and click Yes in the top right corner.
Curious about GDPR? Check out our guide: GDPR and Google Analytics 4: How to Make Your Site Compliant.
Once you’ve signed up and agreed to the terms, you’ll be provided with two Google Tag Manager code snippets that will need to be added to your header (inside <header> tag) and in the <body> section on all of your webpages.
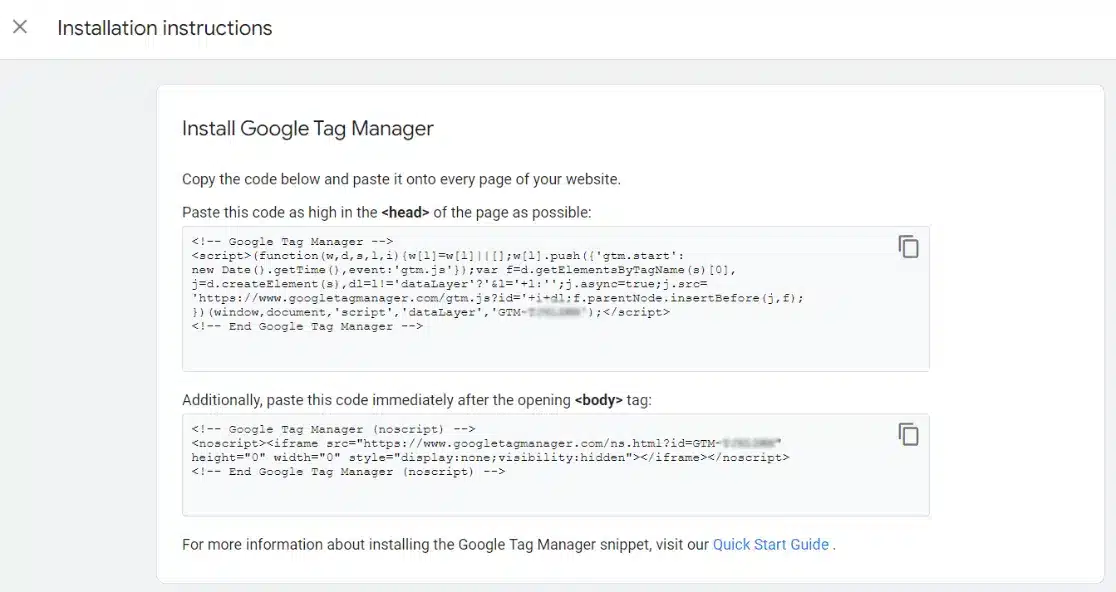
Don’t worry, you don’t need to know any code to handle these. Just keep this tab open, and we’ll come back to it.
Step 2: Add Tag Manager Code to WordPress
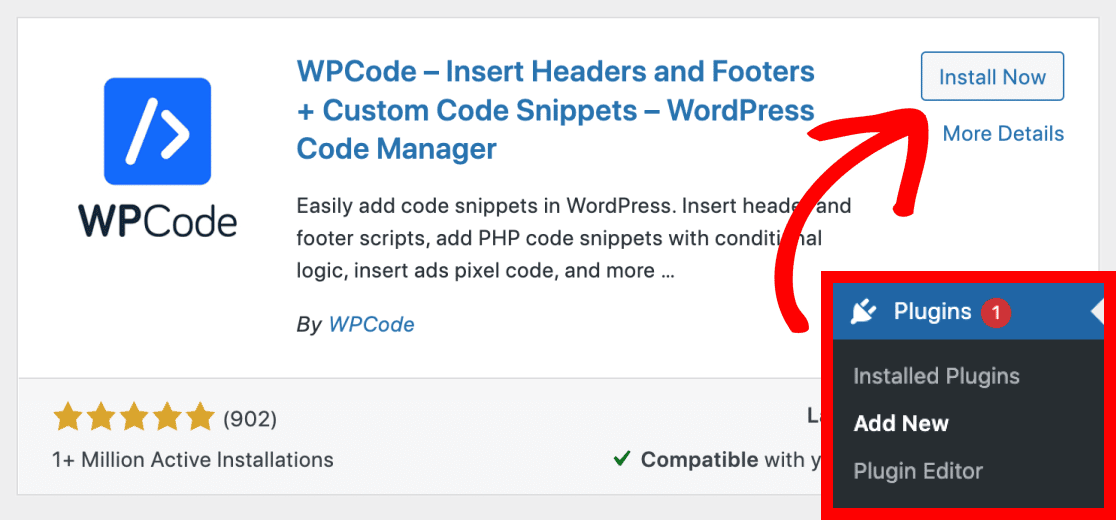
If you’re not a developer, it’s better to use a WordPress plugin to install your Google Tag Manager code. To easily enter GTM codes, you can use the free version of WPCode. All you’ll have to do is paste the code in the plugin and it’ll automatically insert it on your WordPress website.
Go to your WordPress dashboard and click on Plugins » Add New. Now search WPCode in the search bar and click Install Now. When the button changes, click Activate.
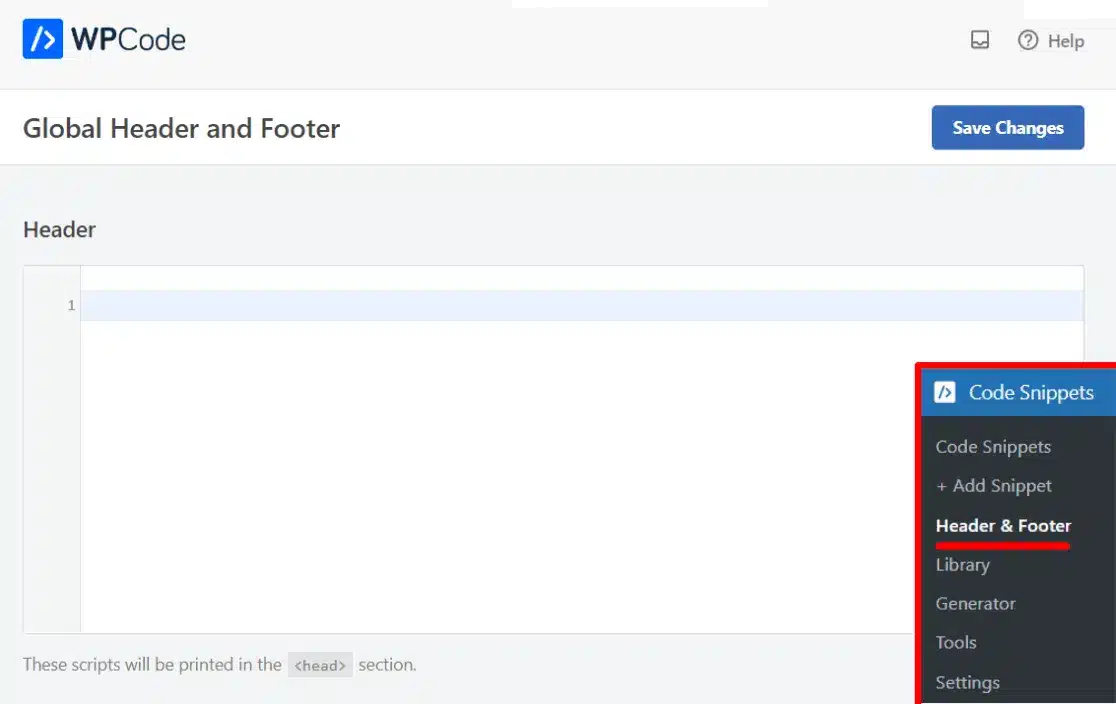
Once the plugin is installed and activated, go to Code Snippets » Header & Footer.
Here, you can see a box for adding code to your header, body, and footer.
Now, go back to your Google Tag Manager account.
Copy the Google Tag Manager code that’s in the first box, and paste it into the WPCode Header box. Do the same thing with the second GTM code and paste it in the Body section.
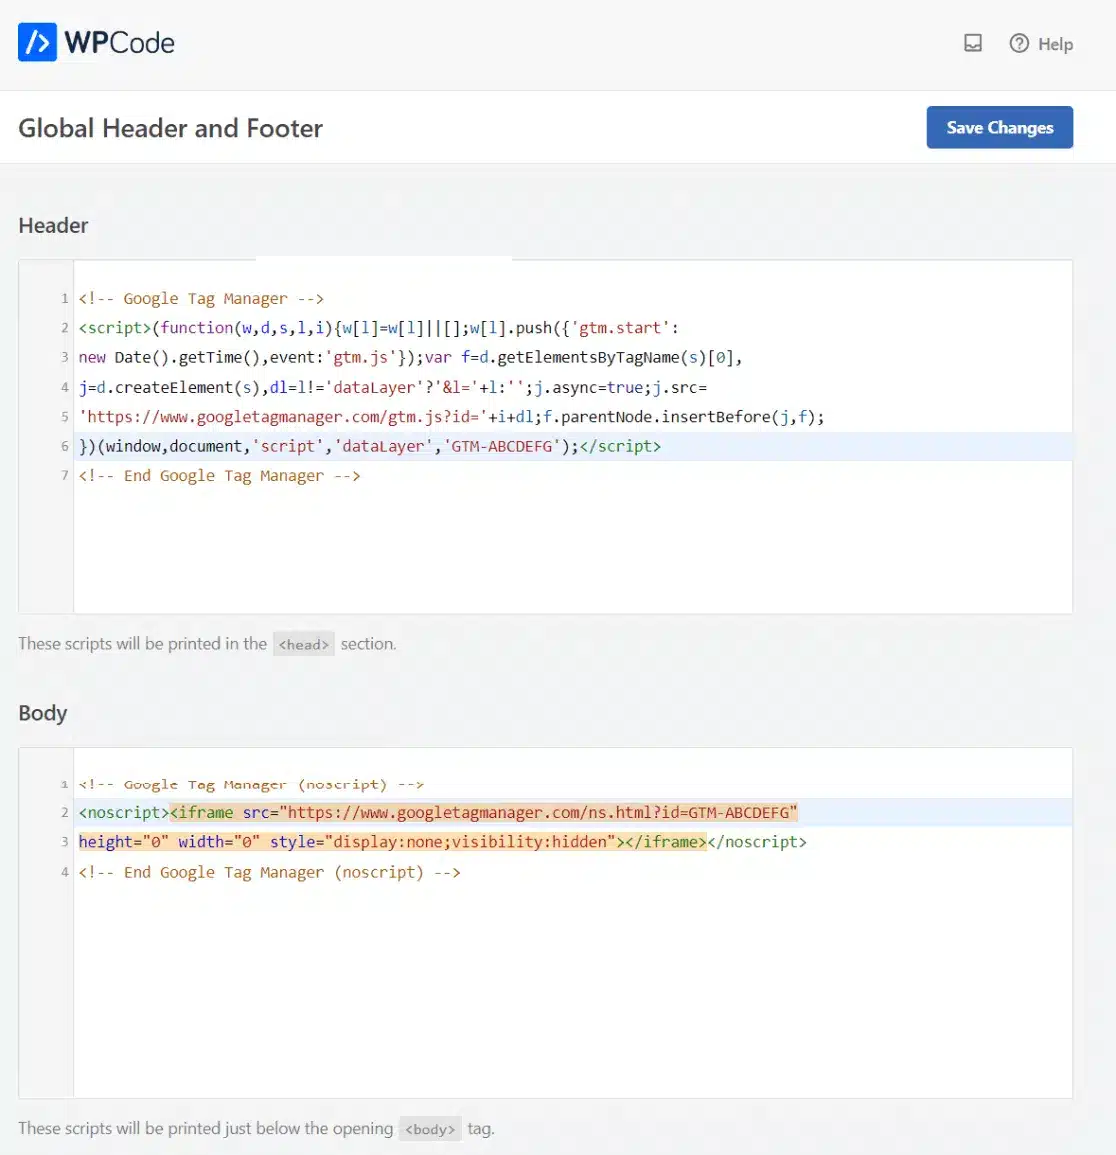
Click Save Changes in the top right corner once you’re done.
Congrats! You’ve added Google Tag Manager to WordPress, and you’re ready to use Google Tag Manager to install any tracking code on your website.
Step 3: Create a New Tag for Your Website
You can now create tags for your website to start tracking custom user interactions and more.
Google Tag Manager is quite versatile and supports over 50 tag types, giving you the flexibility to work with other Google marketing services and third-party tools. You can even add custom HTML or JavaScript tags through the Google Tag Manager interface.
To create your first GTM tag, go to your Workspace. Click on Add a new tag, and then follow the steps.
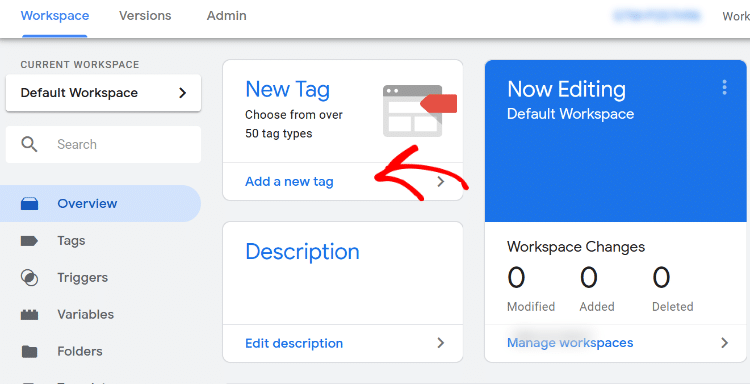
In the first step, give a name to your tag a name at the top. Then, click on the circle icon in the Tag Configuration box.
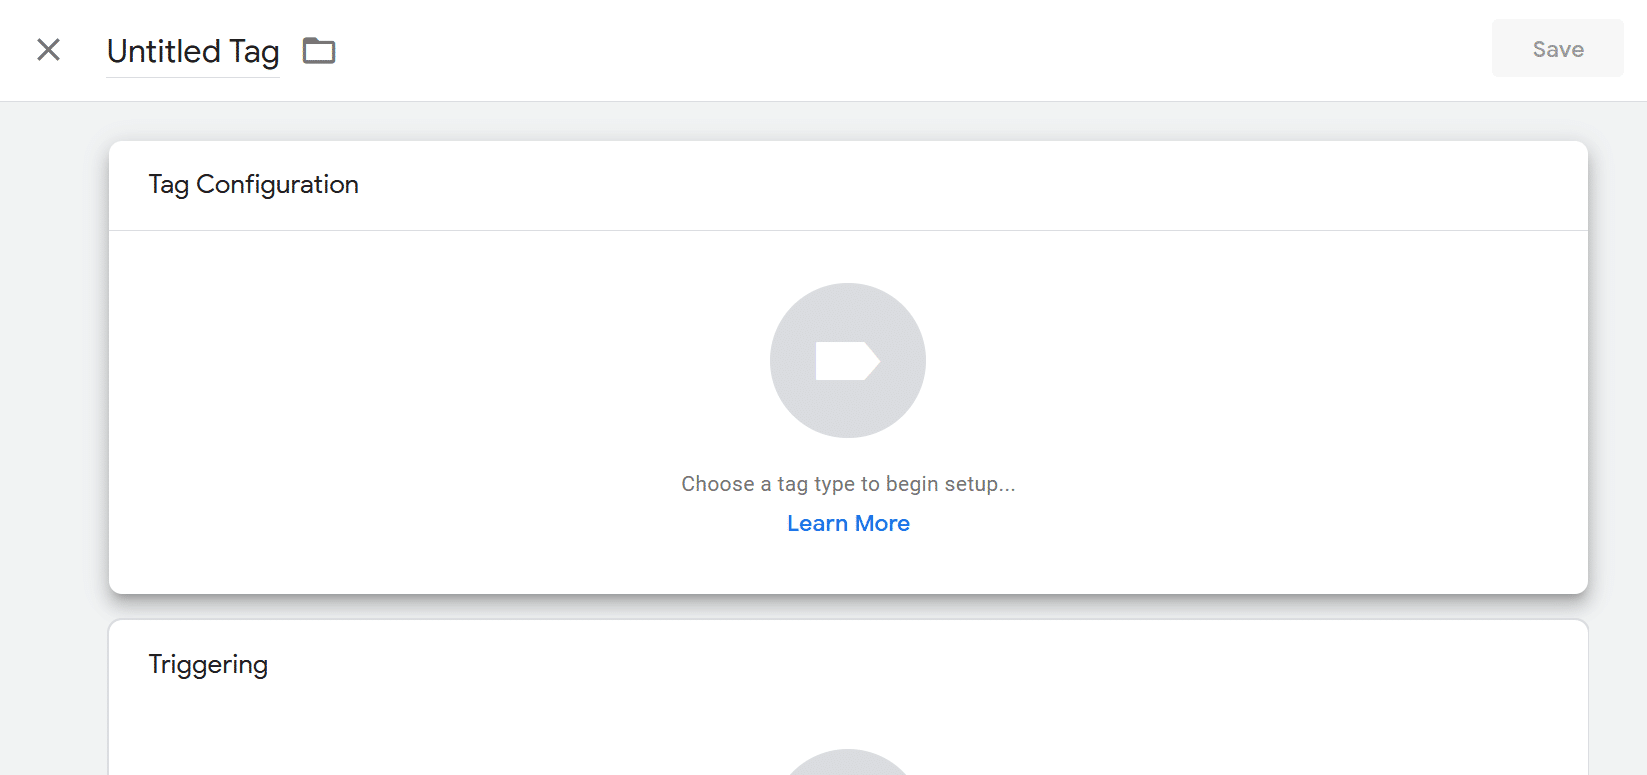
Next, select the tool you want to connect Google Tag Manager with. After that, you’ll be able to proceed with configuring and launching your tag in GTM.
Note: The GA4 configuration tag has been replaced by the Google Tag, which you can use in combination with the Google Analytics: GA4 Event Tag to create custom events to track in Google Analytics. To learn more about configuring Google Analytics 4 with Tag Manager head to Google’s instructions.
That’s it for this tutorial! We hope this article helped you learn how to set up WordPress Google Tag Manager. You can now use GTM to track tons of things on your website. If you’re looking for an easier way of setting up advanced tracking, make sure to give ExactMetrics a try!
If you enjoyed this article, be sure to check out our post on How to Create Google Alerts (Tutorial + Best Uses).
Not using ExactMetrics yet? What are you waiting for?
Don’t forget to follow us on Twitter and Facebook to see all the latest reviews, tips, and Google Analytics tutorials.

