Are you wondering how to set up conversion tracking in Google Ads? Using Google Ads conversion tracking with your Google Analytics account and WordPress website lets you measure the success of your Ads campaigns and optimize them to increase sales!
You can track conversions on your Google Ads campaign (previously known as an AdWords Campaign) to find out how people interact with your site after clicking on your ad.
For example, knowing whether they completed a conversion action, like making a purchase or signing up for a newsletter, helps you optimize your marketing strategy going forward.
What is Conversion Tracking?
Conversion tracking is simply measuring a specific action that you’ve decided is valuable. It could be clicking a button, purchasing from your eCommerce store, signing up for your newsletter, a page view, a phone call to your business, or any other action you decide is valuable.
What’s the Benefit of Conversion Tracking in Google Ads?
Google Ads conversion tracking helps you improve the return on your marketing investments by showing you what actions your visitors take after they click an ad.
What Can Conversion Tracking Help You Measure?
Conversion tracking helps you measure the effectiveness of your Google Ads campaigns by showing which keywords, ads, and campaigns are the most profitable. This data helps you optimize your strategy for ad conversions and make educated decisions about which ads to spend more money on.
Google Ads tracking can also help you optimize your retargeting and dynamic remarketing strategies. The more data you have about your marketing campaigns, the better they will be, which is why using Google Analytics conversion tracking with Google Ads is a powerful combo for small businesses.
In this article, we’ll show you how to set up Google Ads conversion tracking. In only a few steps, you’ll be able to track conversion actions easily for Google Ads shopping and all your other campaigns. You’ll also learn how to link and track campaigns with Google Analytics to maximize your Google Ads insights.
Set Up Google Ads Conversion Tracking in GA4
These are the steps we’ll look at to learn more about Google Analytics conversion tracking and how to track conversions in Google Ads.
Table of Contents
- Set Up ExactMetrics
- Step 1: Download & Install ExactMetrics
- Step 2: Connect Google Analytics
- Step 3: Install Google Ads Conversion Tracking Addon
- How to Set Up Google Ads Conversion Tracking
- Step 4: Create a Google Ads Conversion Tracking Action
- Step 5: Customize Your Google Ads Conversion Tracking Action
- Step 6: Add Conversion Tracking Tags to ExactMetrics
- Step 7: Add the Event Snippet to Google Ads Landing Page
- Link Google Ads to Google Analytics 4
- Step 8: How to Connect Google Ads to Google Analytics (GA4)
- FAQ: Should You Link Google Ads and Google Analytics? (GA4)
Set Up ExactMetrics
Step 1: Download & Install ExactMetrics
ExactMetrics is the best premium WordPress analytics plugin. Setting up conversion tracking in Google Ads only takes a few clicks with ExactMetrics. Plus, you’ll get tons of Google Analytics tools to track media, downloads, forms, Meta Ads with conversion tracking pixels, and lots more.
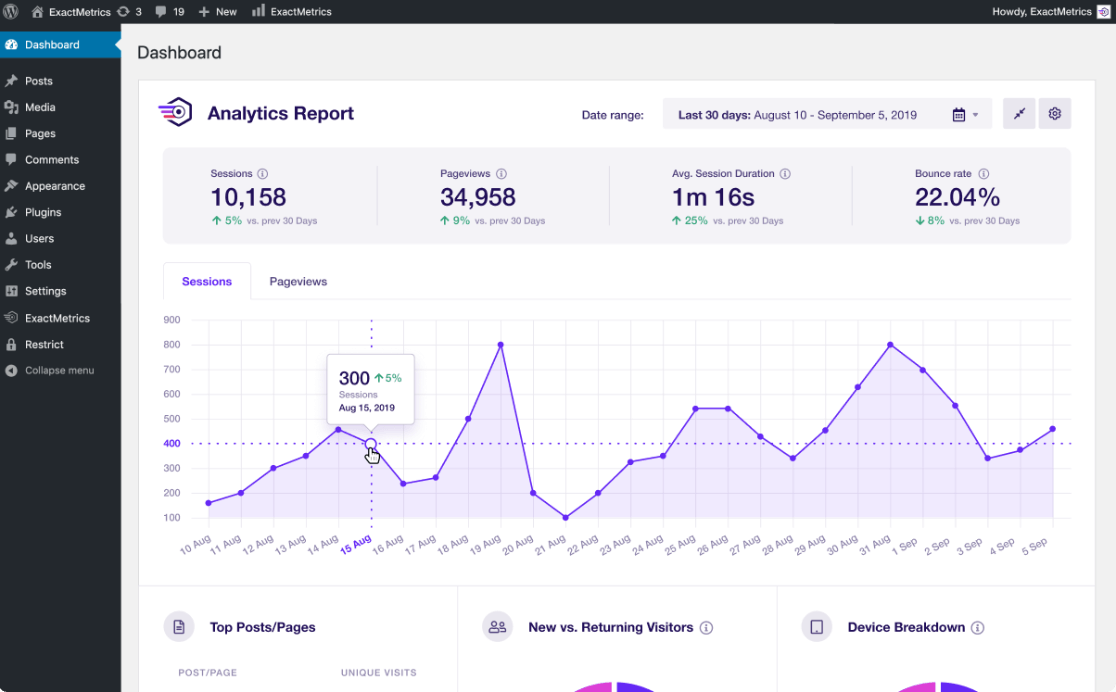
To access the tools for Google Ads conversion tracking you’ll need the Pro license or above.
Head to the ExactMetrics pricing page to get started.
After you’ve purchased your license, we’ll show you how to install the ExactMetrics plugin.
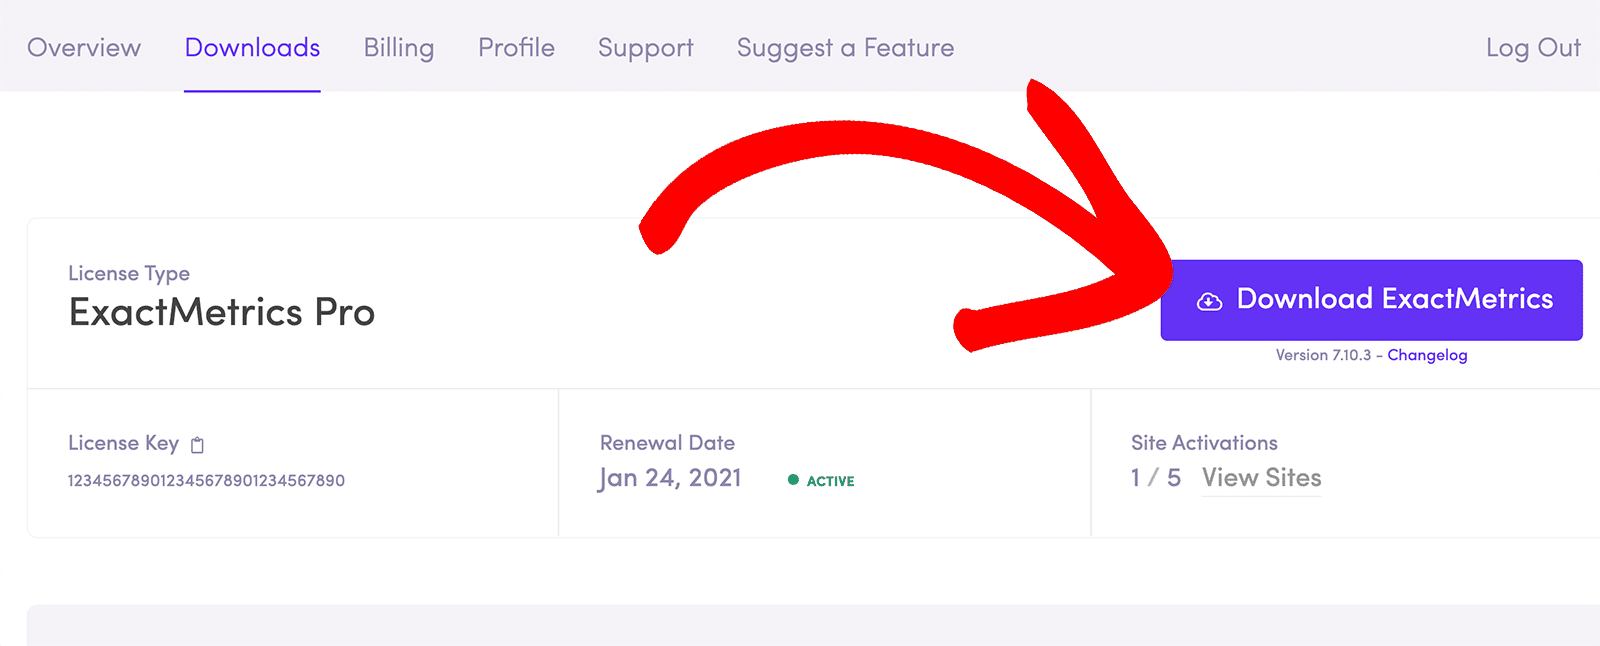
First, from you ExactMetrics account after your purchase, navigate to Downloads and click the button that says Download ExactMetrics:
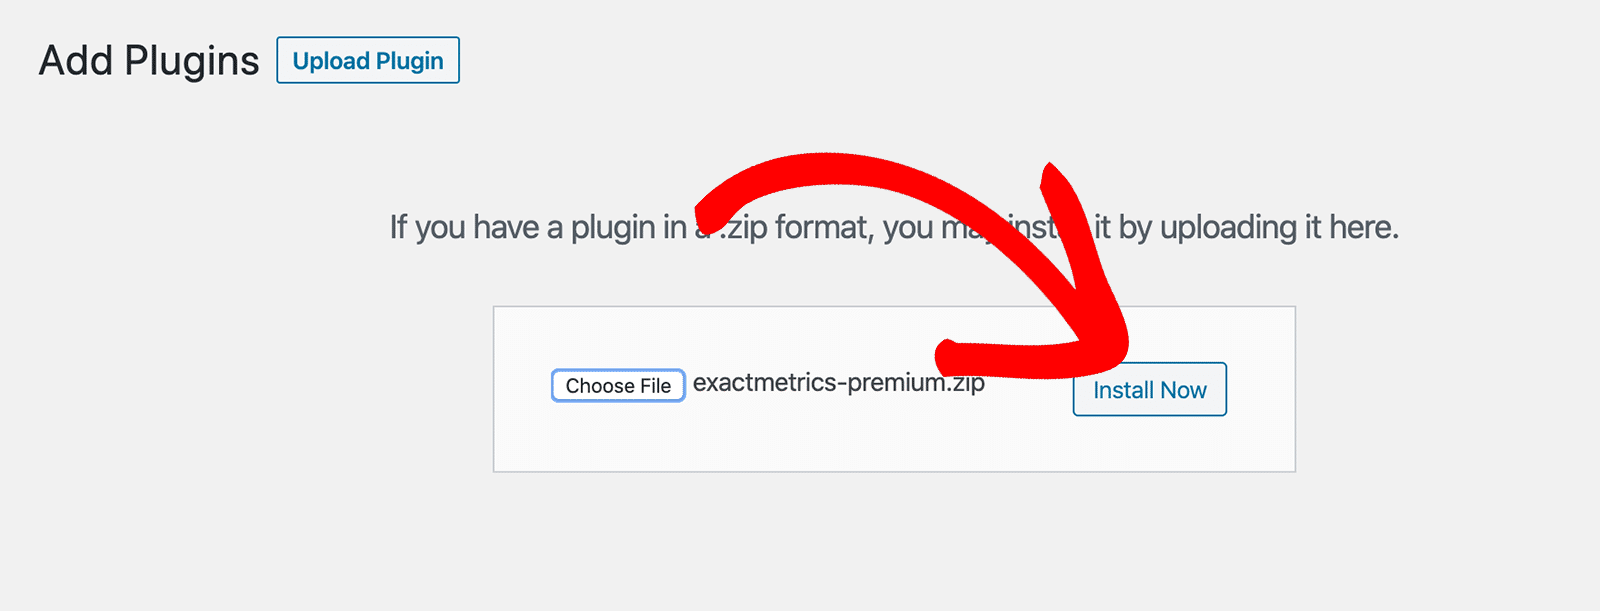
Log in to your WordPress site and navigate to Plugins » Add New. Click the button at the top that says Upload Plugin. Now click Choose File or drag and drop the zip file you downloaded from ExactMetrics. Then you’ll press Install Now:
After the plugin finishes installing, press the Activate Plugin button:

If you need more help installing and activating the ExactMetrics plugin before moving on to Google Analytics conversion tracking in Google Ads, check out our detailed guide for installing ExactMetrics.
Step 2: Connect Google Analytics
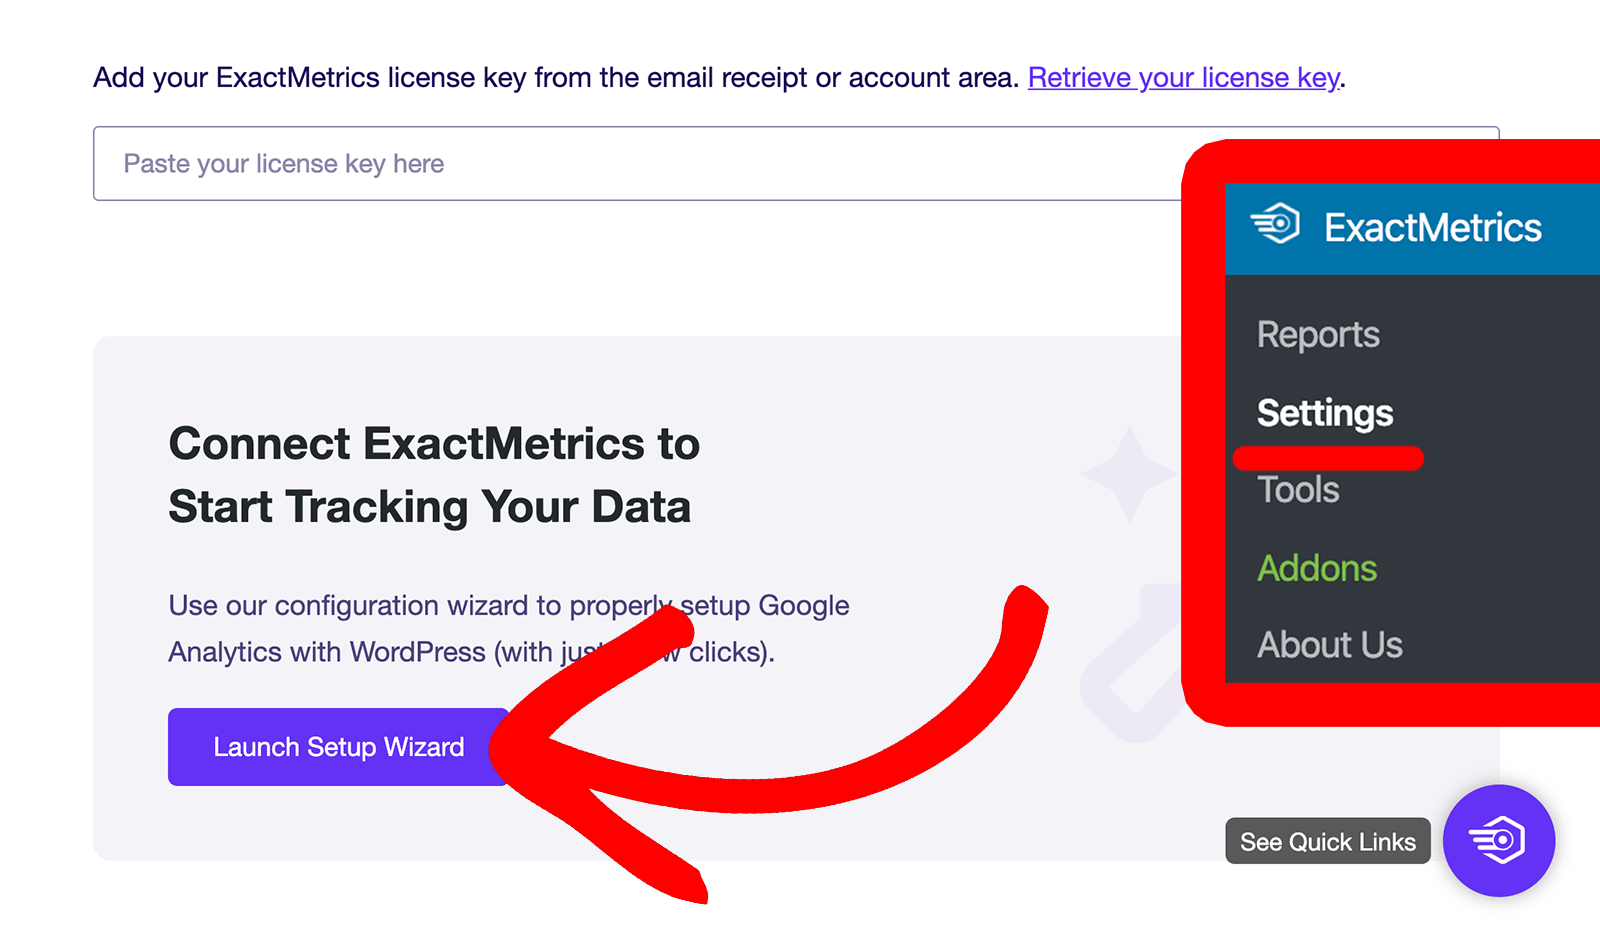
After you’ve installed and activated the plugin, you’ll need to connect Google Analytics. Don’t worry though, ExactMetrics helps you set up analytics for WordPress easily and will automatically take care of proper setup with your global site tag on all pages, so you don’t have to touch any code.
Navigate to ExactMetrics » Settings in WordPress and press Launch Setup Wizard:
Step 3: Install Google Ads Conversion Tracking Addons
Once you have ExactMetrics connected and ready to go, you’ll need to install and activate the PPC Tracking addon.
If you have a website with purchases, and you plan to track eCommerce in Google Analytics and Google Ads, you’ll also want to install the eCommerce addon. Remember, you need the ExactMetrics Pro Plan or higher to access these addons.
Click Addons under ExactMetrics in your WordPress dashboard. Find the one that says PPC Tracking and press the Activate button:
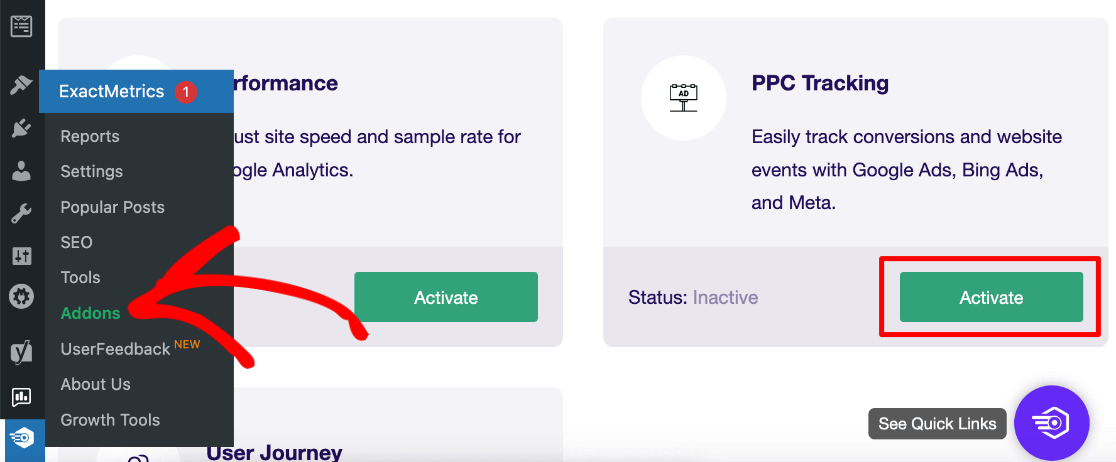
If your site is an eCommerce site, you’ll also need to find the addon that says eCommerce and click the Activate button, if it isn’t already activated:

After you have the ExactMetrics addons activated, head to the next step to set up Google Ads conversion tracking.
How to Set Up Google Ads Conversion Tracking
Next, we’ll show you step-by-step how to set up Google Ads conversion tracking.
Step 4: Create a Google Ads Conversion Tracking Action
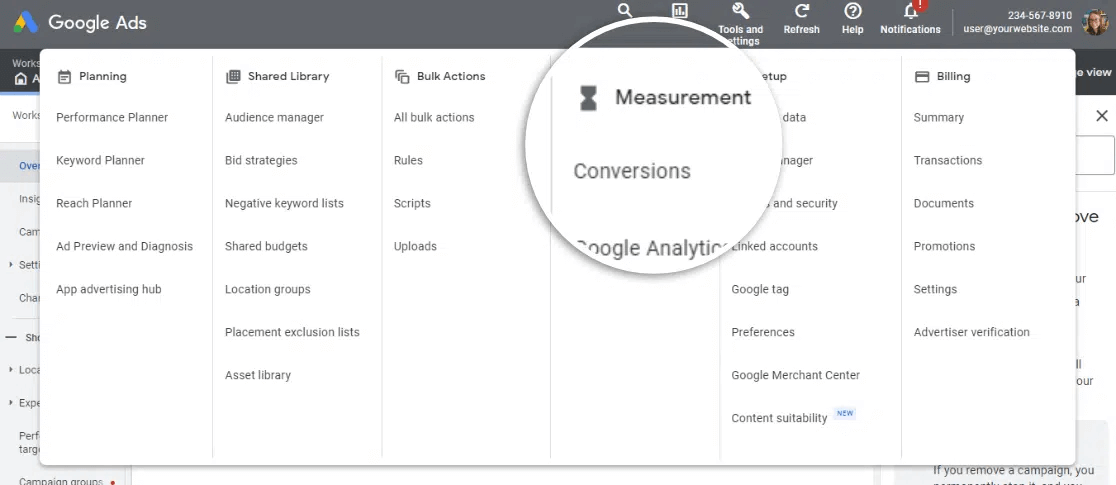
Sign into your Google Ads account and click the Wrench Icon in the top right corner. Under Measurement, click Conversions:
Note: If you don’t see that option, click Settings. Then click Switch to Expert Mode. Now follow the step from above.
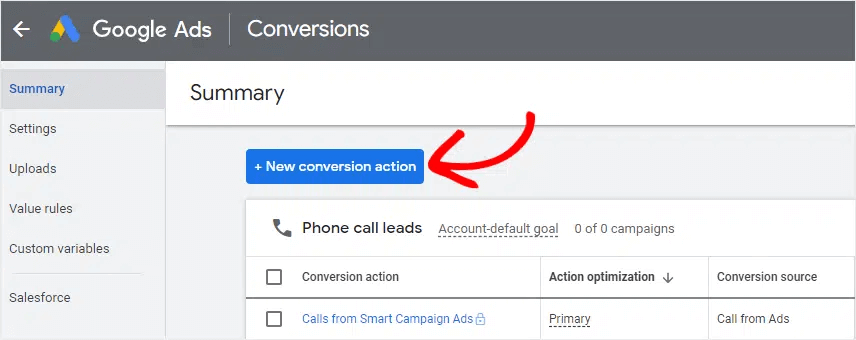
Next, press the blue button + New conversion action:
Now click the Website option:

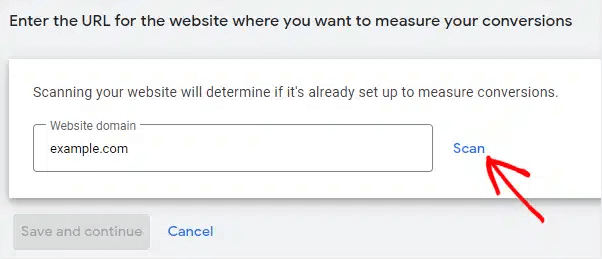
Enter your site domain and press Scan. This lets Google scan your website to see if it’s configured for conversion tracking:
Once it finishes scanning, you’ll be given the option to create a conversion action Automatically or Manually. You’ll need to select manually by pressing + Add a conversion action manually:

Next, we’ll set the conversion parameters for your Google Ads tracking.
Step 5: Customize Your Google Ads Conversion Tracking Action
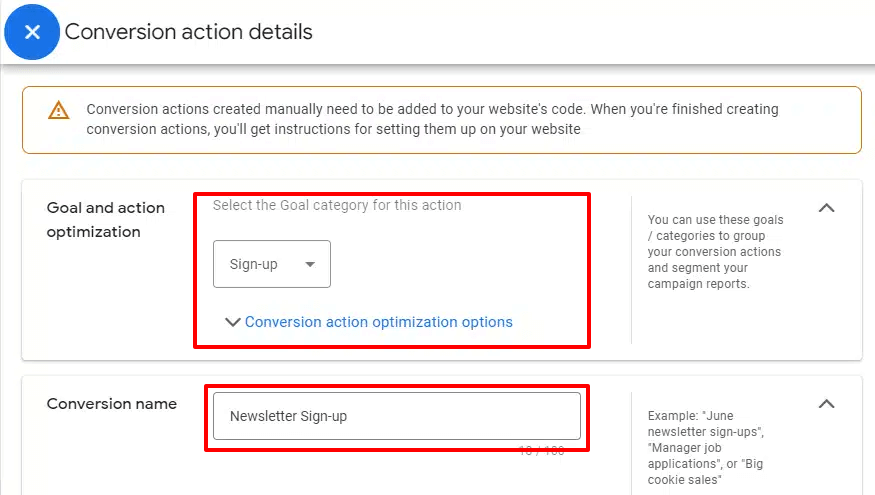
Select a Goal for your action and enter a Conversion Name.
Note: If you’d like to further customize your website conversion tracking Goal, such as changing the conversion window, you can click the Conversion action optimization options drop down.
Next, you need to set the conversion Value and Count. We set the attribution model for Value to be the same for each conversion, and our conversion value is set to $5.
For your Count, choose which conversion count option would allow you to measure and improve your sales or other website actions best. We set our Count to One for our Newsletter Sign-up, so that every subscriber is only counted once for conversion tracking. However, for purchase conversions, you would likely want to set it to Every so that each purchase is tracked as a Google Ads conversion:
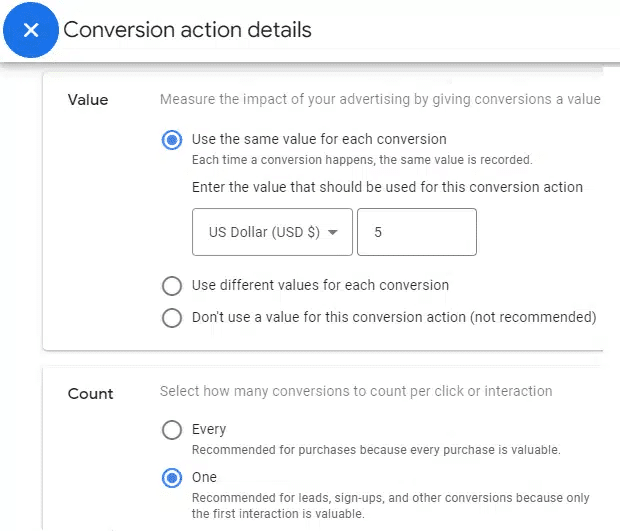
After you’ve finished with your selections, click Done. You’ve now created a new action for conversion tracking in Google Ads. In our Newsletter Sign-up example, everyone who signs up for our newsletter will now be tracked as a conversion, and a $5 value will be assigned to each sign-up.
Go ahead and click Save and continue, then click the option that says Use Google Tag Manager:
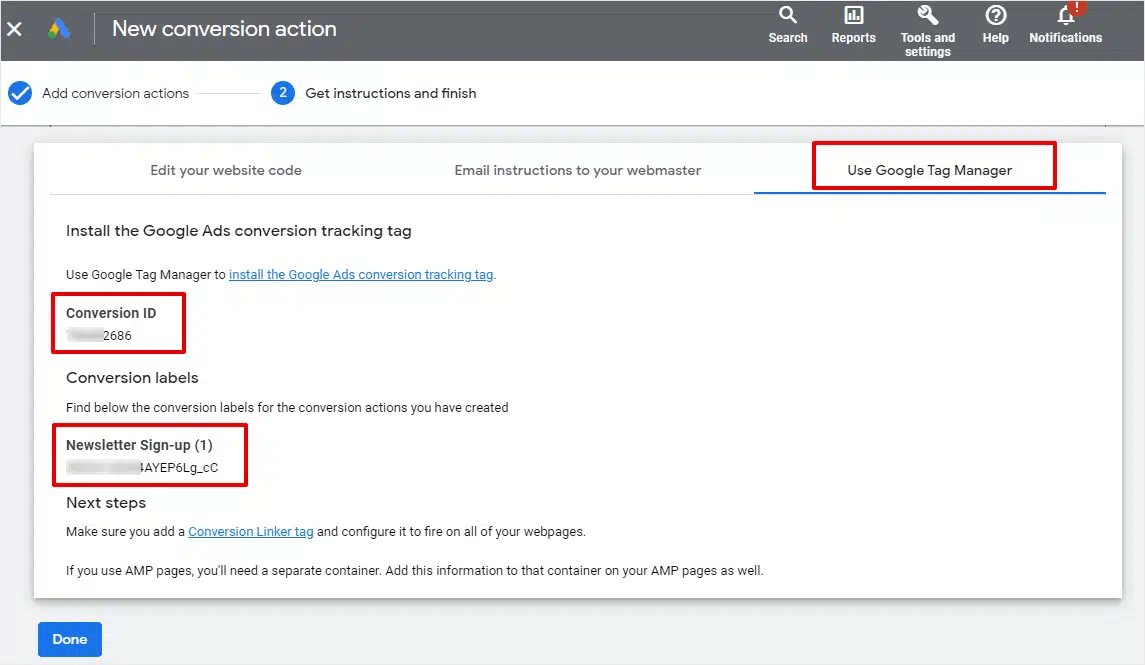
At this point, you should see the Google Ads Conversion ID and Conversion Label, which we’ll use to finish setting up Google Ads conversion tracking in ExactMetrics. Just keep the window open and move on to the next step.
Step 6: Add Conversion Tracking Tags to ExactMetrics
Now it’s time to add your tracking ID info in ExactMetrics. First, copy your Conversion ID that you got in Google Ads during the last step.
In a second window, head back to your WordPress website and navigate to ExactMetrics » Settings. Then click the Conversions tab at the top and the Arrow to expand the section titled Ads Tracking.
Go ahead and paste your Conversion ID in the field. It will be a 9-digit code with the format AW-123456789 or 123456789. Also paste your Conversion Label in ExactMetrics, if required:
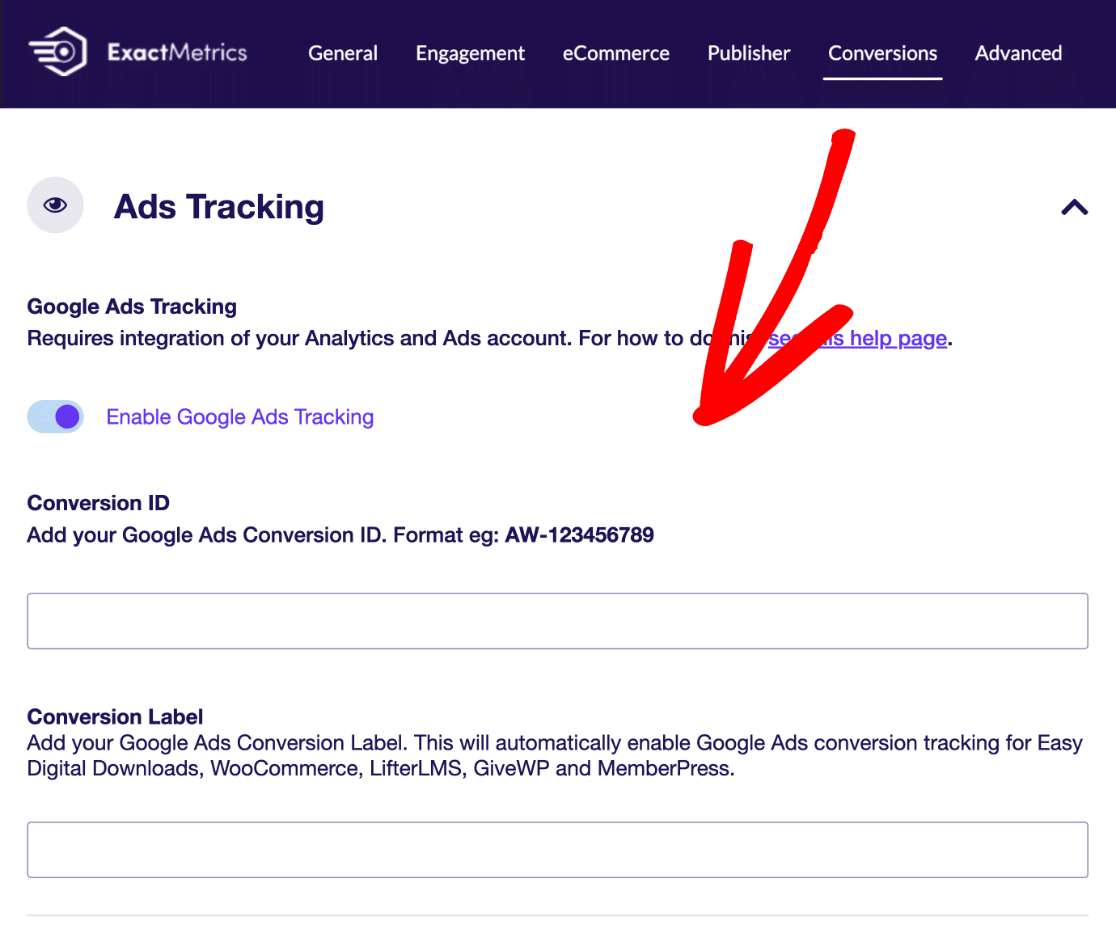
If you’re using Easy Digital Downloads, WooCommerce, LifterLMS, GiveWP or MemberPress, that’s all you need to do for your Google Ads tag setup. After pasting the Conversion Label from Google Ads into ExactMetrics, you can skip to the last step. It will automatically enable Google Ads conversion tracking for ExactMetrics.
If you’re not using Easy Digital Downloads, WooCommerce, LifterLMS, GiveWP or MemberPress, follow along for the next step.
Step 7: Add the Event Snippet to Google Ads Landing Page
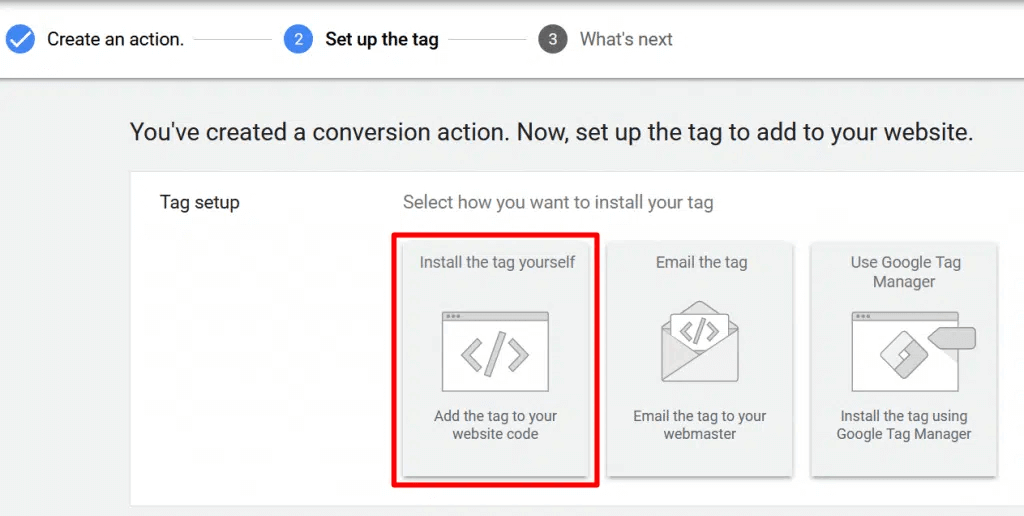
Next up, we’ll need to set up a conversion linker tag so that Google Ads knows the destination for conversion tracking. First, go back to your GTM tab in Google Ads, and click the Back button. Press the option that says Install the tag yourself:
Scroll down to the section titled Event snippet. Now you’ll need to choose whether to track Google Ad conversions on a Page load or a Click. For example, is your conversion a URL destination, like a thank you page view, or is it a click, such as a “sign-up now” button?
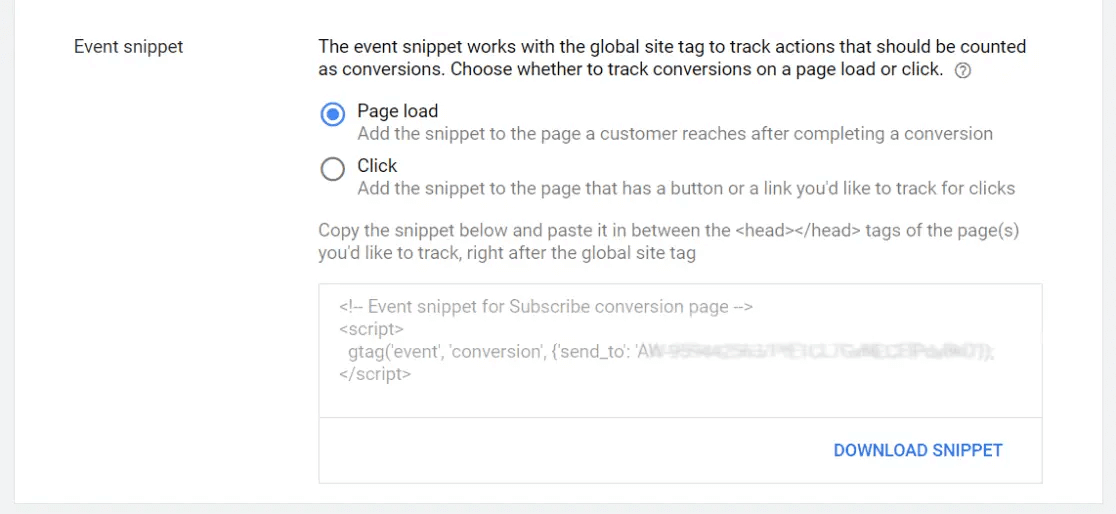
Now you need to copy the tracking code (event snippet) for your tag type, and insert it on the page where your conversion happens.
Google Ads suggests putting the code snippet in your header, but it can also work to place it at the top of the page’s HTML in your WordPress page editor. If that seems a little confusing, you can also use the WPCode plugin to easily insert the code into the header of a specific page.
You did it! You learned how to set up Google Ads conversion tracking in WordPress!
Link Google Ads to Google Analytics 4
Now there’s one more step to make sure you’re using all of the Google conversion tools and Google Analytics tools to get the best Google Ads conversion tracking data and reports.
Step 8: How to Connect Google Ads to Google Analytics (GA4)
We’ll show you step-by-step how to link Google Ads with Google Analytics 4. First, go to GA4, log in, and select the Property that you want to link to your Google Ads.
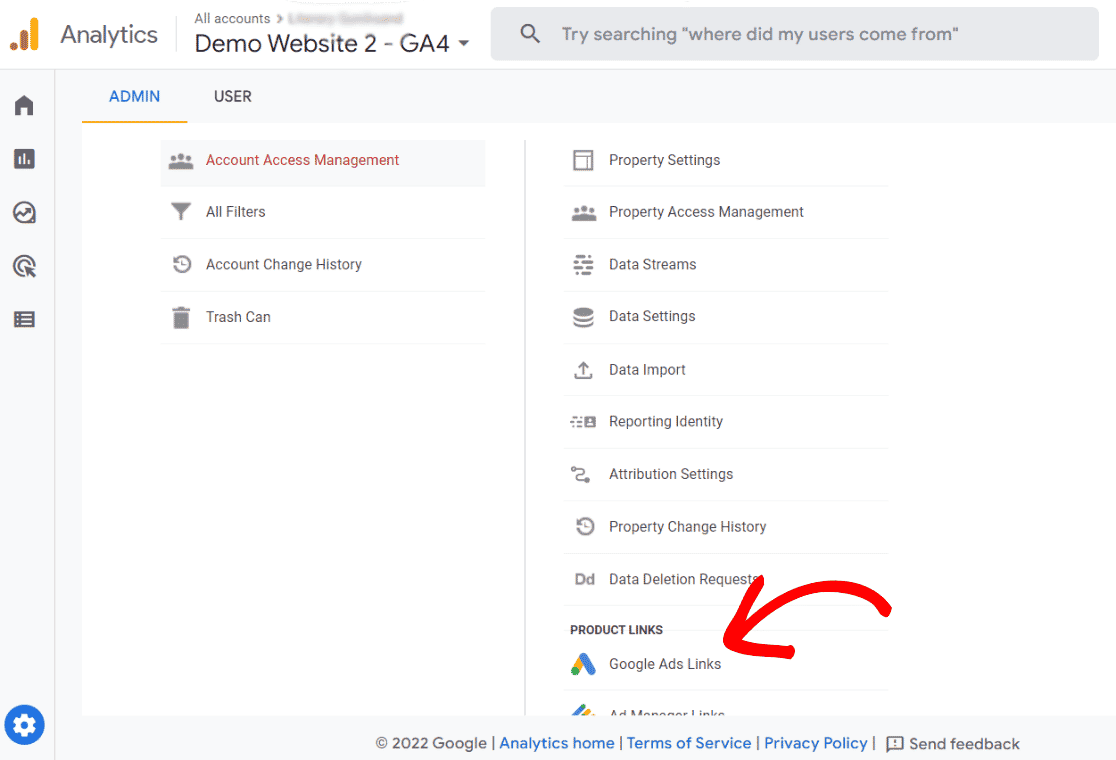
Click the Admin button on the left, and then in the right column, scroll down to find Google Ads Links. Click it, and then press the button that says Choose Google Ads accounts.
Next, you’ll see a list of all the Google Ads accounts that you have edit permissions to and are authorized to connect with. Just click to Check the Box next to the Google Ads account that you want to link to your website’s analytics. Press the Confirm button at the top:
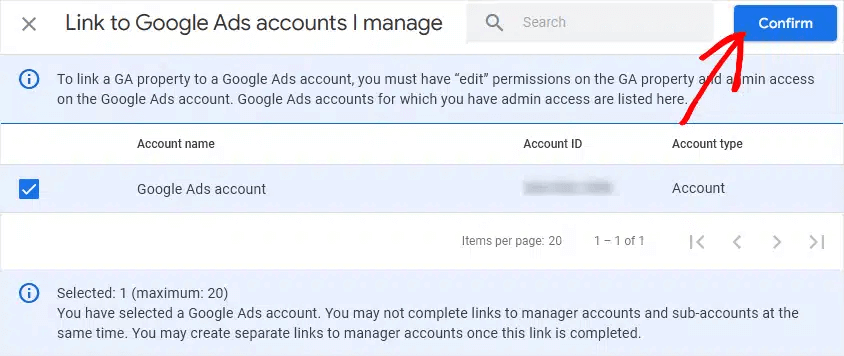
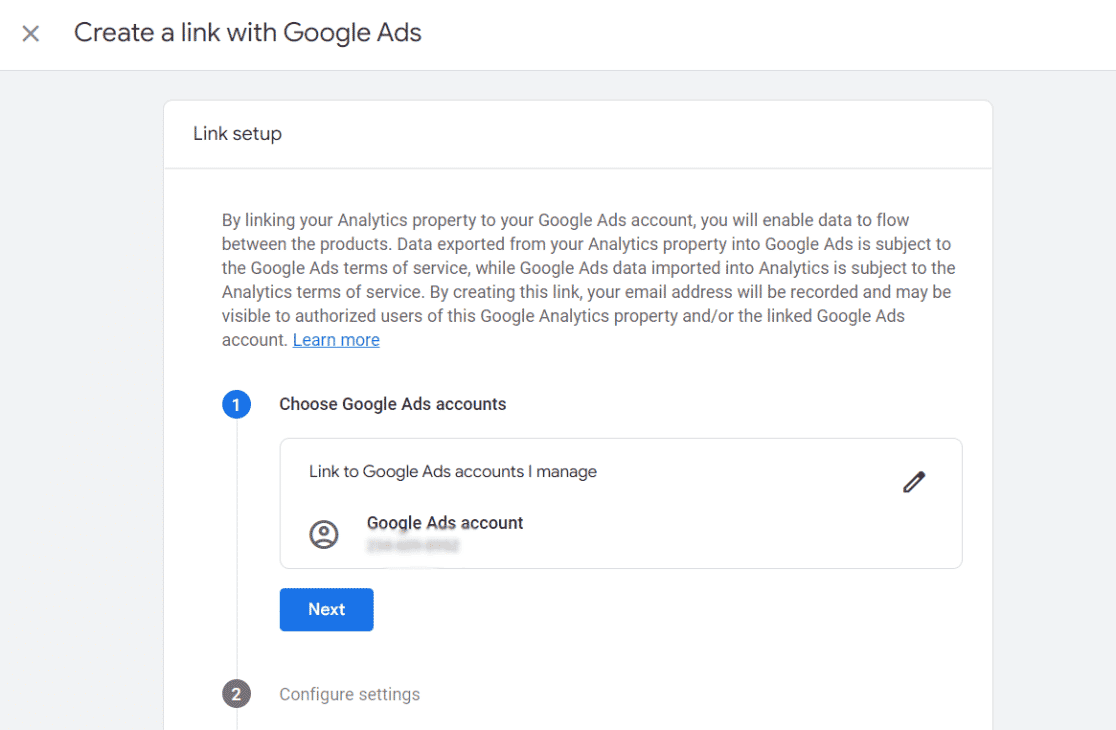
It will take you back to the previous window and you’ll see the Google Ads account you chose for conversion tracking. Go ahead and click Next:
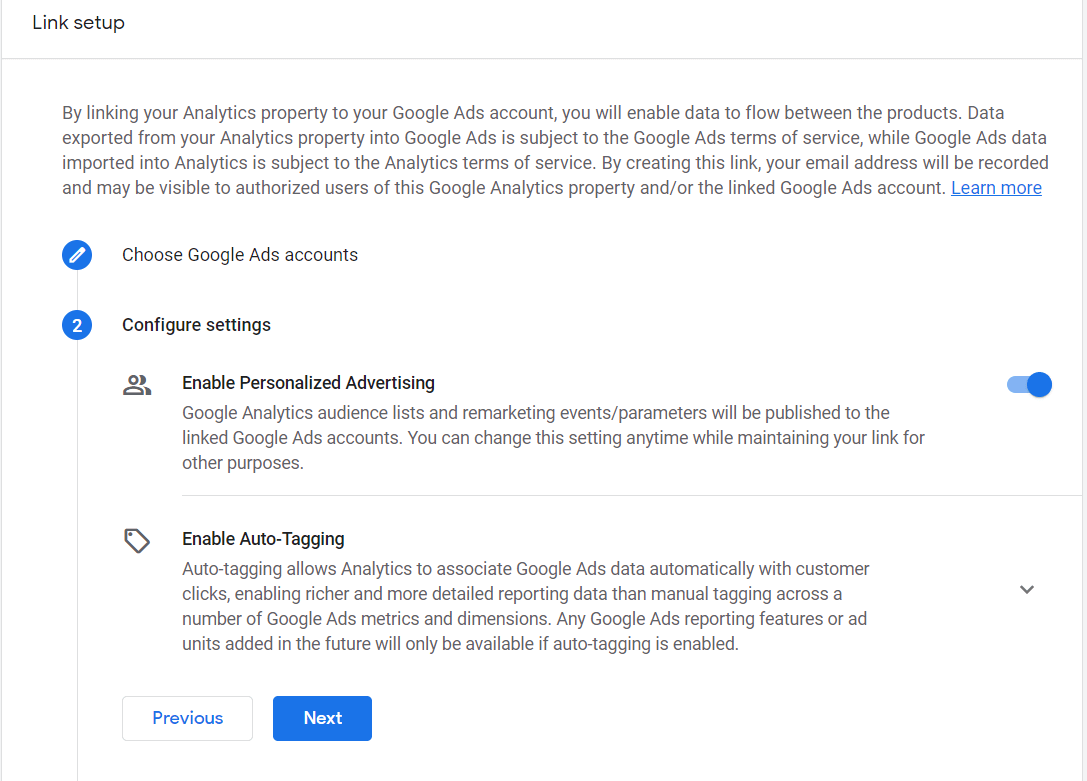
You can leave the default settings as they are and press Next again:
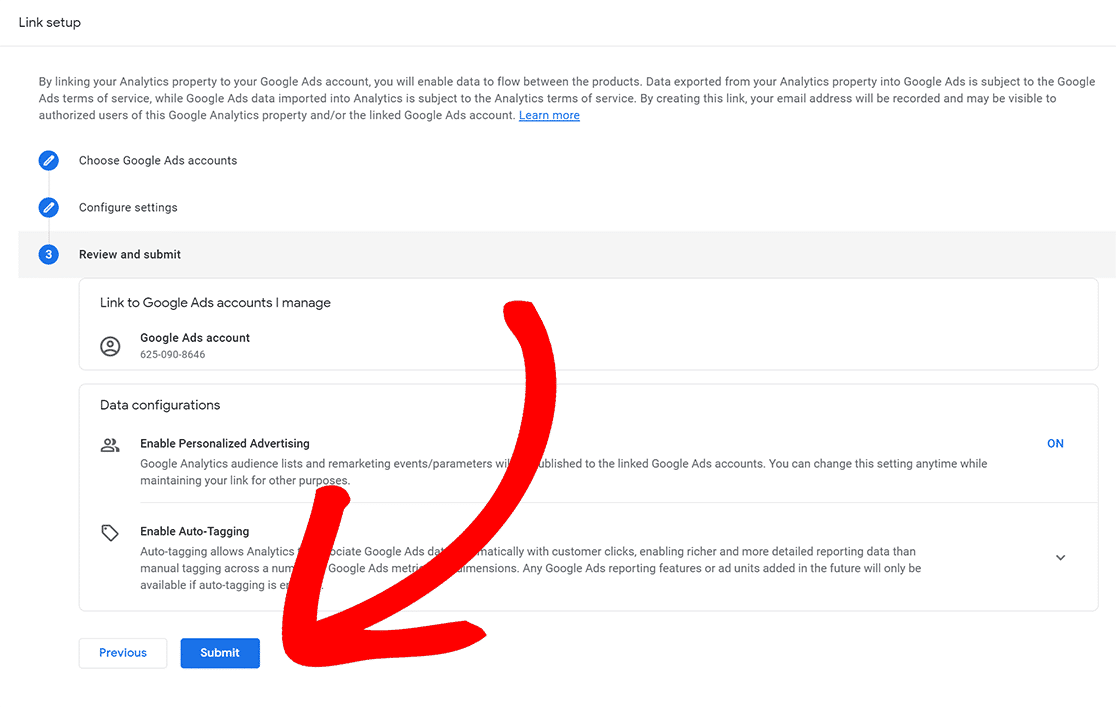
On the last step, just double check that your settings are correct and press Submit:
Congrats! You finished setting up your Google Ads conversion tracking with Google Analytics!
Should You Link Google Ads and Google Analytics? (GA4)
Absolutely! Setting up your Google Analytics account in ExactMetrics gives you tons of insight about your visitors, but linking your Google Ads account will let you see your full customer cycle for the best ad optimization and SEO.
Linking your Google Ads with Analytics lets you more accurately track the customers you acquired through your Google Ads (AdWords) conversion tracking and see what they do after the ad click.
You’ll also be able to see your ad performance report with other site data in Google Analytics, import GA4 metrics, and eCommerce transactions into Google Ads.
We hope this guide taught you how to set up conversion tracking in Google Ads and connect Google Analytics 4. ExactMetrics makes it easier than ever to set up Google Analytics 4, Google Ads conversion tracking, and so much more. Your website’s key metrics, delivered straight to your WordPress dashboard.
If you enjoyed this guide, check out our article on GA4 custom reports to get the data you care about: How to Create Google Analytics 4 Custom Exploration Reports.
And don’t forget to follow us on Twitter and Facebook to get to know the latest Google Analytics tutorials.

