Are you looking for some marketing hacks to drive more traffic to your website, or are you struggling to attract new and returning visitors?
It takes time and patience, but with the right high-impact marketing hacks you can drive more traffic. We’ve put together a whole list of marketing hacks for you to look through and choose what you’d like to try.
By using these hacks, you can boost user engagement, convert visitors into leads, build your brand, get more email subscribers, and more.
This is a really big list, so we’ve organized our marketing hacks into specific categories.
Marketing Hacks Categories
- Content Idea Hacks: Find Relevant Topics
- Optimization Hacks: Use Existing Content to Attract More Visitors
- Viral Traffic Hacks: Promote Social Media Activity
- Promotional Hacks: Publicize Your Content
Ready? Let’s jump right in and get started growing your traffic.
Content Idea Hacks: Find Relevant Topics
You’ve heard of a content strategy, but it means more than just coming up with a list of topics you think your audience wants to read. You need to put some data behind your ideas to really attract the traffic you want.
But, what kind of data, and how do you find it? How do you find out exactly what content your audience wants to read?
Here are some content idea hacks to kick off our marketing hacks list.
1. Get Inspiration from Your Audience’s Interests
What is it your audience is interested in? Sure, they clicked on your content, so they must be interested in your subject. But what else are they interested in?
If you can tailor your content to certain subjects your audience is the most interested in, you can tap into that potential.
To find out what your visitors are interested in, you need to collect demographics and interests data. Here’s how to enable visitor demographics and interests reports in Google Analytics.
Then, if you’re using ExactMetrics, you can easily view the report by clicking on ExactMetrics from your WordPress dashboard and then going to Reports. From the top menu, click Publishers and scroll down to view the interests of your audience.
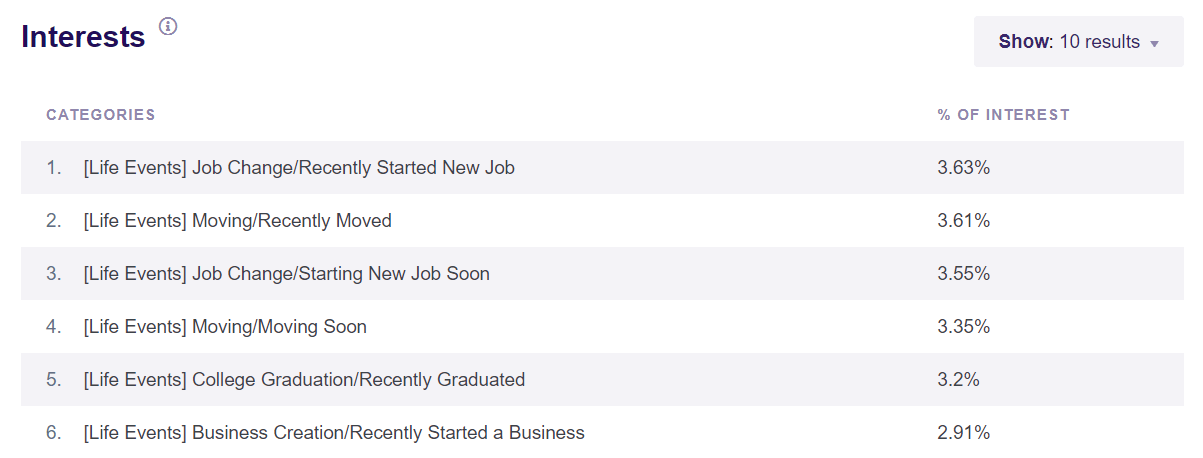
In Google Analytics, find the report under Reports » User » Demographics » Demographic details. You can then use the drop-down menu at the top of the table to see informations by country, gender, interests, and more.
Using this report, you can get a good idea of what general category your site visitors are interested in. You can then tailor your content strategy to appeal to those interests.
For example, in the screenshot above, this site’s visitors are clearly interested in job searching and moving. Brainstorm how you can appeal to those interests with your new content.
You can also use your own website’s data to see what visitors are most interested in by setting up category and tag tracking (for WordPress users).
Once you know which categories and tags are most popular, you can focus on creating more content related to those.
2. Let Your Top Landing Pages Inspire New Content
Similar to what we just went over with category and tag tracking, you can use your top landing pages to see what you’re already getting traffic for, and create more content around those subjects.
If you’re an ExactMetrics user, you can access your top landing pages report by going to ExactMetrics and then clicking on Reports. From the top menu, select Publishers and the first report will be of top landing pages.
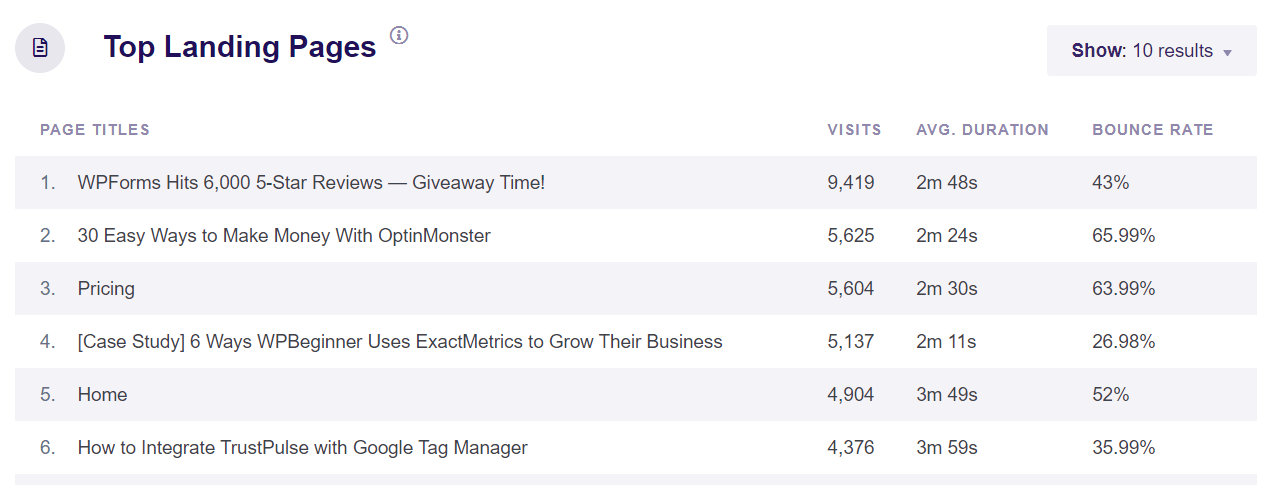
Or in Google Analytics, find this report under Reports » Engagement » Landing Page.
Using the report, you can find out what subjects/keywords your audience is finding you for. Then, you can use that to create new content.
Let’s say you have a blog about cars. You have a few different types of posts: reviews, how-to guides, and listicles (like “top 10 cars for moms in 2021).
When looking at your Landing Page report, you notice that your listicles get the most traffic, but the average user engagement time is the lowest for those. How-to guides, on the other hand, make visitors stick around for a lot longer.
So, you might want to focus your efforts on more how-to guides.
3. Cover More to Keep Visitors Longer
How are visitors leaving your website?
Sure, a good number of them are hitting the back button, but others are probably clicking on your external links to other sites or even your social media profiles.
Which of those links to external sites are getting the most clicks?
Google Analytics does not track external link clicks out of the box. However, ExactMetrics automatically tracks your outbound links for you – no code needed.
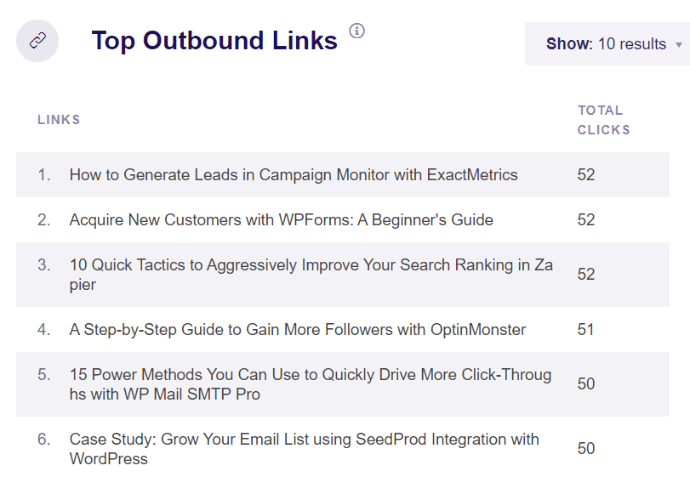
This is awesome data to have in your back pocket. If you can see where and why visitors are clicking to leave your site, you can “plug the leaks.”
For example, in the screenshot above, we have people leaving to read “how to generate leads in Campaign Monitor with ExactMetrics.” Perhaps we could write a similar article to link to instead, to keep those visitors on our website. Boom, great content idea!
4. Identify Content to Repurpose and Reuse
There are a couple of different ways to find content on your site that you’ve already created that could be repurposed or reused in a different way to bring in more traffic.
First, if you offer downloads on your site, you might be able to use those to create new pieces of awesome content.
Unfortunately, Google Analytics doesn’t track file downloads by default, so you might not know how many downloads are occurring. To easily track those, you can use ExactMetrics. We track file downloads automatically!
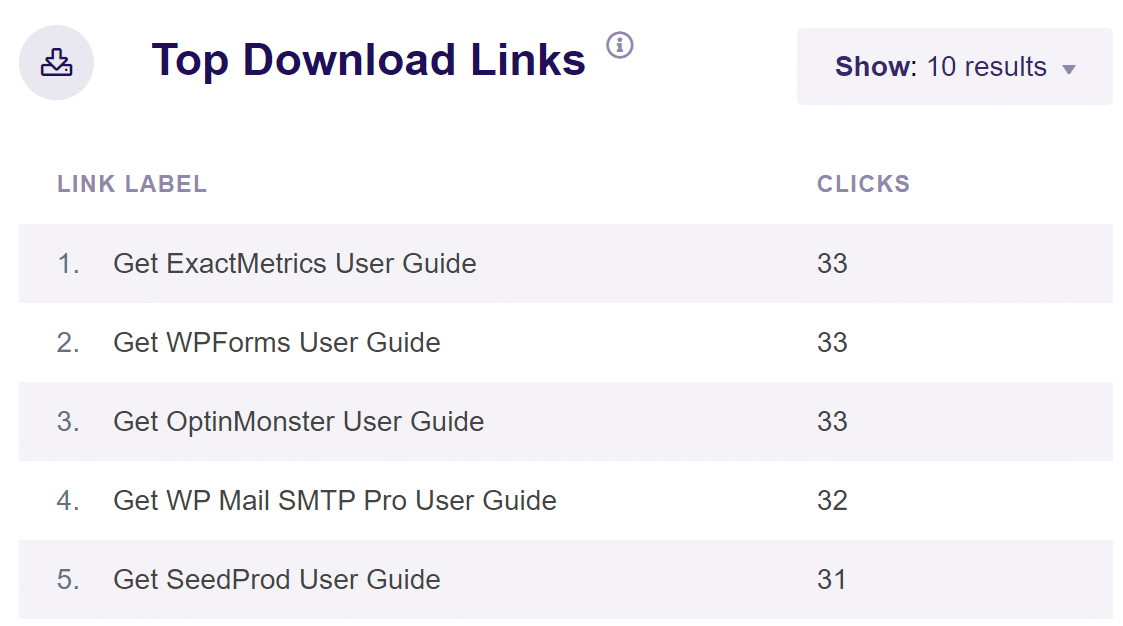
Using this report, you can see if any of your files are popular downloads. If people are downloading something, odds are it would be good content to have as a page on your site, instead of a download.
Another way to identify content to repurpose and reuse is by changing its format. For instance, if you have a blog post with a lot of numbers in it, maybe you could make that into an infographic. Or, maybe another of your posts would make an awesome, engaging video.
5. Use Google Autocomplete to Find Content Ideas
Need help coming up with new keyword ideas that’ll bring in highly relevant traffic? Here are some SEO traffic hacks for you.
Head to Google search and start typing in some of your products or existing keyphrases. Google will offer autocomplete suggestions based on what’s popular in search. These are terms that you know are getting at least some hits if Google is offering them as suggestions!
Keep trying this with new topics and keywords and you’re bound to find some fantastic new ideas.

6. Check Google’s Related Searches Too
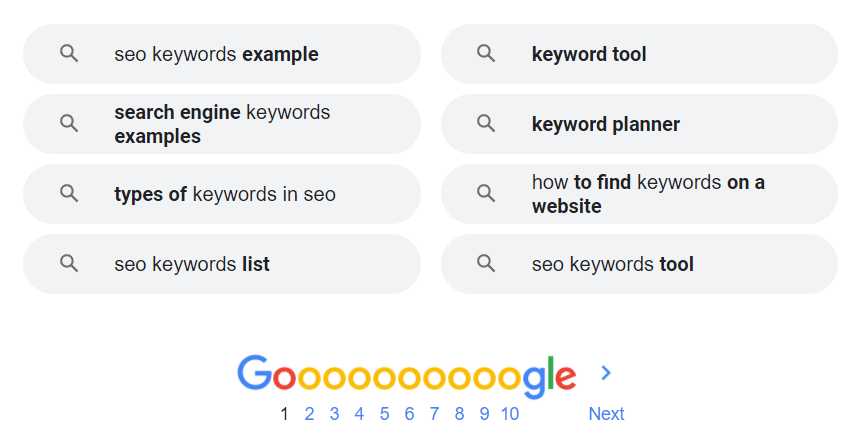
Once you run your search, you can head to the bottom of the search results page to find even more ideas from Google. It goes beyond autocomplete to show you searches that are related to the one you typed in. There are always some great ideas here for topics you might not have considered yet!
For example, this screenshot is at the bottom of the first page of the results for “how keywords work in SEO.” You can see that people who search this term are likely also interested in seeing real examples of SEO keywords, checking out keyword tools, and learning how to find keyword opportunities.
7. Use Keyword Research Tools
Keyword research tools can be a huge help when you’re trying to come up with content that’s going to bring in relevant traffic. They do most of the work for you, bringing up tons of ideas, complete with information about how often each term is searched (search volume).
Now, it can definitely be worth it to pay for a tool like Semrush, which can not only provide you with keyword research and suggestions but also a bunch of other SEO and content tools. Ahrefs is another really comprehensive keyword and SEO tool.
That said, if you don’t have a budget for a fancy tool, you can definitely get by with a few free keyword research tools. We suggest trying the free version of Semrush’s Keyword Magic Tool, Answer the Public, and Keyword Explorer.
For example, let’s plug “keyword research” into Semrush. We get a bunch of great ideas for content that we can create around “keyword research”:
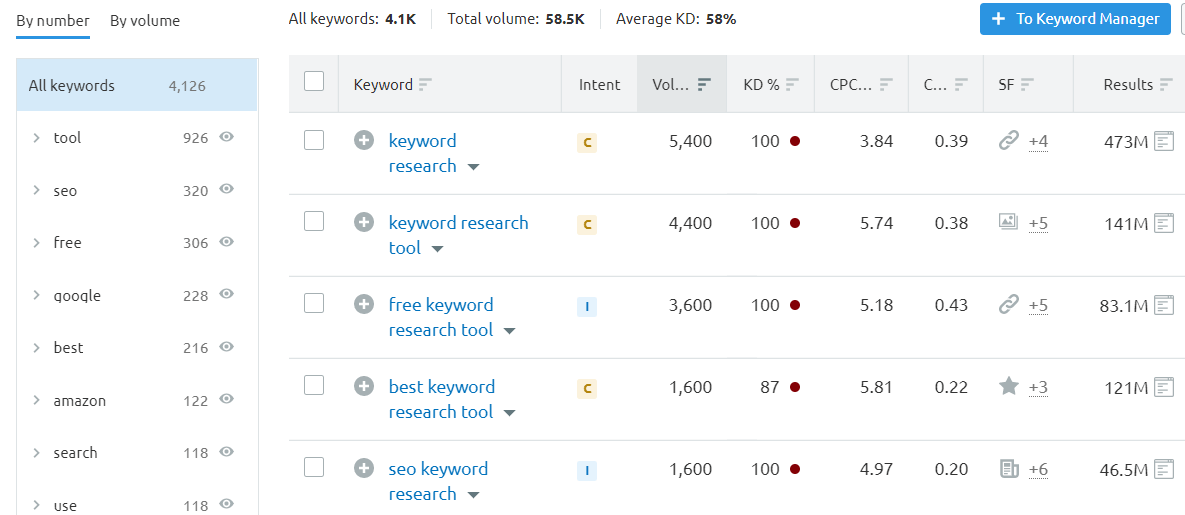
You’ll get instant information about organic keywords, their volume, how difficult it’ll likely be to rank for them, and more.
8. Take Geographical Data into Account
Where are your visitors from?
Whether your website targets visitors that are local, regional, national, or international, you can create content that targets specific groups of people to bring in more traffic.
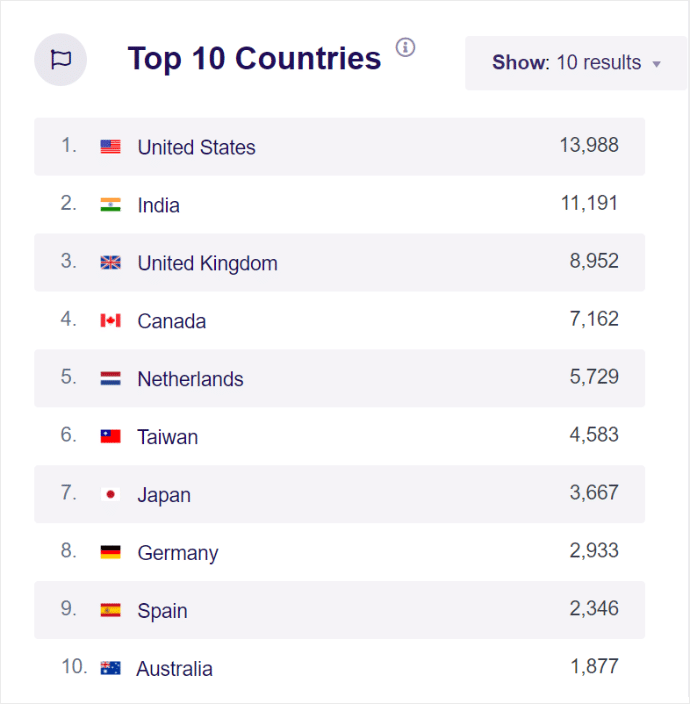
You can find out where your visitors are coming from by heading to ExactMetrics » Reports. Right in the Overview report, you’ll see a breakdown by country. Click the blue View Countries Report at the bottom to open up Google Analytics and click further into each country and region to dive further into where your traffic is coming from.
Then, think about how you can create content for visitors from specific places, and what kinds of keywords they might be searching that are different from others.
Optimization Hacks: Optimize Existing Content
Have you heard the famous quote, “If you build it, they will come”? Well, that term is definitely false when it comes to creating content for the web. You can’t simply publish something and expect it to get a bunch of traffic.
Odds are, you have some awesome content that deserves to get a lot more traffic than it does. Let’s take a look at some ways you can use that existing content to bring in more traffic.
9. Use the Best SEO Plugin
Your content won’t rank unless it’s optimized. Period.
How do you optimize your content? With the best SEO plugin for WordPress, of course! All in One SEO is a powerful SEO plugin that guides you in optimizing your website to bring in the most traffic possible.
AIOSEO is a beginner-friendly plugin that you can use to rock your optimization.
Some of the best features are:
- Local SEO settings and tools
- Smart XML sitemaps
- Focus Keyphrase and TruSEO Score on-page analysis tools
- Rich snippets schema
- WooCommerce SEO
- Semrush integration so you can discover new keywords
- And more!
10. Focus on the Right Content
To look for pages that could use better optimization, we suggest taking a look at the Search Terms report in ExactMetrics in the Search Console tab.
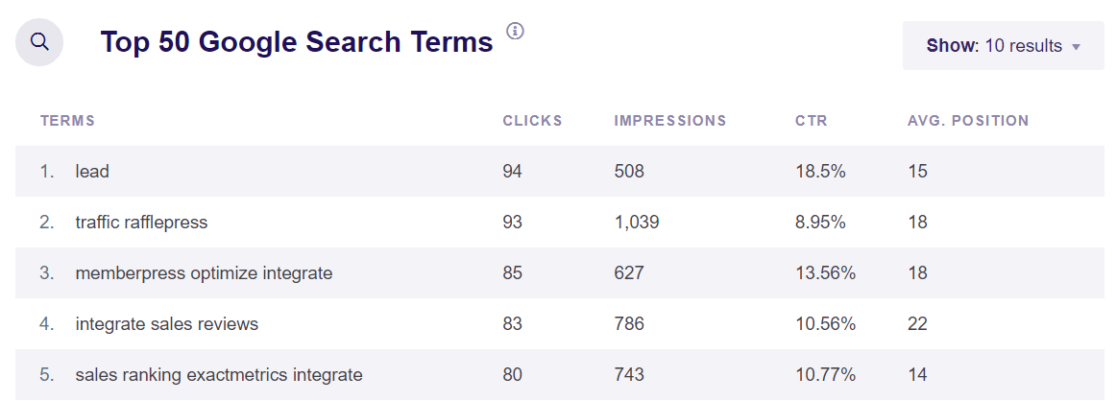
Check the Average Position of your keywords. Are there some you’re close to ranking in the top 10 for?
To see this in Google Analytics, click on the “View Full Queries Report” link at the bottom of the ExactMetrics report. Once you’re in Google Analytics, navigate to Reports » Search Console » Google organic search traffic. If you don’t see the Search Console tab in Google Analytics you’ll need to connect Google Analytics with Search Console and add a report under Library.
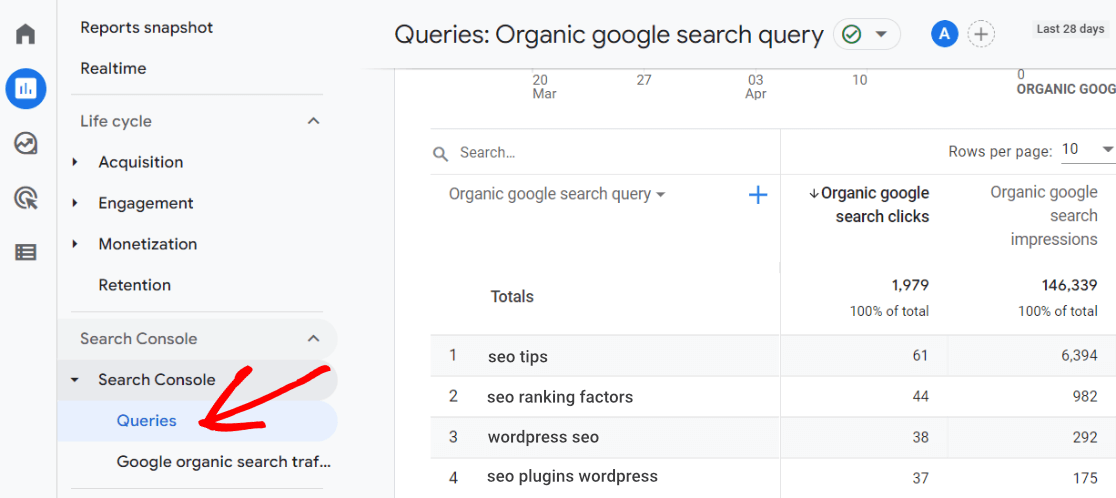
If you want to see which pages you’re ranking with for these terms, click on Google search traffic instead of Queries, and you’ll be able to see the landing page and the query string.
Here, you can see the average position of your pages in search. If you want to see the data for one or a few pages, you can create filters or use the search bar to search for a specific string (such as typing /store to see the views for pages that start with store).
You can drill into this data more by creating custom dimensions and metrics.
Go on down your list of pages and keywords, looking for some that have a lot of optimization opportunities.
In the All in One SEO plugin, you can optimize your pages by adding a Focus Keyphrase, then using the instant suggestions to better optimize your content.
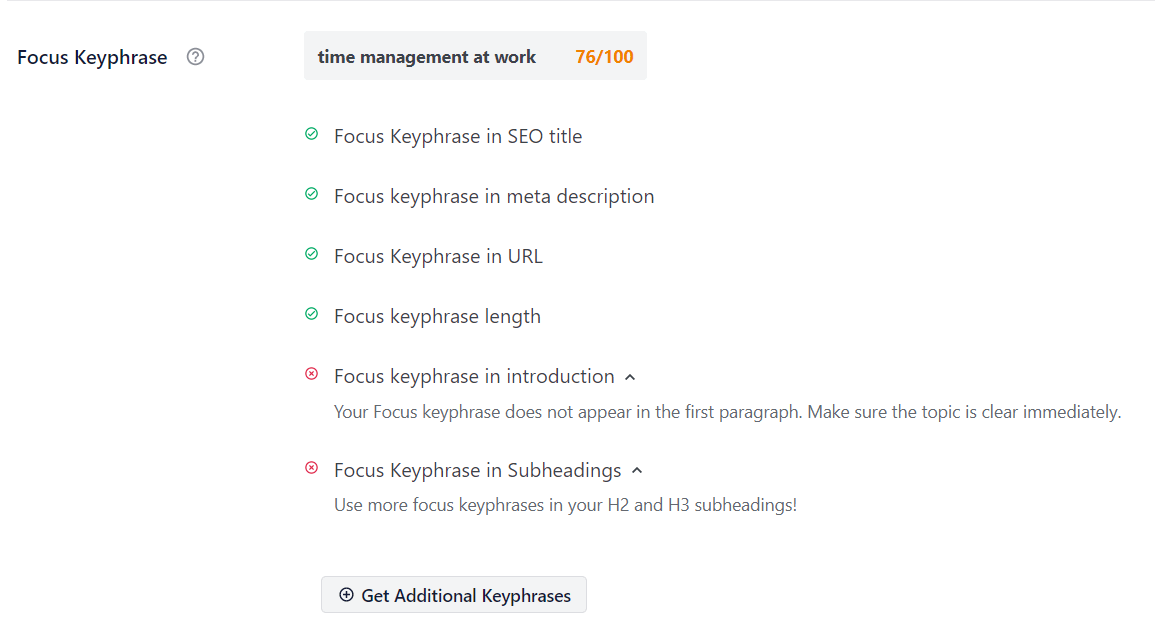
Better-optimizing pieces of content this way is a great SEO hack that sets you up for success.
11. Write Awesome Headlines to Improve Click-Through Rate
A powerful headline can change everything for a piece of content. It can be the difference between a popular article and one that doesn’t get clicked much at all.
To write optimized headlines that are going to get clicked on, use the ExactMetrics built-in headline analyzer, available at the Plus license level or above.
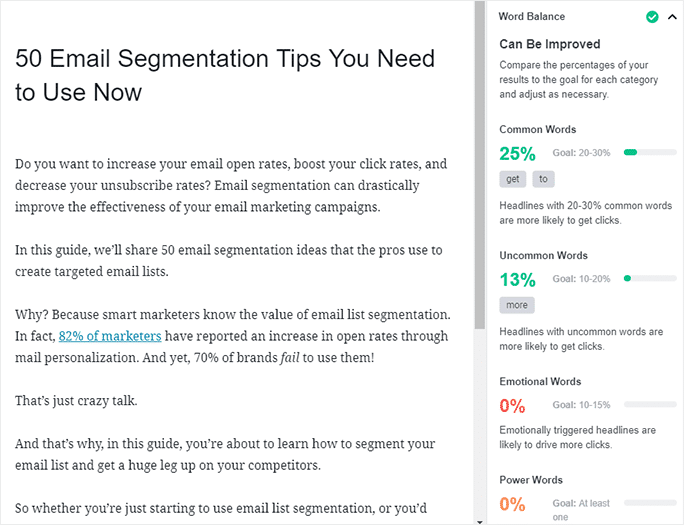
Then, to improve your click-through rate, take a look at the suggestions provided by the headline analyzer. What kinds of words are you missing that you can add? If you’re missing power words, check out this list of over 700 power words.
12. Add Bonus Content to Answer Common Questions
Let’s get further into some awesome traffic hacks.
To expand your content to cover even more potential keywords and phrases, pay attention to the People also ask results in Google when researching your topic.
For example, let’s say we’re writing a post targeting the phrase “keyword density in SEO”. When we search that term, the People also ask box looks like this:
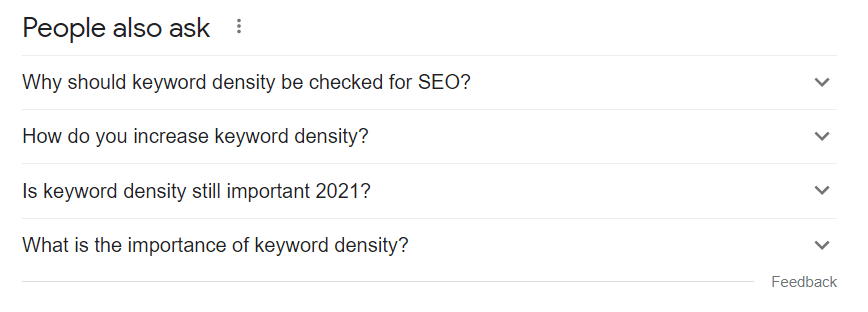
So, when you’re writing your article, if you can include a couple of those questions in your post, that’s an awesome way to cover your bases in order to rank your post for your targeted keyword. Try to word the questions exactly as they appear in the search, and use them as a heading if you can. Then, answer the question immediately under the heading.
13. Consider Search Intent
If you want to rank well for a particular keyword phrase, you need to think about why people are searching it. What are they hoping to find? Are they looking for an answer to a question? Looking to buy a product? Researching with the intention to eventually make a purchase?
The four types of search intent are:
- Navigational, where users search for a particular website.
- Informational, where users search for the answer to a question.
- Investigational, where users search for information that may eventually lead to a transaction.
- Transactional, where users are ready to buy.
So, think about which of those categories your content falls into and write accordingly.
Plus, think even further about what kind of content a person is looking for when typing in a particular keyword. Make sure to search the term yourself to see what’s ranking in the top spots. Do listicles answer the search query the best? Or a longer, more in-depth guide? How about a product comparison?
Get into the mind of your audience. What are they needing to get out of the content they find for a particular search term?
14. Shoot for the Snippets
Want to be in the number 1 spot in Google’s search results? Then chances are, you need to write in a way that’s optimized for a featured snippet.
Featured snippets are the expanded information Google shares at the very top of the search results page.
For example, let’s go back to our “keyword density in SEO” example. If you’re trying to rank in the featured snippet position, you’d need to have a clear definition of what keyword density is, since that’s what Google is currently showing in that spot.

Getting a featured snippet can increase your traffic by 10% or more!
There are some things you should know about how to optimize for featured snippets. Check out How to Optimize Content for Featured Snippets and Get More Traffic via OptinMonster.
15. Speed Up Your Website
A fast website is an expectation that just about every visitor has. Plus, a slow website can not only make visitors bounce away quickly in search of a faster website, but it can also make Google rank you lower in search results.
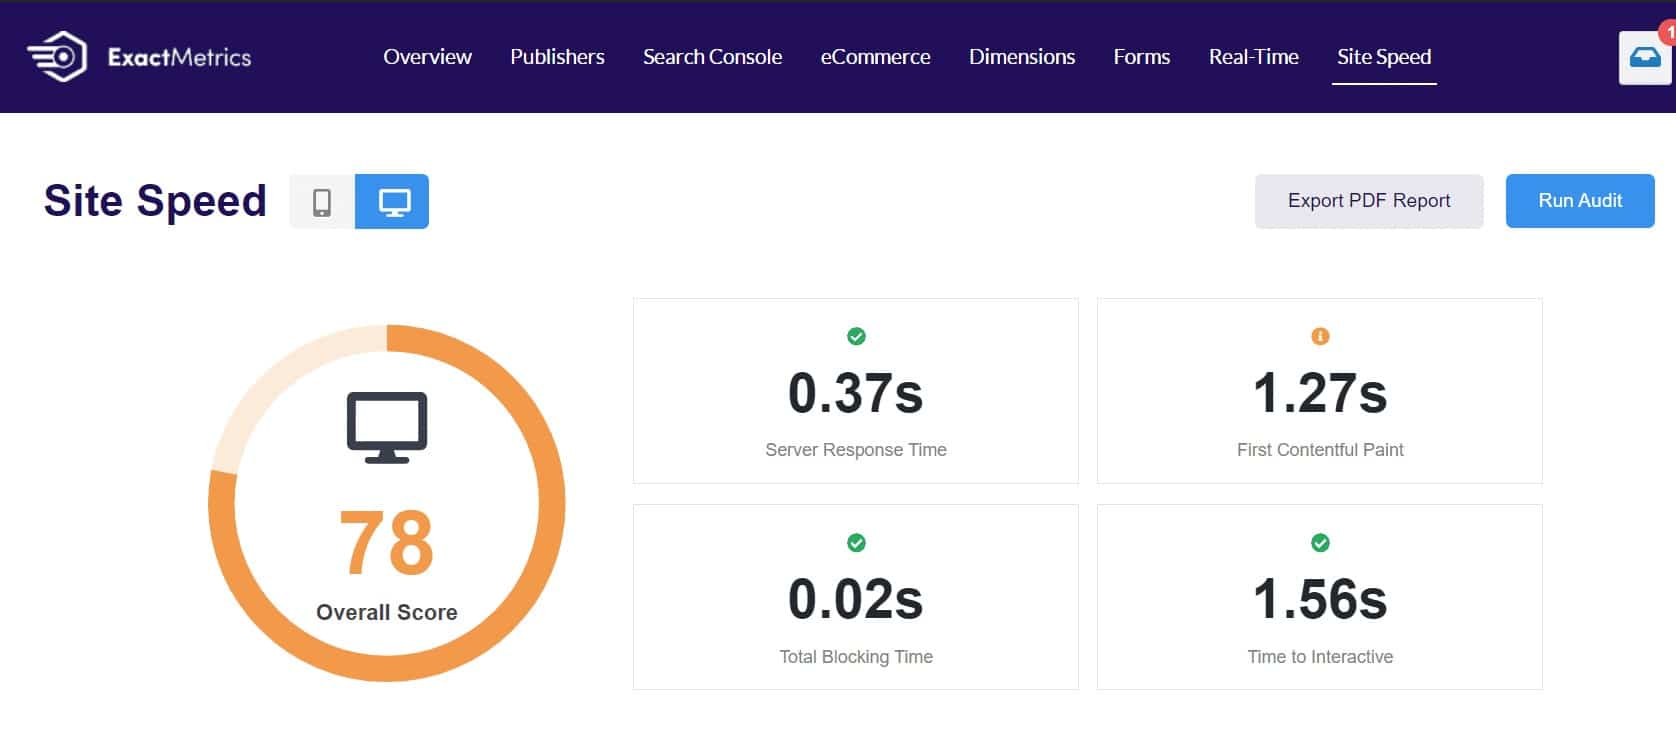
While Google had been considering page speed in their search engine rankings since 2018, the 2021 “page experience update” really took things a big step further. Now, there are three new scores, called Core Web Vitals, that your website has to have high marks on in order to rank above your competitors. These three scores are primarily based on how quickly your site loads.
So, to maximize your rankings and your traffic, you’ve got to have a fast website.
Is your website on WordPress? Check out How to Run a WordPress Website Speed Test (Quick + Easy) and How to Speed Up Your WordPress Site (14 Ways).
16. Use Internal Links Wisely
Internal links are an awesome way to not only send your visitors to more pages on your site, but they can also help your content rank in search.
When Google’s crawlers visit your website, they crawl through all your links to index each page on your site. If you have internal links throughout your content, that can help those bots find and index everything. Plus, if you have a piece of content that’s ranking highly and you put some internal links into it to other articles, you can help those articles rank, too.
However, you do have to be careful not to add so many internal links that your content looks shoddy or over-promotional. Shoot for one every few sentences or so.
Viral Traffic Hacks: Social Media Promotion
Another way to attract website traffic is through social media. We’ve all heard about “going viral” and it would be cool to make it happen.
So, here are a few things to try!
17. Create Giveaways Everyone Wants to Win
Hosting contests and giveaways are great ways to not only gain more followers but also get more email subscribers and increase the traffic to your website, too.
The best, easiest way to run a giveaway is through a plugin that handles a lot of the details for you. The one we recommend for WordPress is RafflePress.
RafflePress is the best giveaway plugin because it’s lightweight, beginner friendly, and can create eye-catching campaigns with a drag-and-drop builder.
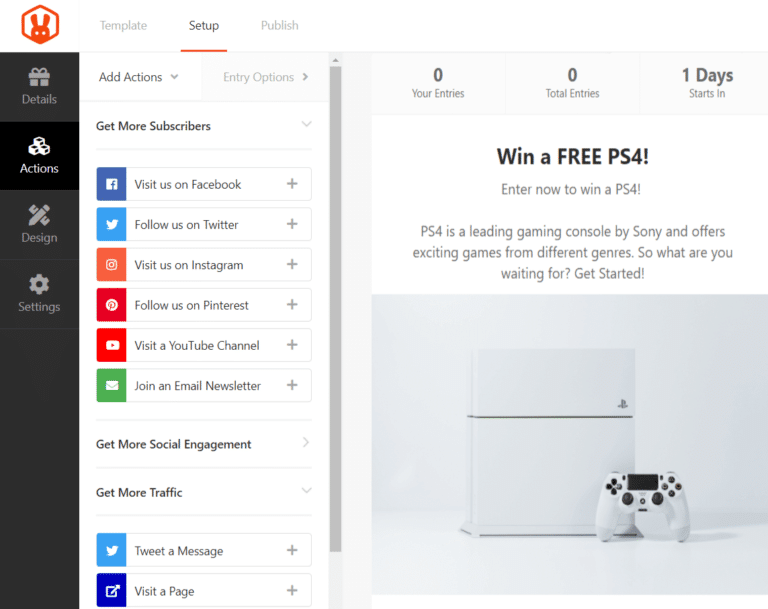
The more actions visitors complete to share the giveaway, the more entries into the giveaway they get.
A few of the actions you can ask your visitors to take for a giveaway entry are:
- Visit you on Facebook and/or like your Facebook page
- View an Instagram post
- Tweet a specific message
- Comment on a blog post
- Visit a YouTube channel
- And many more
Get started with RafflePress now.
18. Create Polls, Reels, or Other Unique Content
If you want to stand out on social media, your content needs to be:
- Useful/relevant to your audience
- Unique
- Interesting
- Not overly promotional
Nobody wants to open social media and see all promotional content that’s always the same. Sure, the whole reason you have those profiles is to use them to reach an audience and promote yourself, but nobody will follow you if you’re boring and over-promotional.
One way to make sure your content isn’t boring is to post different types of content beyond the norm.
On Twitter, create fun polls that your audience will actually want to participate in. On Instagram, try creating a reel. On Facebook, create an offer or host a Q&A.
You can also create polls and surveys on your website with a plugin like UserFeedback and then share the results on social media.
19. Create Quizzes on Your Website
Are you a Starbucks fan? If so, have you ever played their game over the holiday season to try to win points toward their beverages?
Gamification is a great way to get your audience not only involved in your website in an even bigger way but also to attract more traffic.
A fun way to add gamification to your site is through quizzes.
You might have seen a lot of fun quizzes out there that are kind of more time wasters than anything else (especially the quizzes you find on Buzzfeed), but there are ways to make some that are more professional, too.
For example, if you subscribe to emails from the New York Times, every week you’ll get their weekly news quiz to find out how well you were paying attention to the news that week.
For more on how to create quizzes, read How to Easily Create a Quiz in WordPress.
20. Repurpose Content for Awesome Social Media Posts
We all get burned out coming up with new topics for social media posts. It can get pretty difficult to come up with them constantly!
Luckily, you probably have a whole website full of content that you can use. You just have to think about it in a new way.
Try taking a look at your top posts and pages. In ExactMetrics, find them in the Publishers report:
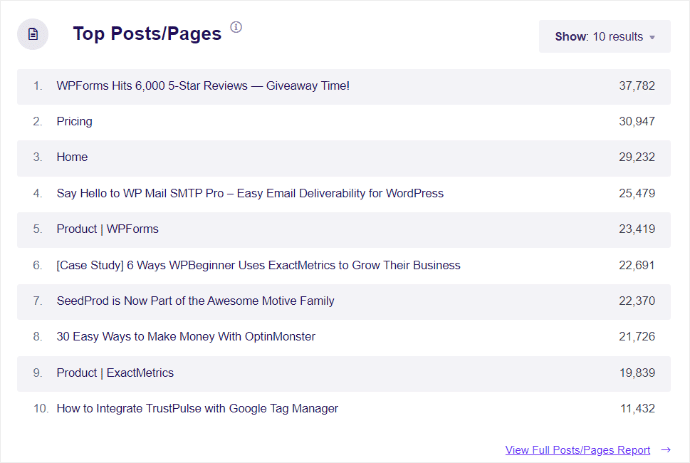
In the list above, it looks like there’s a case study that’s pretty popular content on the blog. So, let’s design an infographic with the numbers in it for social media! Or we could make a video or create a podcast where we interview that company’s CEO…so many possibilities!
Promotional Hacks: Publicize Your Content
Have a bunch of fantastic content that doesn’t get the traffic it deserves?
It’s time to promote that content to the right audience so you can drive more traffic to your website.
21. Find Partners in Referral Traffic
Sometimes, there are possible partners that could help you promote your traffic right under your nose. Odds are, if someone is linking to one of your posts from their website, they’re probably willing to work with you.
For instance, a website owner who links to yours might be interested in:
- Posting a guest blog post from you
- Promoting another piece of your content that maybe they haven’t seen yet
- Partnering with you on a new piece of content that you both promote
To find other sites that link to you, head into ExactMetrics. In your Overview report, you’ll see your Top 10 Referrals:
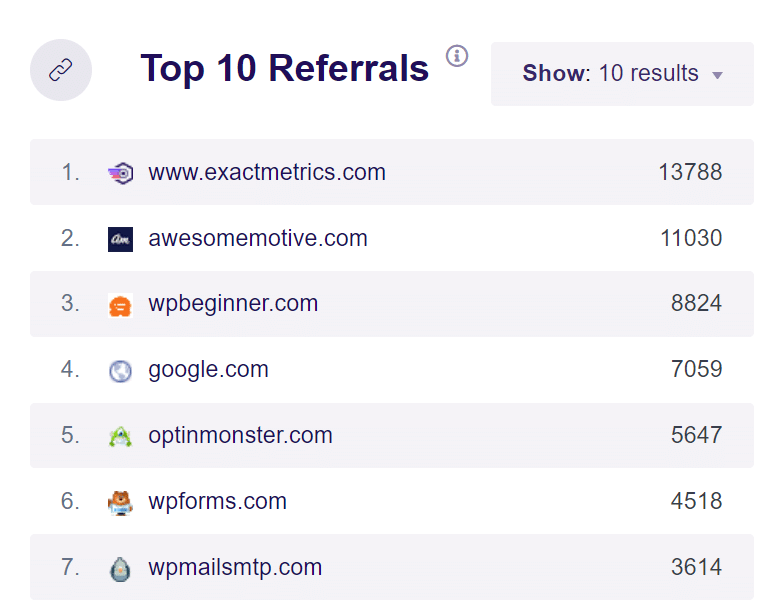
Plus, you can click the View All Referral Sources link at the bottom of the report to go to Google Analytics and see all those referrals.
Now, go through the list and look for opportunities to work with the websites that are linking to yours.
If you want to learn more about guest blogging, check out this ultimate guide.
22. Get Active in Popular Forums
Actively participating in forums is a good way to start sending some traffic to your website. If you have truly great content that answers questions or explains things that other people are wondering about, then posting about it in a forum where those people are interested is a good bet.
For instance, Reddit has a ton of “subreddits” that cover just about any topic you could think of. Some of them aren’t super active, but go ahead and look around for related ones that are. You do have to be careful though, because sometimes forums discourage any posts that are self-promotional. If you’re posting links to your own site too often, you might get flagged.
To look for forums in your niche, head to Google and type in forum+[your topic]. That’ll hopefully bring up some relevant, active forums you can join.
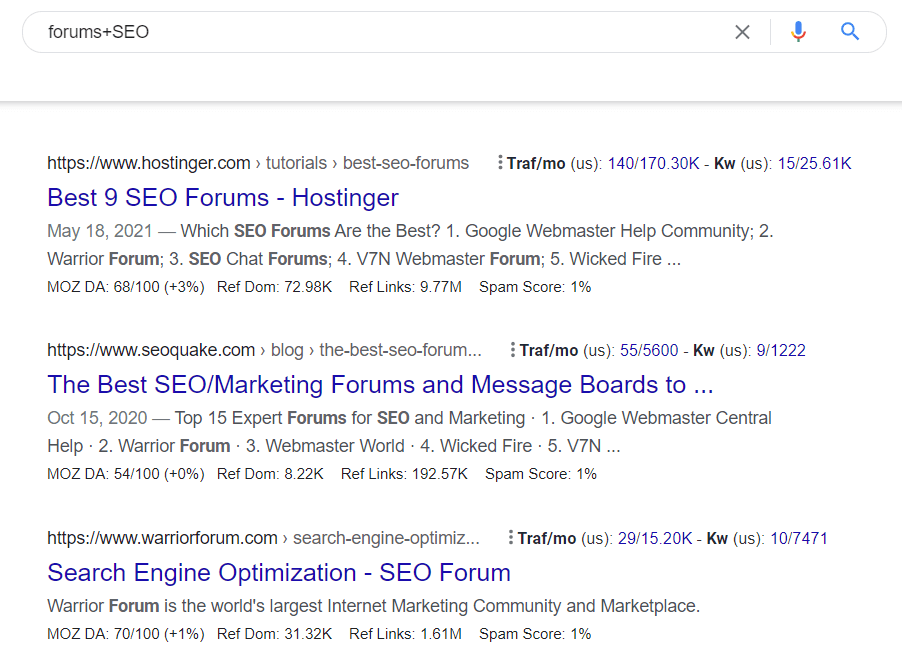
One good tip is to start participating in the forum before adding links to your own content. That might help you look a little less self-promotional.
23. Be a Podcast Guest
Odds are, if you’re a website owner, you’re an expert at something. If you want to work at building a community and creating relationships with your audience, being a guest on a podcast about something important to you is a great way to go about it.
Of course, you could also create your own podcast, but creating it, attracting listeners, and managing it takes a lot of time. If you’d rather just share your expertise without going through all of that, being a guest on a podcast that’s already established is an awesome option.
Go ahead and search on podcast platforms like Spotify, Apple Podcasts, and Google Play for some that are relevant to your industry or area of expertise, and start reaching out.
Another plus of being a podcast guest is that you’ll often get a link in the episode notes. That’s a good way to build backlinks and send interested audience members to your site to learn more.
24. Use Push Notifications
Push notifications are messages that display on a desktop or mobile device. They’re clickable, so they’re kind of like an ad. If someone opts into push notifications from your website, you can send them out when you have any new content, a sale, or anything else worthy of sharing.
What’s awesome about push notifications is they can appear at any time, not just when the visitor is on your website. So, you can send a notification any time to appear in front of them.
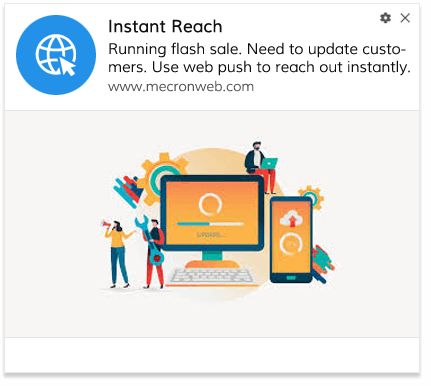
Plus, someone who subscribes to your push notifications is probably already a fan of your content or your deals. This leads to an increased chance of them clicking through to view whatever you share in your notification. It’s a win-win!
The best push notification tool is PushEngage. Get started with PushEngage now!
25. Reach Out with Email Campaigns
If you’re not yet doing any email marketing or have a list that you’re not sending to, it’s time to get it going. Email is an awesome way to send more traffic to your site!
There are a lot of things you can put into a newsletter, like sales, new content, or content that you’re trying to get in front of people that’s not necessarily new.
There are so many different things that go into creating a great email marketing campaign. To dive in, read Email Marketing: The #1 Ridiculously Easy Way To Grow Your Business.
And if you’re looking for the best email marketing tool, we suggest Constant Contact.
26. Create Videos to Get More Engagement
Video is huge. Period. If you’re not creating videos, it might be time to get started.
Videos are just so much more engaging than reading text. Plus, 87% of video marketers say video has increased traffic to their websites. That’s huge!
Your video doesn’t have to have a huge budget or be groundbreaking. It just has to be engaging!
For tons of ideas and statistics on video marketing, read Video Marketing Statistics: What You Must Know for 2021.
27. Look at Your Competitors’ Facebook Ads
Taking a look at your competitors’ ads on Facebook can help you get a glimpse into someone else’s strategy and give you ideas for your own.
To find out information about your competitor’s ads, go to your competitor’s Facebook page. On the right side, you’ll see the Page Transparency box. Click See More to expand the box.

Next, click on Go to Ad Library to see the advertisements your competitor is running.
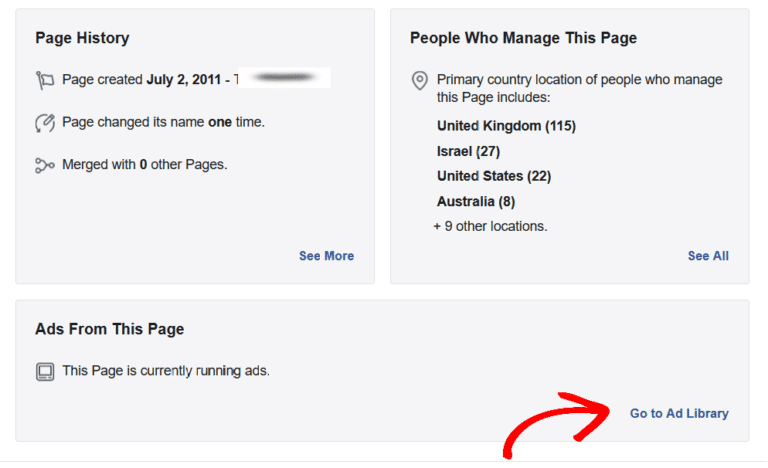
Facebook will list all the ads, and then using the funnel on the right, you can filter them based on Language, Platform, Media Type, and Impressions by Date. You can then use this information to create ads of your own to get traffic, conversions, and engagement.
28. Ask for Testimonials from Influencers
Influencer marketing is a whole subset of marketing you should definitely try. While there are a bunch of different things you can try with influencers, asking for quotes or testimonials is a pretty easy one.
To start, think about/research influencers in your industry. Odds are you’re already aware of them, but do some work looking for the ones that make the most sense to reach out to. Twitter and LinkedIn are often good places to look, depending on your niche.
Then, reach out with your ask. Give them your product/tool/service for free in exchange for a testimonial for your site. Hopefully, they’ll also be open to sharing the testimonial with their followers on social media.
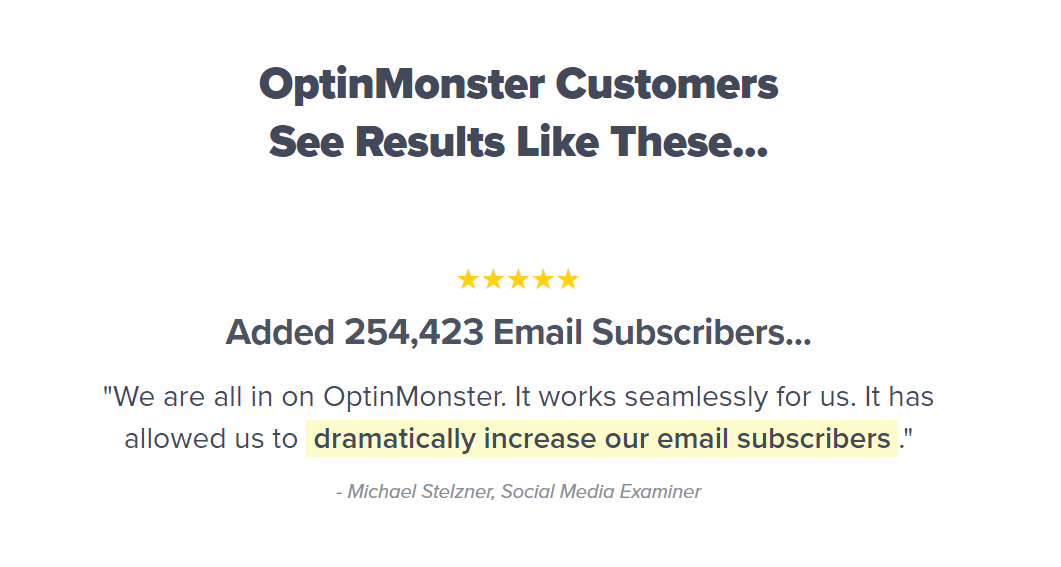
Influencer marketing is an awesome way to get more visits to your website and more awareness for your company or brand.
For more on influencer marketing with lots of great ideas, read Win Big at Influencer Marketing: An Ultimate Guide for Beginners.
29. Find High-Ranking Quora Threads to Answer
We already went over using forums to promote your content, but let’s focus for a minute on Quora.
Quora is a platform to ask questions and get answers from other users. It’s become a place where a lot of professionals go to answer questions about their niches and provide links to relevant answers from their own websites.
Some Quora pages (or “threads” of answers) rank highly in Google searches. It can help you drive traffic to your site if you can be in that thread.
To find out which Quora threads in your niche are on the first page of Google’s search results, you’ll need an SEO tool. We’re going to use Ahrefs.
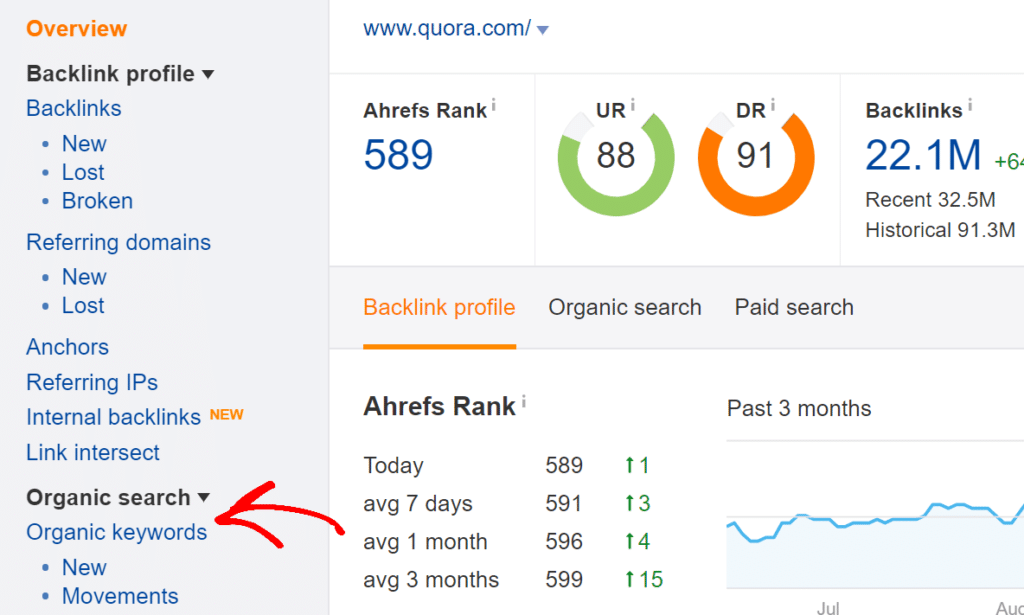
The first thing you’ll need to do is go to Site Explorer in Ahrefs and enter www.quora.com.

Then from the menu on your left-hand side, click Organic keywords.
Next, you’ll be given a list of keywords. Click on Position to sort them from ascending to descending (to find pages that are on the first page).
You can also include keywords to filter topics and find a question on Quora that’s relevant to your business.
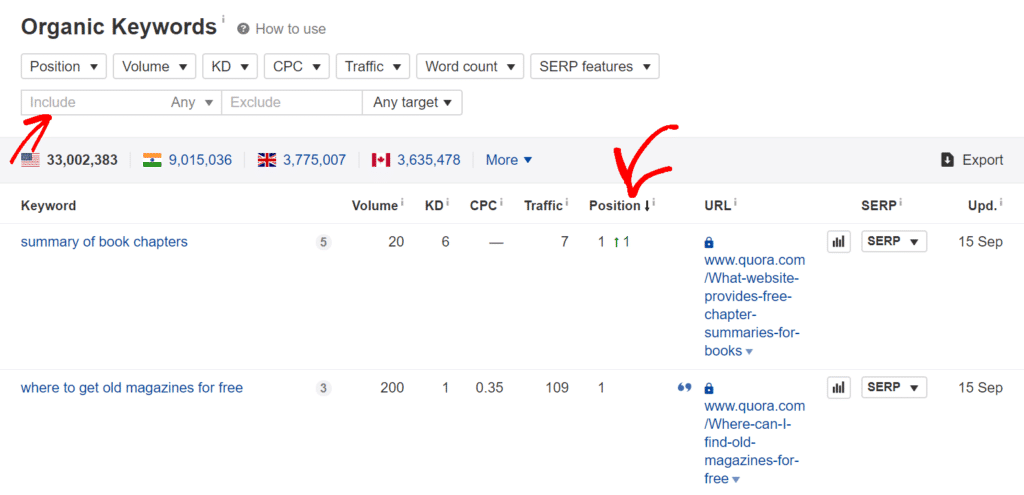
After you’re done identifying the top questions, you can then answer them in the Quora thread with a link to relevant content on your site.
30. Get Mentions Through HARO
Help a Reporter Out (HARO) is a really cool concept. It helps reporters working on a story to connect with expert sources to add quotes/interviews to their content.
Although it involves some work on your part to look through the requests each time an email comes out, it can be really fantastic mentions and links in news stories for you.
To get started, just sign up as a source on the HARO website.
That’s it!
We hope you’ve found a few helpful explosive marketing hacks to apply to your marketing strategy.
Want to keep an eye on your Analytics without needing to put time and energy into it? Check out How to Get a Weekly Google Analytics Email Report.
Don’t forget to follow us on Twitter and Facebook to see all the latest Google Analytics tutorials.


