Looking for a quick and easy way to track logged-in user’s activity on your website? If you have a membership website, an online forum, online courses, or any other site that requires users to register, you can use Google Analytics user ID tracking to better understand how those visitors interact with your website.
Gain valuable insights into your logged-in users’ behavior on your site. Discover which pages visitors view, what they’re interested interested in, and more. Then, use this data to curate a highly personalized experience for your audience.
In this article, we’ll explain how to set up Google Analytics User ID tracking for WordPress. By the end of the guide, you’ll be able to accurately track your subscriber’s activities.
Can Google Analytics Track User ID?
Yes, Google Analytics is fully equipped to track user IDs on your site. This powerful feature enables you to understand and analyze logged-in user’s interactions over multiple sessions and on different devices. Referencing the user ID gives you the opportunity to delve deeper into individuals’ experiences and how they behave on your website.
Why Should You Track User ID in GA4?
User tracking comes in handy if you require people to log in to view exclusive content, like with a MemberPress website, or offer e-learning where visitors sign up/make a purchase to access educational material. Any website that requires users to register can take advantage of user tracking in GA4. Let’s take a closer look at some of the benefits.
Get Accurate Data for Unique Visitors
One of the biggest benefits of enabling user ID tracking is the ability to follow your users across different devices. This gives you accurate data about the variety of devices they use, their engagement, which traffic channels they use to find your site, and revenue over multiple sessions and an extended period of time.
Consider this scenario: A user stumbles upon your website by clicking on a referral link while using their mobile device. Yet, they exit your site without performing a conversion. Later on, they revisit your site by manually entering your URL into their browser, and they make a purchase.
Without UserID tracking, Google Analytics perceives the above event as the actions of two distinct visitors. It attributes the final conversion to direct traffic. But if you had UserID tracking implemented, it would reveal that the same user who originally clicked on a referral link eventually came back via the direct channel to finalize their conversion.
Offer a Personalized Experience
Not all of your visitors are the same, and when you track User ID you can create a much more personalized experience for users. For instance, let’s say a specific user reaches out to you for assistance. By locating this user in Google Analytics, you can find out which pages on your site they’ve explored, distinguish if they’re a desktop or mobile user, and more. Then, you can provide targeted and effective support.
And that’s not all! Think about the potential of turning user information into successful marketing strategies. Suppose you just launched a premium online course. By employing a combination of Google Analytics UserID tracking and the ExactMetrics User ID custom dimension, you’ll have the ability to identify which users (based on User ID) have perused your new course.
This data can become a powerhouse in fine-tuning your marketing efforts. For example, you can assemble an email list composed of these interested users and specifically target them. Or, if a certain user abandons checkout after adding the course to their cart, send them a discount code to complete their purchase.
Pretty cool, right? Now, let’s see how you can set up user ID tracking in Google Analytics 4 and WordPress.
How to Set Up Google Analytics User ID Tracking
Before we dive into the tutorial, it’s important to know how user ID tracking works in Google Analytics 4 (GA4). Enabling user ID tracking means that Google Analytics will replace a Client ID with a visitor’s WordPress User ID to identify them.
Client ID usually represents a browser or device and is assigned to all unique visitors on your website.
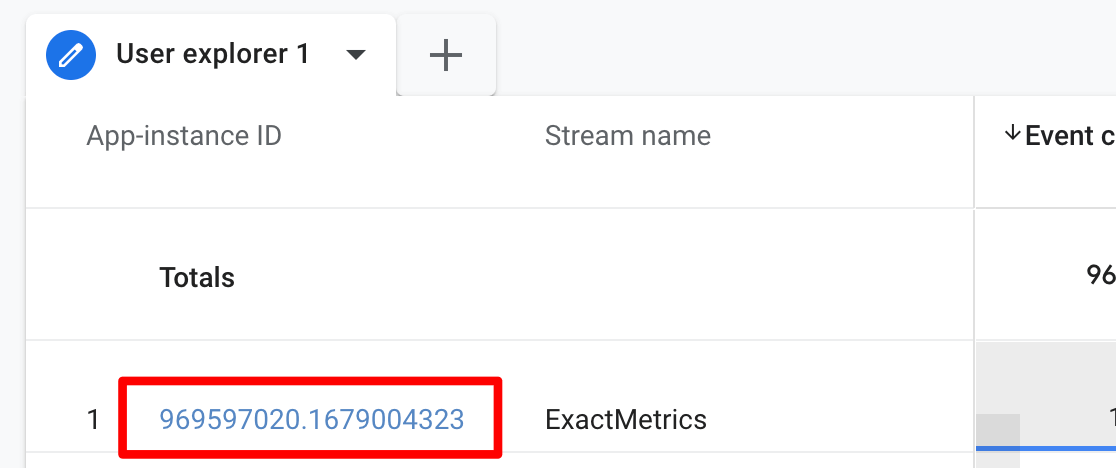
But, that means if the same user accesses your website from two different devices, they’ll be recorded as two separate users.
On the other hand, User ID is only assigned to logged-in users. It helps to identify individual users across different devices.
![]()
So, if someone logs in and views your site on mobile and then again views it using a desktop, Google Analytics will count them as a single session, thanks to user ID.
Now that you know the difference between user ID and client ID, let’s start the tutorial.
If you’re searching for a simple yet effective way to track WordPress user IDs, look no further than ExactMetrics. As the best premium Google Analytics plugin for WordPress, it streamlines the tracking process easily and efficiently.
Aside from allowing you to easily set up user tracking, ExactMetrics provides tons of other advanced Google Analytics tracking in only a couple of clicks such as eCommerce tracking, file download tracking, custom dimension tracking, affiliate link tracking, and lots more.
When it comes to tracking your registered users, ExactMetrics swaps the anonymous Client ID in Google Analytics for the specific WordPress User ID in just a couple of clicks.
How to Enable Google Analytics User ID Tracking
Just follow the steps below to enable user ID and get more precise tracking. Then, we’ll show you how to see user ID data in Google Analytics.
Step 1: Install ExactMetrics
The first thing you’ll need to do is install ExactMetrics on your WordPress site. Make sure you sign up for a Pro plan or above to access User ID tracking.
After installing and activating the plugin on your site, you’ll need to connect Google Analytics with your WordPress website. Don’t worry though, the handy setup wizard will guide you through it in just a couple of minutes and you won’t need to touch any code.
Follow our tutorial on How to Add Google Analytics to WordPress (Step-by-Step Guide) for detailed instructions on getting set up with ExactMetrics.
Step 2: Install eCommerce Addon
Now that ExactMetrics is up and running, you need to install the eCommerce addon. To do that, go to your WordPress dashboard, and click ExactMetrics » Addon.
Go to eCommerce and click Install. The addon will automatically activate in a few seconds.
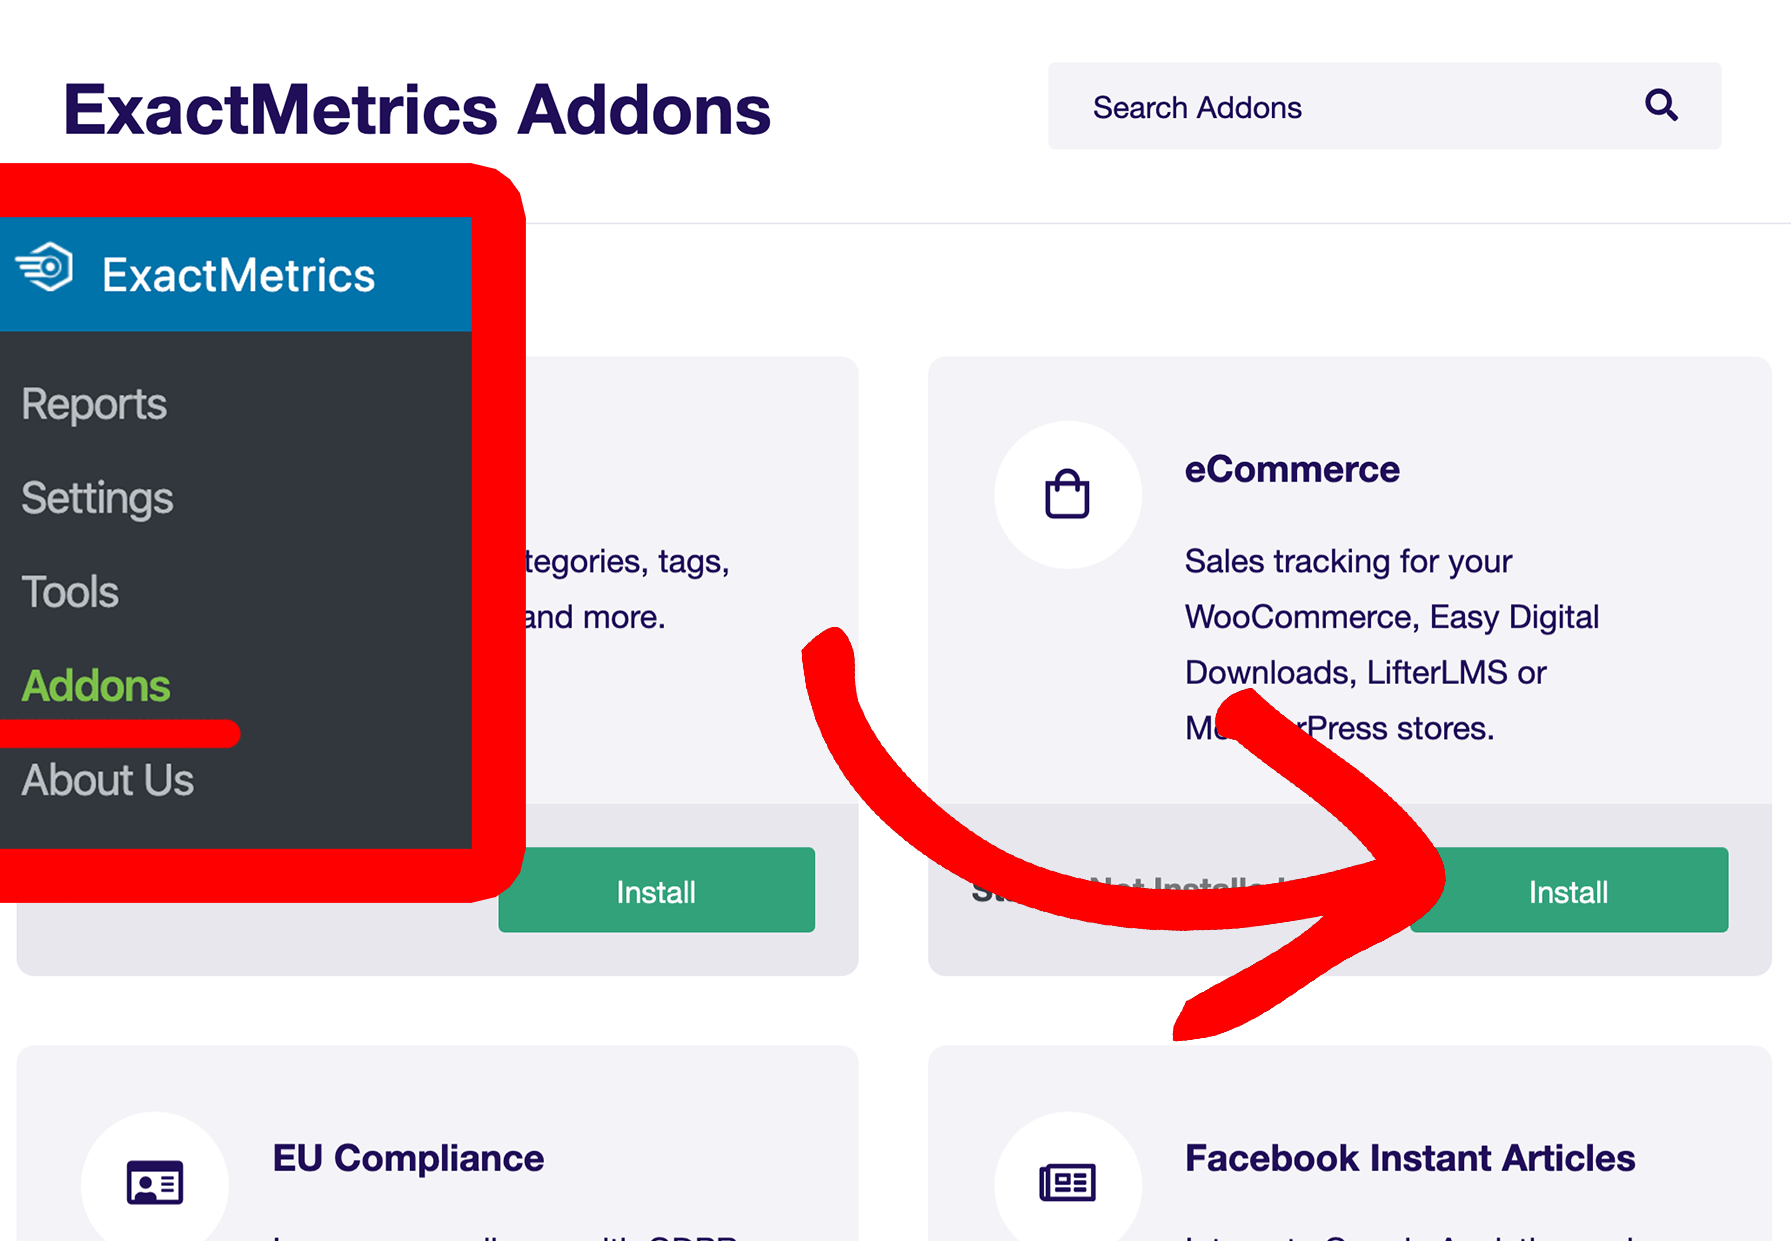
That’s all there is to it for setting up Google Analytics eCommerce tracking when you use ExactMetrics!
Step 3: Enable User ID Tracking in ExactMetrics
Next, you’ll have to enable user ID tracking within the plugin. Head to ExactMetrics » Settings » eCommerce.
Scroll down to User ID Tracking and toggle the switch to enable it.
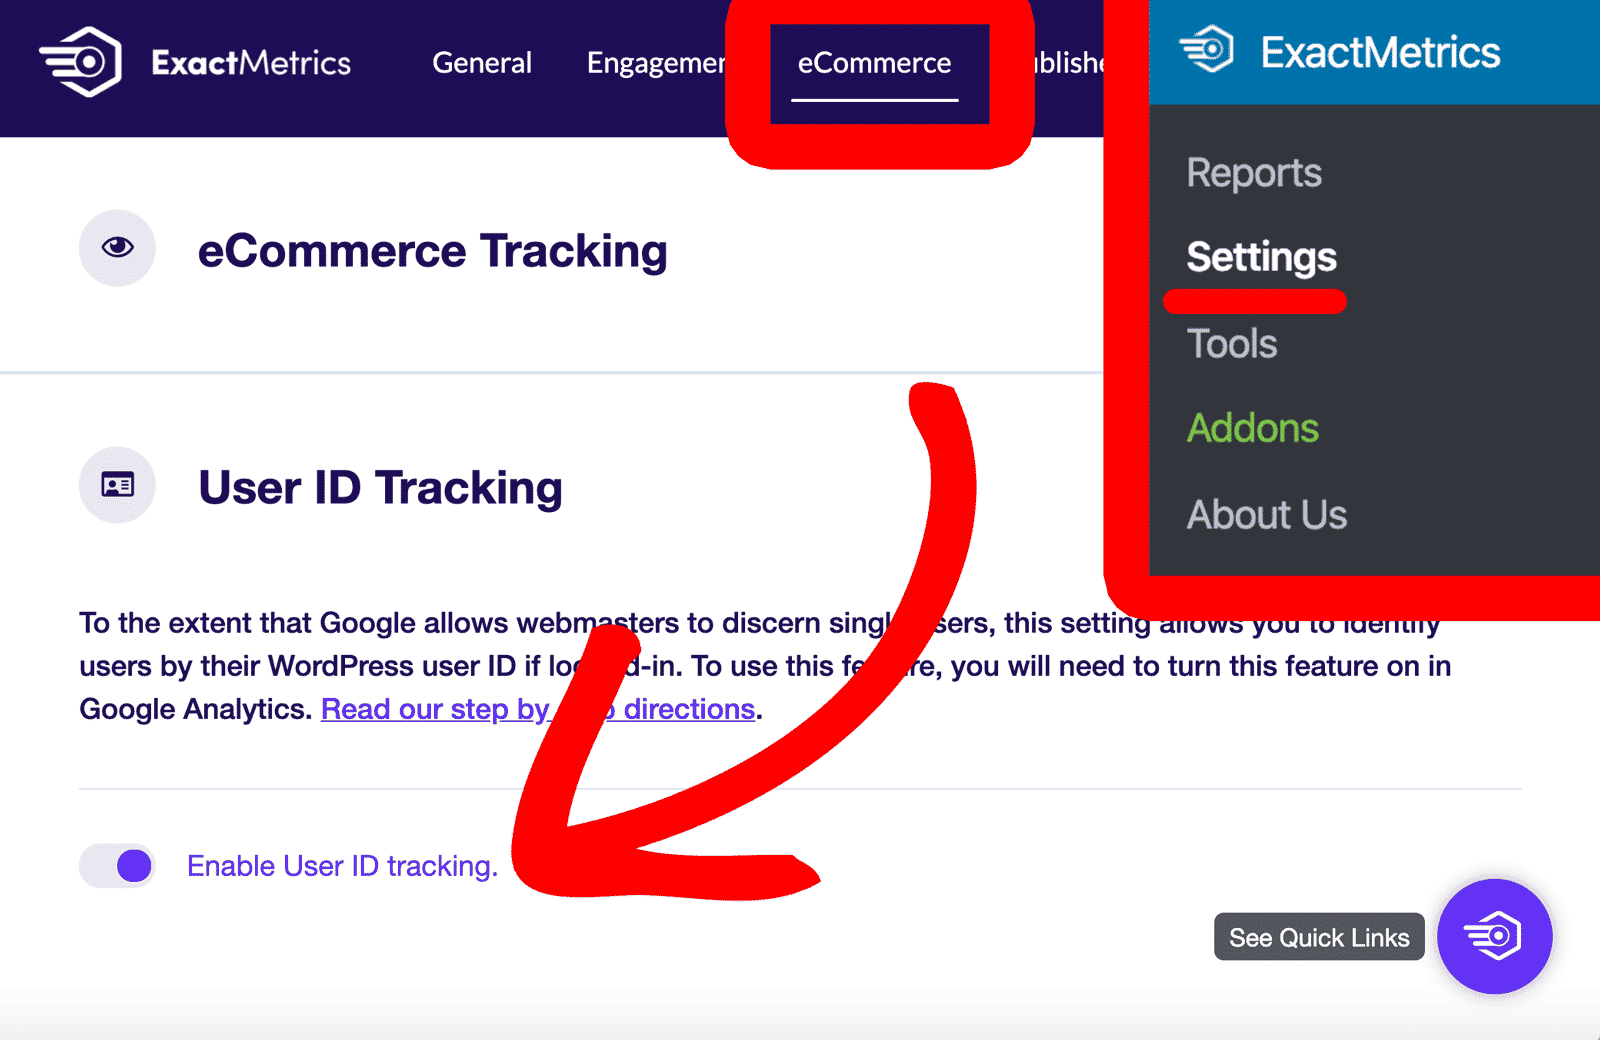
You’re done! Google Analytics user ID tracking is set up and ready to go. Next, we’ll show you how to track your users in GA4.
How to Track User ID in Google Analytics
Once you’ve enabled user ID tracking using ExactMetrics, you’ll want to create a simple custom report in Google Analytics 4 to track registered visitors.
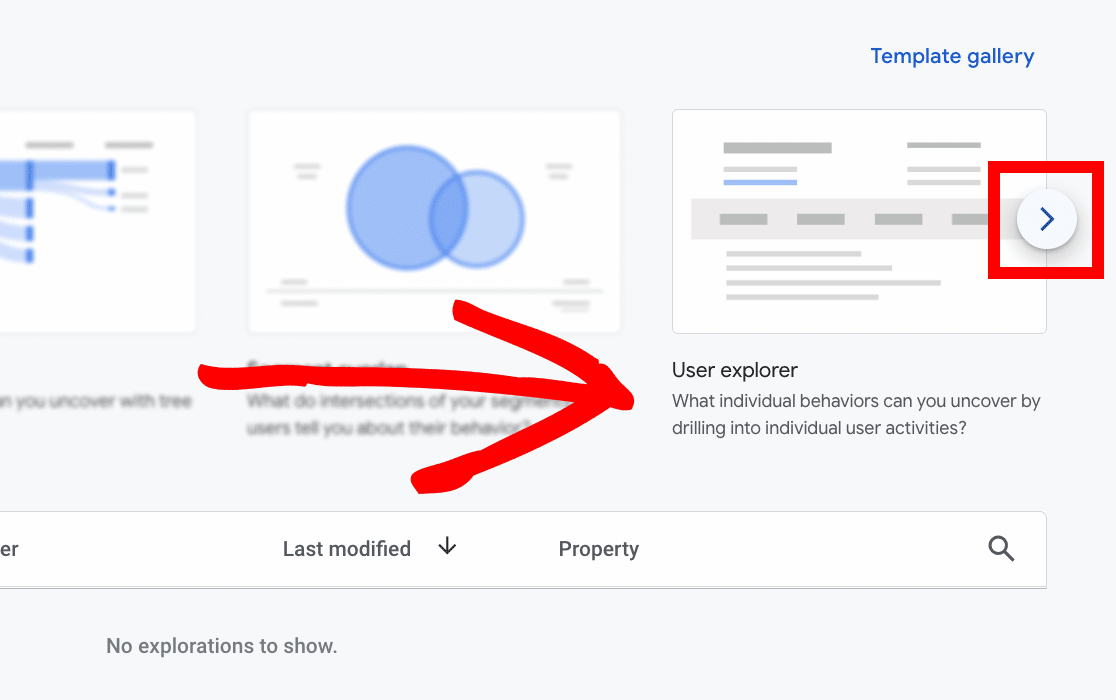
First, log in to your Google Analytics account and click the Explore tab. Scroll over until you see the template called User explorer and select it.
You’ll immediately see your User ID report! Just remember, if a user isn’t registered, they’ll be tracked by the usual Client ID instead.
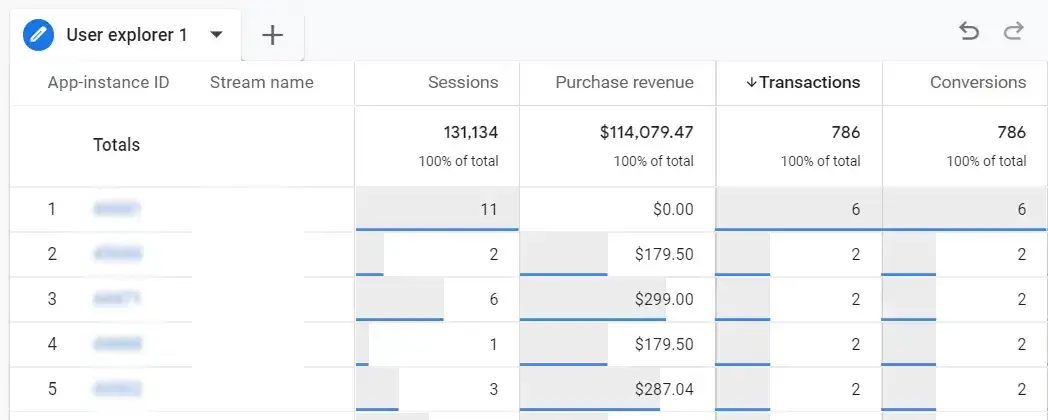
You can click on any of the User IDs in the first column to see more information about that particular visitor.
This lets you see where that user is from, purchase revenue, transactions, and more.
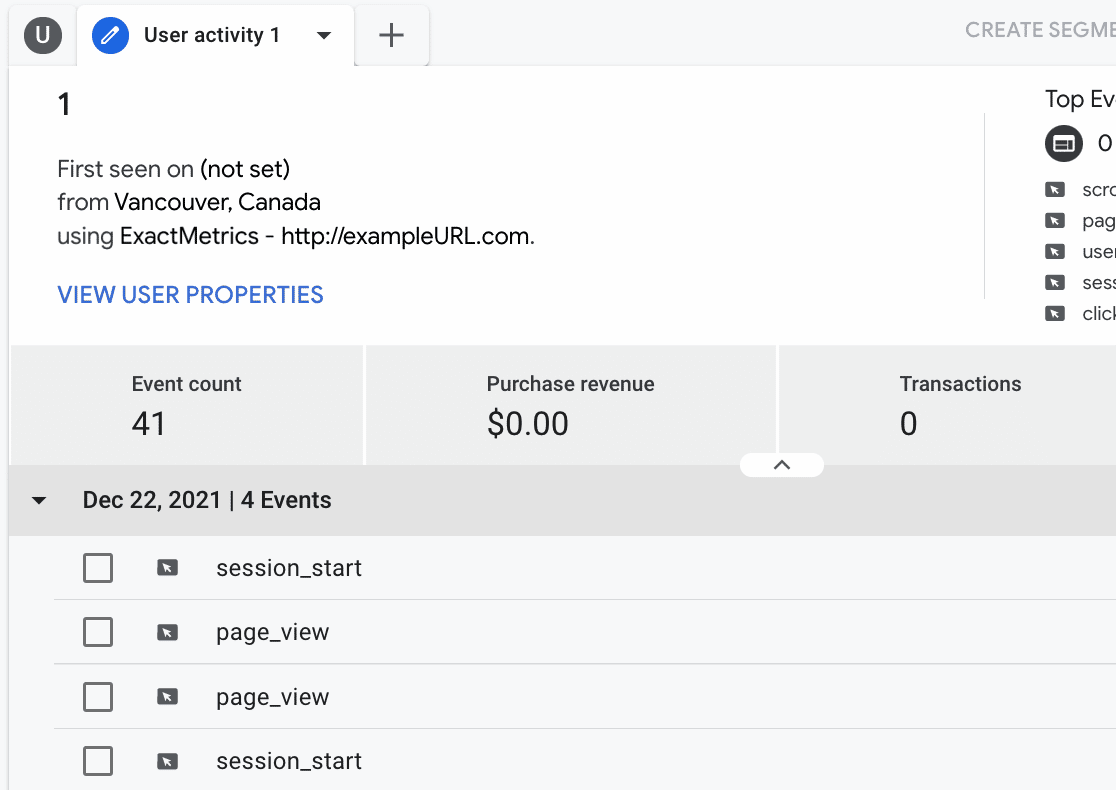
To see more about the events a user completed, just click any of the events in the list. Now, let’s head back to WordPress and figure out how to find individual User IDs and see your top logged-in users.
View Logged-In Users in WordPress
With User ID all set up, you can compare data from your User ID report in Google Analytics with logged-in user data in WordPress or vice versa to create a personal experience or improve your marketing strategy. We’ll also show you how to view your top logged-in users right inside WordPress.
Find the User ID of an Individual
First, to find the user ID of a logged-in user, go to Users » All Users. Here you can see all your registered members.
If you hover over any user, you can see the ID number in the URL where it says user_id= or you can click Edit under the username to view the user ID in your browser URL.
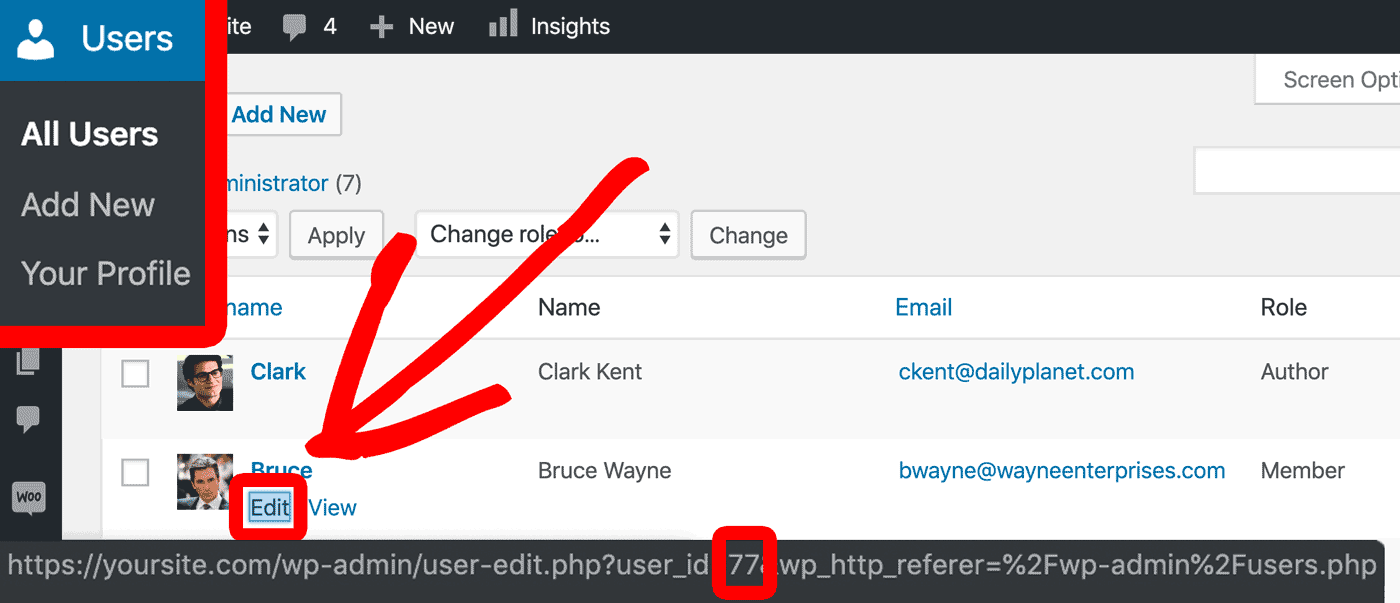
Using this data, you can find more information in Google Analytics about a registered user who needs support. Or, find the email of a user that you want to send targeted marketing to after seeing their activity in Google Analytics.
View Your Top Logged-In Users
Want to see your top logged-in users? ExactMetrics makes it easy with the Custom Dimensions addon.
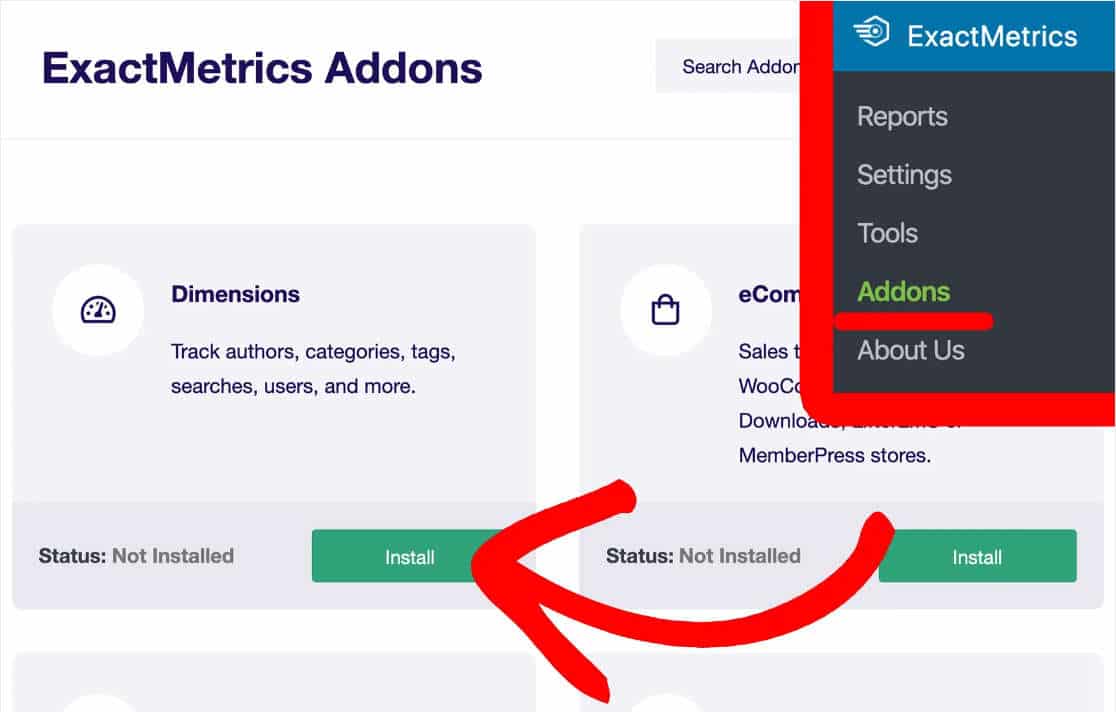
To install the addon, go to ExactMetrics » Addons. Click Install under the Dimensions addon.
Next, go to ExactMetrics » Settings and click the Conversions tab at the top.
Scroll down and expand the Custom Dimensions section. Click + Add New Custom Dimension.
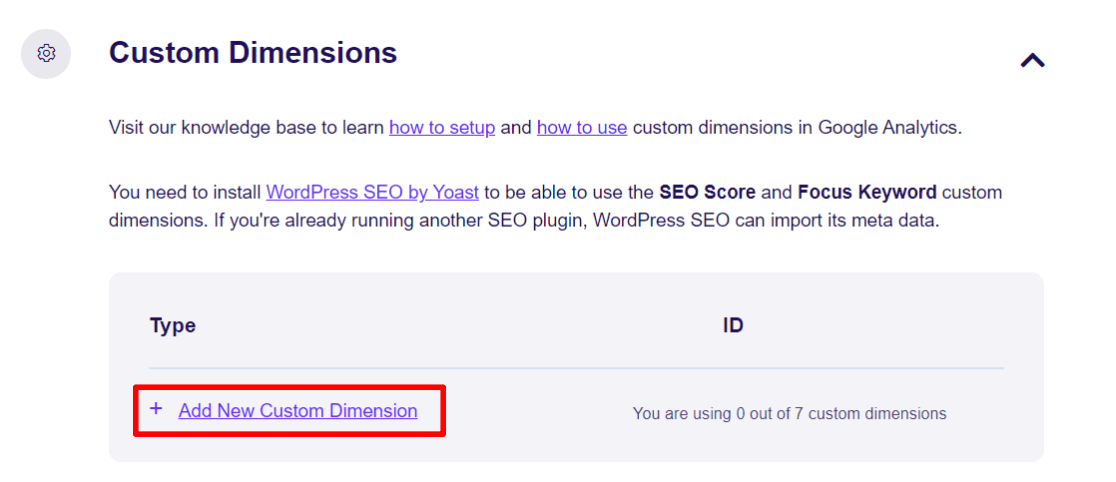
Now, using the drop-down menu, select User ID. After that, you’ll be able to access your custom dimensions report in WordPress.
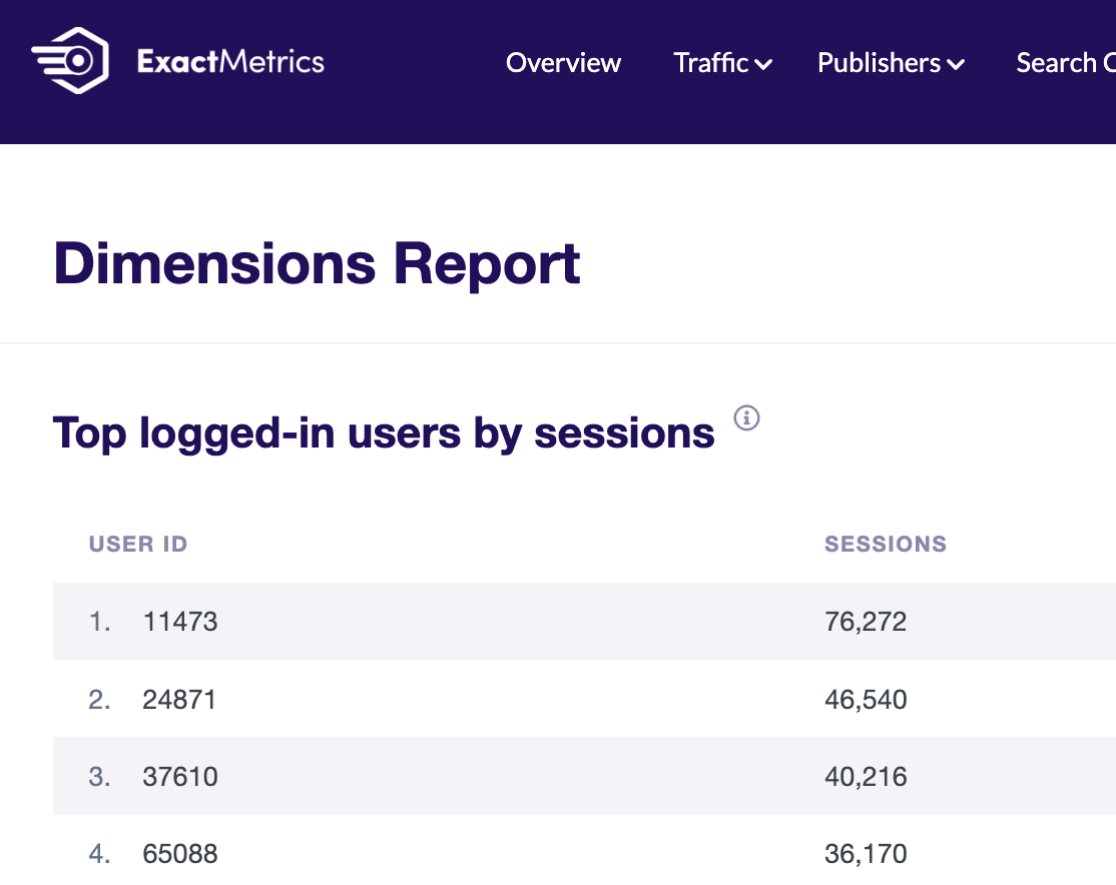
Go to ExactMetrics » Reports and click Dimensions at the top. Here’s where you can see Top logged-in users by sessions along with any other custom dimensions you enabled.
And that’s it!
We hope this article helped you set up Google Analytics user ID tracking in WordPress. If you liked this post, check out our guide on GDPR and Google Analytics: How to Make Your Site Compliant.
Not using ExactMetrics yet? What are you waiting for?
Don’t forget to follow us on Twitter and Facebook to see all the latest reviews, tips, and Google Analytics tutorials.


