Are you looking for a quick and simple way to add Google Analytics to your WooCommerce store? Setting up Google Analytics for WooCommerce allows you to easily track the performance of your online store.
You can get insights about your customer’s shopping behavior, which product sells the most, where your visitors are coming from, which campaigns are performing the best, and lots more.
In this article, I’ll show you how to properly set up Google Analytics for WooCommerce. So, let’s get straight to it…
How to Set Up Google Analytics for WooCommerce?
To get started, just follow these steps and you’ll be able to track your WooCommerce store’s performance in Google Analytics in no time.
- Install ExactMetrics
- Activate eCommerce and PPC Tracking Addon
- How to View WooCommerce Analytics in WordPress
- How to View WooCommerce Performance in Google Analytics
Install ExactMetrics
The first step is to get hold of ExactMetrics. It’s the best Premium WordPress Analytics plugin that offers loads of features, including WooCommerce tracking.
You can use the plugin to add Google Analytics to your WordPress website without the need to touch a single line of code or hire a developer.
Using ExactMetrics’ eCommerce addon, you can automatically track your WooCommerce store in Google Analytics. No additional setup or coding is required and you won’t have to use a complicated tool like Google Tag Manager. You get advanced tracking right out of the box with an extremely user-friendly interface and Google Analytics reports right inside your WordPress dashboard.
Plus, you gain access to tons of additional Google Analytics features and advanced tracking capabilities with just a few simple clicks. Here are some of ExactMetrics’ most popular features:
- Custom event tracking
- Custom dimensions
- Display popular products
- Advanced form tracking and integration with popular form builders like WPForms, Formidable Forms, Ninja Forms, Gravity Forms, and more.
- EU Compliance
- Affiliate and outbound link tracking
- Social media tracking
- Media and video play tracking
- And more…
Head to the pricing page to get started. Do note that you’ll need an ExactMetrics Pro plan for configuring eCommerce tracking.
After you purchase your license, you’ll need to install and activate the plugin. Then, connect it to your Google Analytics account by following the simple setup wizard. For more detailed instructions on setting up ExactMetrics, head to How to Add Google Analytics to Your WordPress Site.
Once you’ve successfully activated the plugin on your site and connected it to your Google Analytics account, you’re ready to move on to the next step.
Activate eCommerce and PPC Tracking Addon
Next, we need to enable eCommerce tracking in ExactMetrics. To install the addon, go to your WordPress dashboard and click ExactMetrics » Addons. Next, find eCommerce and click Install. The addon will automatically install and activate.
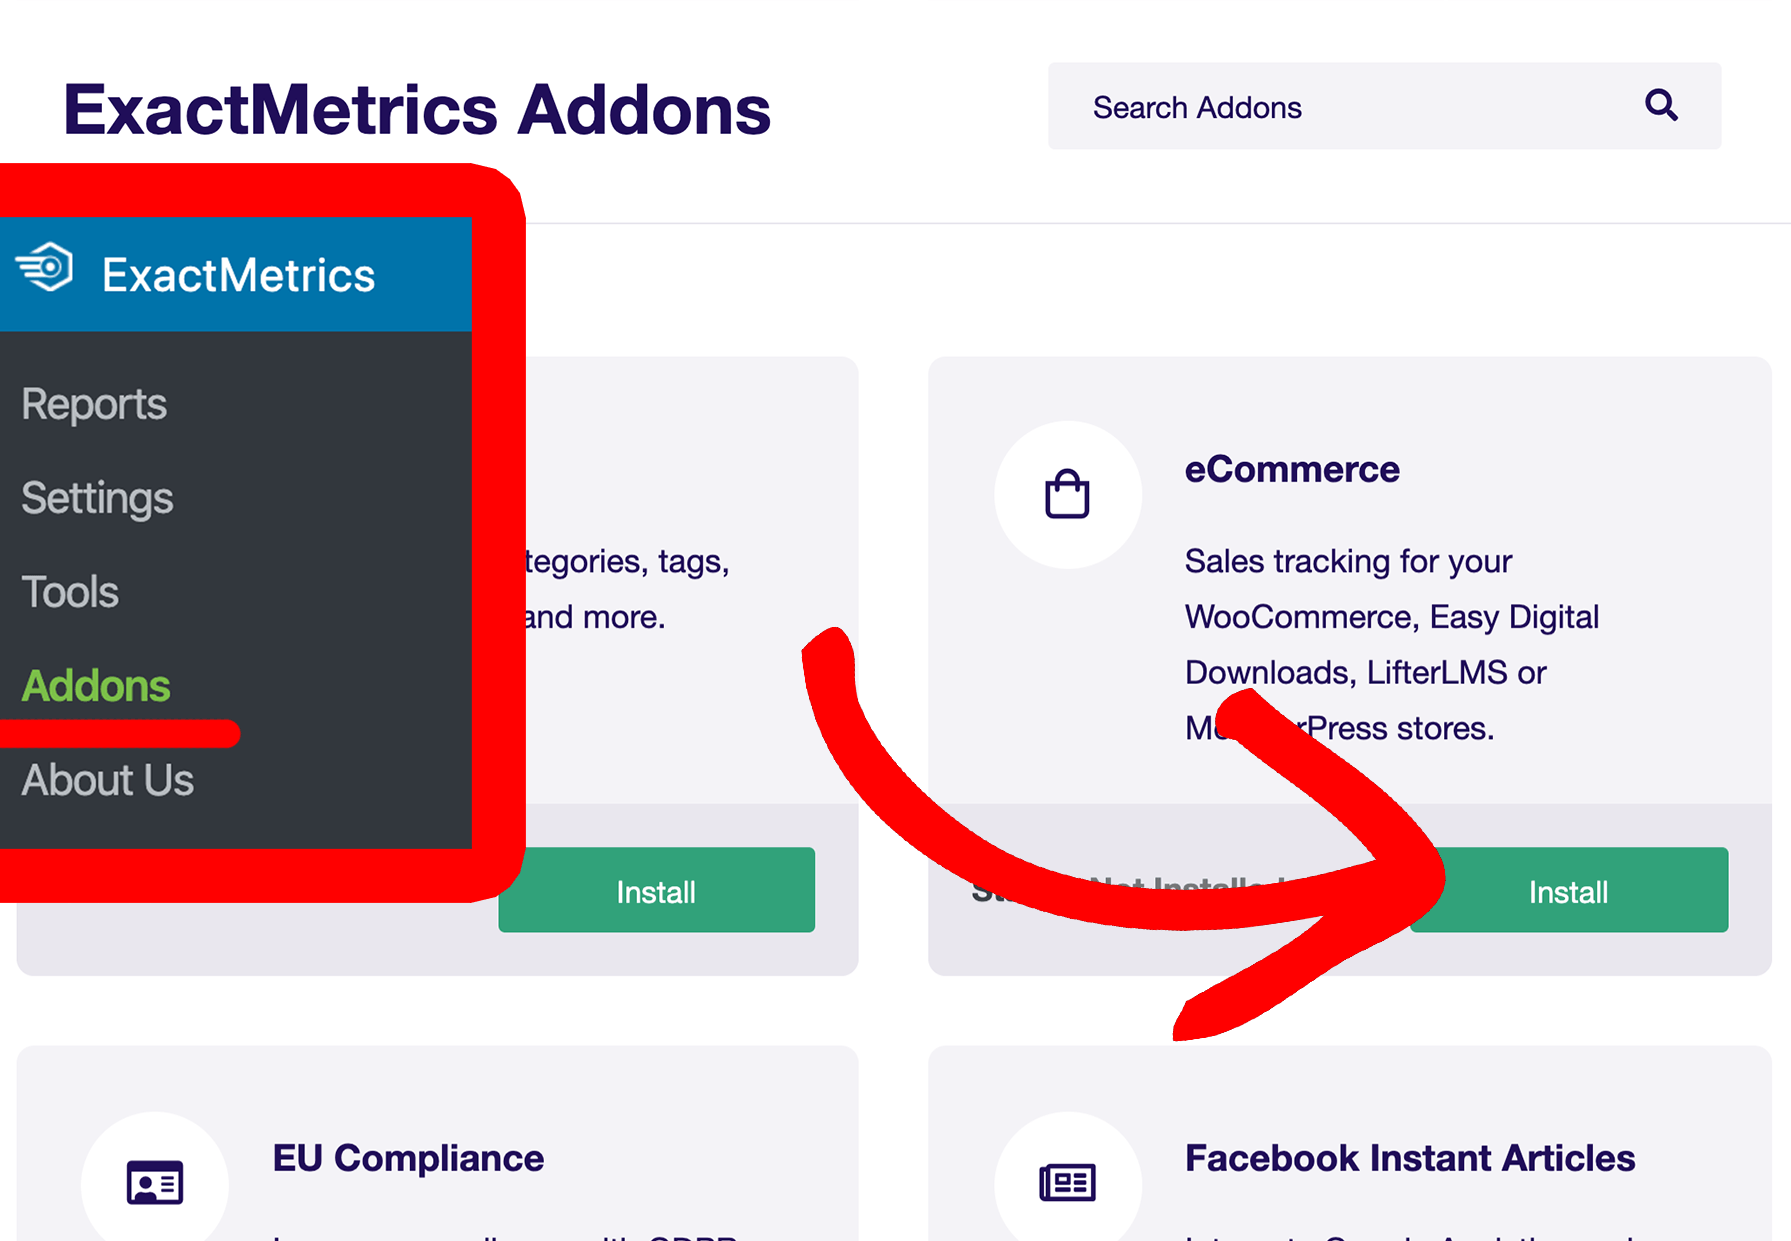
That’s all you have to do to set up Google Analytics eCommerce tracking with ExactMetrics! Now, if you run ad campaigns with Google Ads, Microsoft (Bing) Ads, or Facebook (Meta) Ads, you’ll also want to Install the PPC Tracking addon. That way, you can easily track WooCommerce conversions from your ad campaigns.
![]()
After PPC Tracking is activated, go to ExactMetrics » Settings and click Conversions in the top menu. Expand the section labeled Ads Tracking and enter your conversion information in the correct areas.
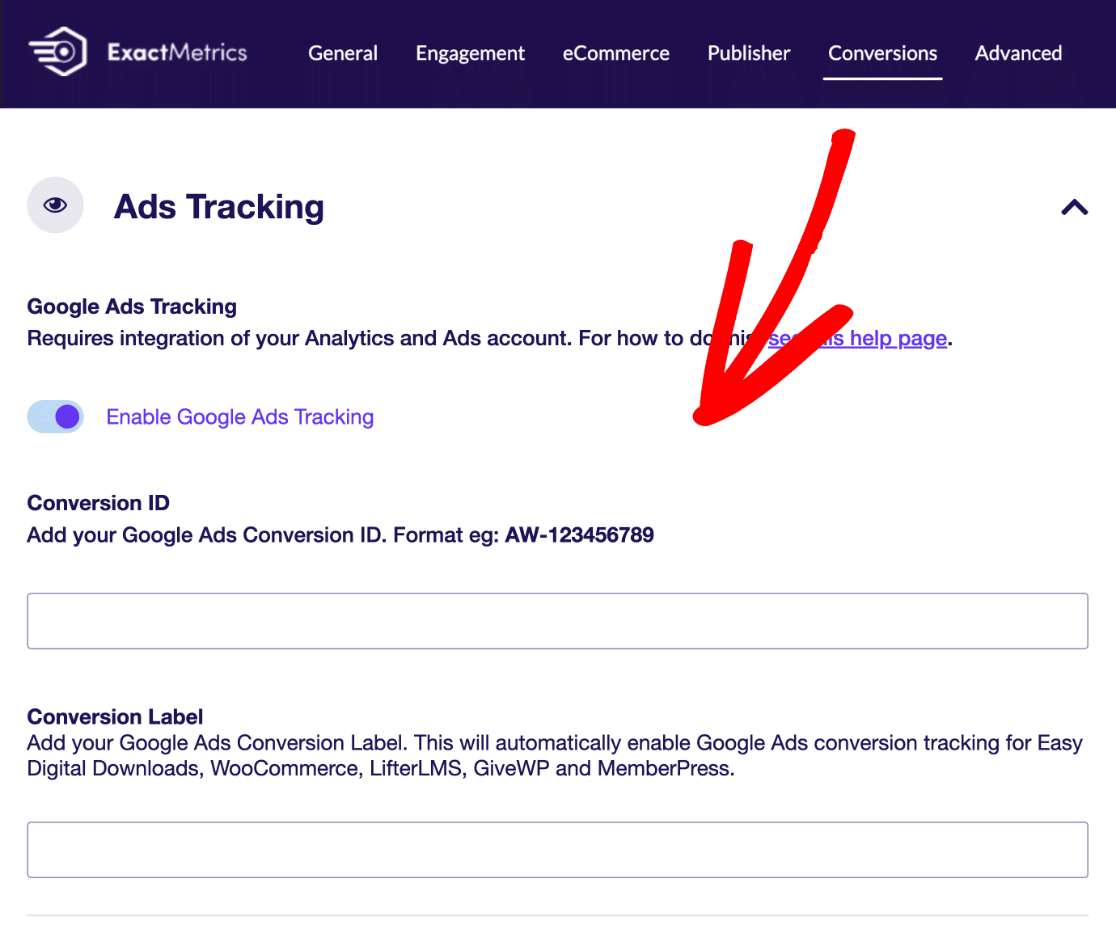
For help with finding your Conversion ID and detailed instructions on connecting PPC ads to your eCommerce site, check out these articles:
- How to Set Up WooCommerce Google Ads Conversion Tracking
- Set Up Microsoft Ads (Bing) Conversion Tracking in WordPress
- Best Way to Add a Facebook Pixel to WordPress (Step-By-Step)
How to View WooCommerce Analytics in WordPress
Aside from setting up your WooCommerce tracking easily, a big benefit of using ExactMetrics is that you can see all of your important Google Analytics metrics right inside your WordPress dashboard.
To view your WooCommerce reports in WordPress, go to ExactMetrics » Reports » eCommerce.
Right off the bat, you can see the conversion rate of your store, the number of transactions, revenue, and the average order value for the selected date range.
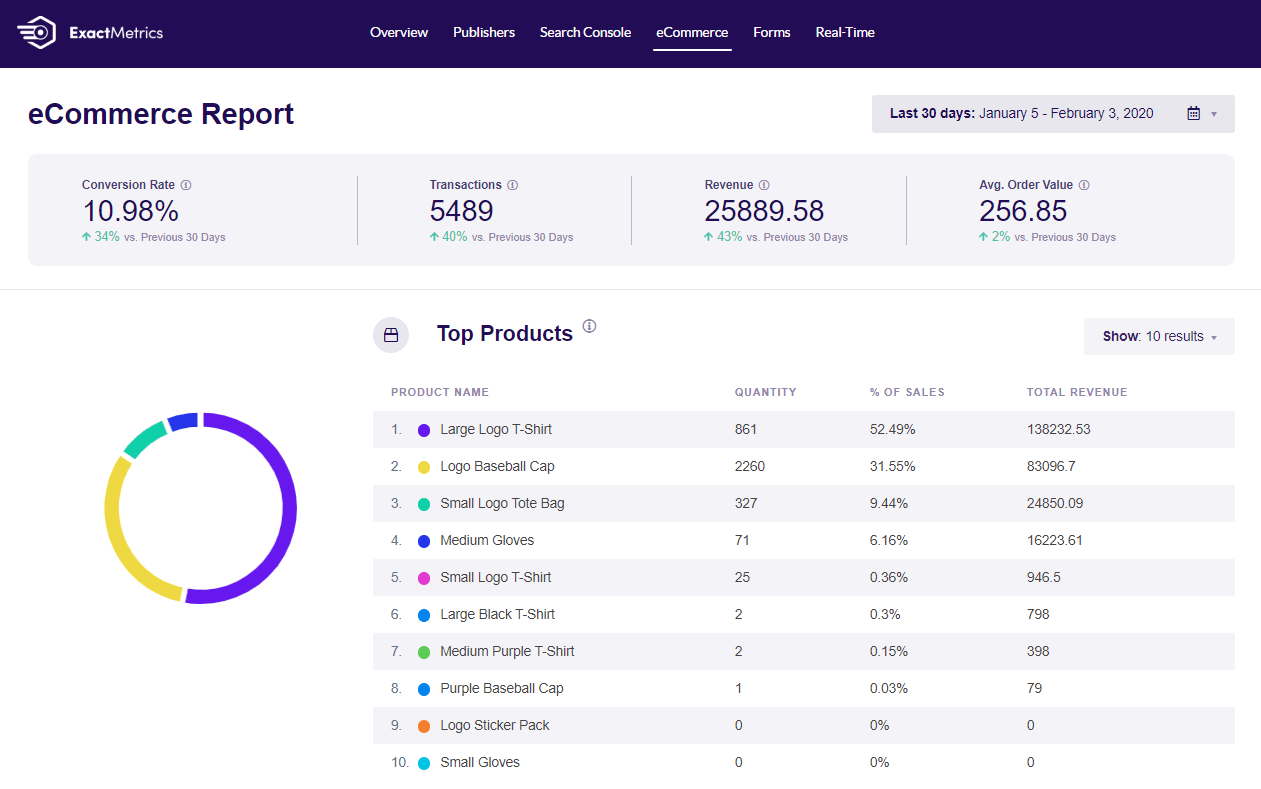
Not only that, but you can see your top products. These are products that generate the most sales in your WooCommerce store. And for each product, you can view the quantity sold, its contribution towards sales, and the total revenue generated.
If you scroll down, you’ll see more reports like top conversion sources. These are the sources that led customers to your WooCommerce store, where they bought a product.
Besides that, ExactMetrics also shows total add-to-carts, remove-from-carts, and abandoned checkouts.
The Cart Abandonment report is especially useful for analyzing which products are being left behind and making adjustments to boost sales:
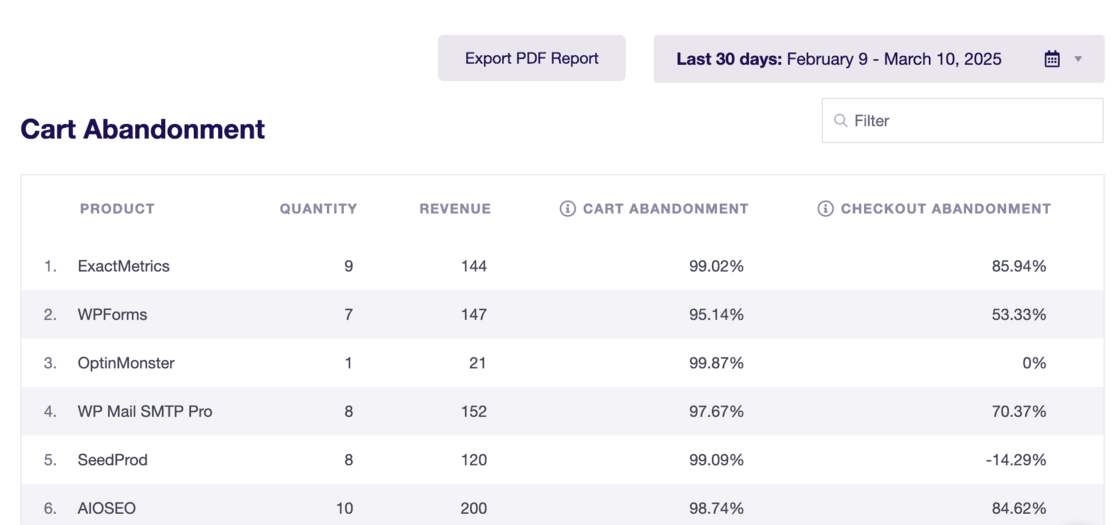
This report lets you see:
- The exact items people are abandoning
- How many items are being left behind
- How much money you could be making
- Which products might have issues
- Different stages of checkout to see where people give up
With ExactMetrics, you can even view your coupon report to see which coupon codes are used the most and lead to the most revenue. Plus, activate the User Journey addon to see individual steps in the buying process and measure the time to purchase, even if it’s over multiple sessions or days.
Easily accessing your eCommerce reports allows you to keep an eye on your store’s performance and optimize it for more sales.
But, what if you want to see these reports in Google Analytics?
How to View WooCommerce Performance in Google Analytics
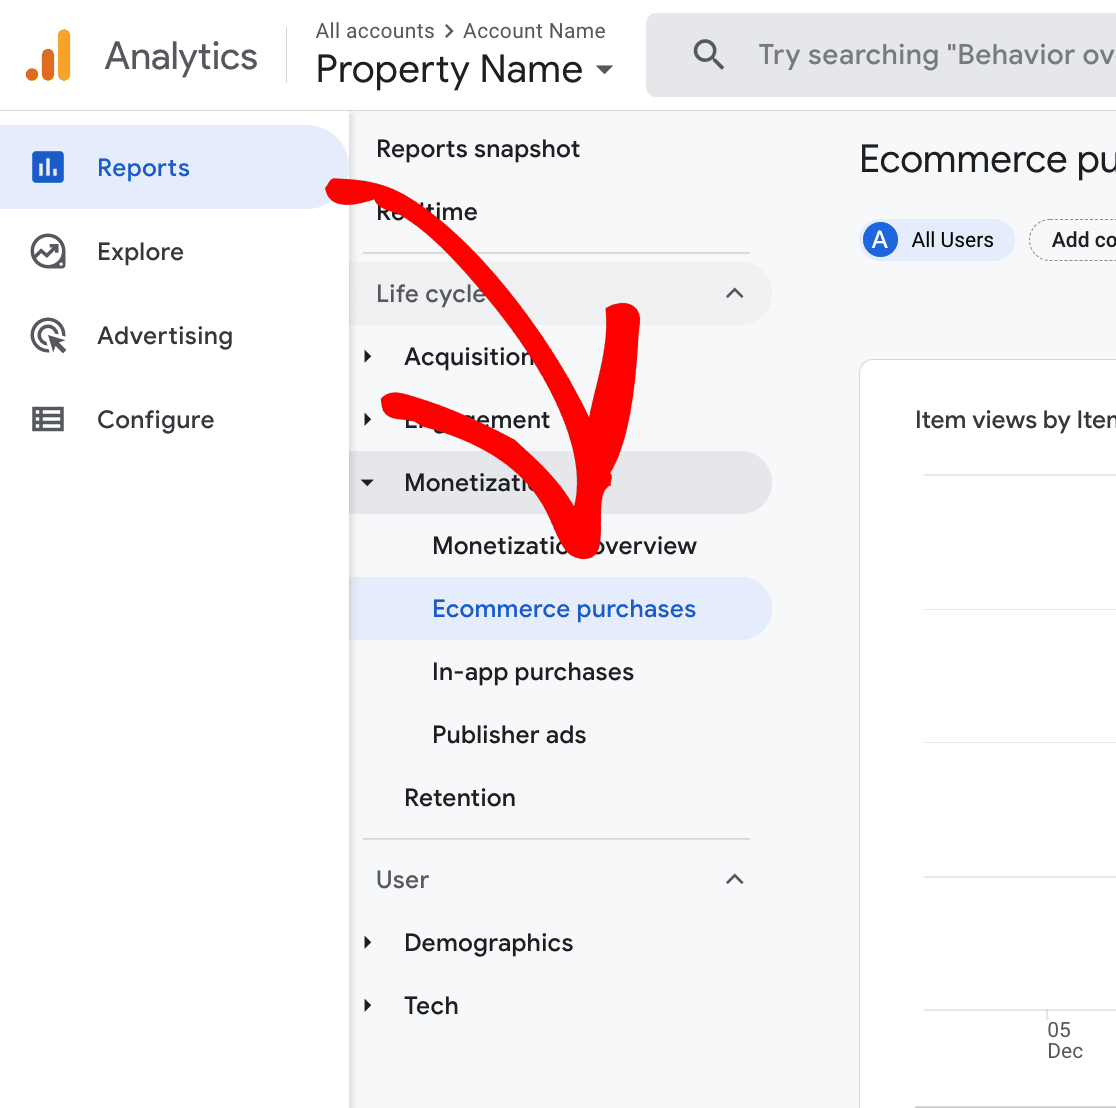
You can also view your WooCommerce performance in Google Analytics. To view the reports, go to your Analytics account and navigate to Monetization » Overview. You can see your revenue trend by day, purchases by day, purchases by item name, purchases by item list, and more in this area.

To get a closer at the items purchased, go to Monetization » Ecommerce purchases.
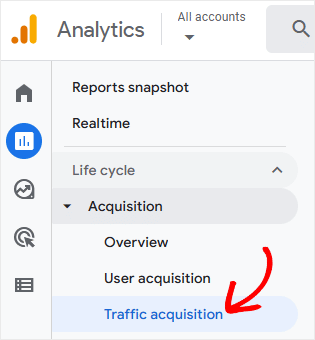
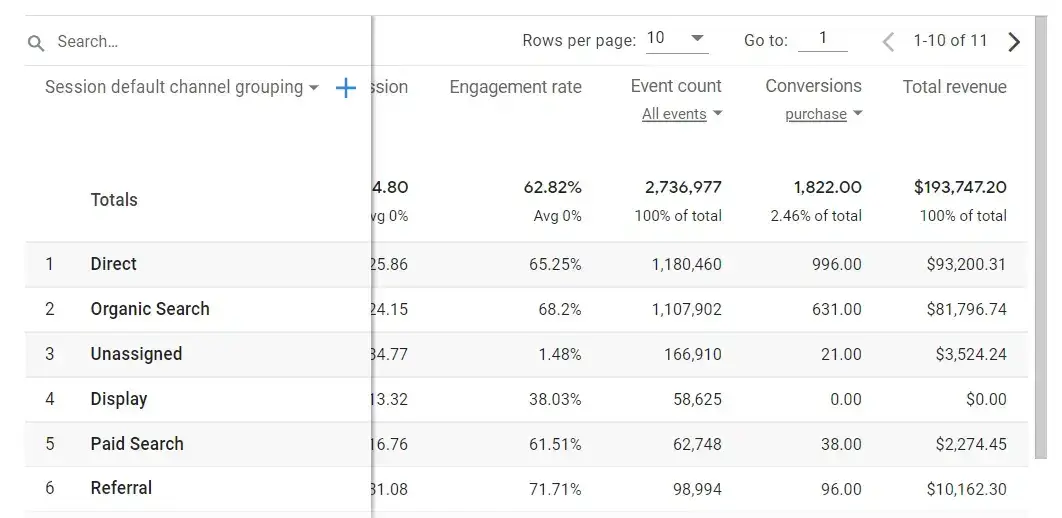
If you want to see your Google Analytics eCommerce sales and revenue by channel, head to Acquisition » Traffic acquisition in your sidebar menu.
In the table, scroll to the right and find the columns labeled Conversions and Total Revenue. In the Conversions column, click All events for the drop-down menu. Then, click Purchases.
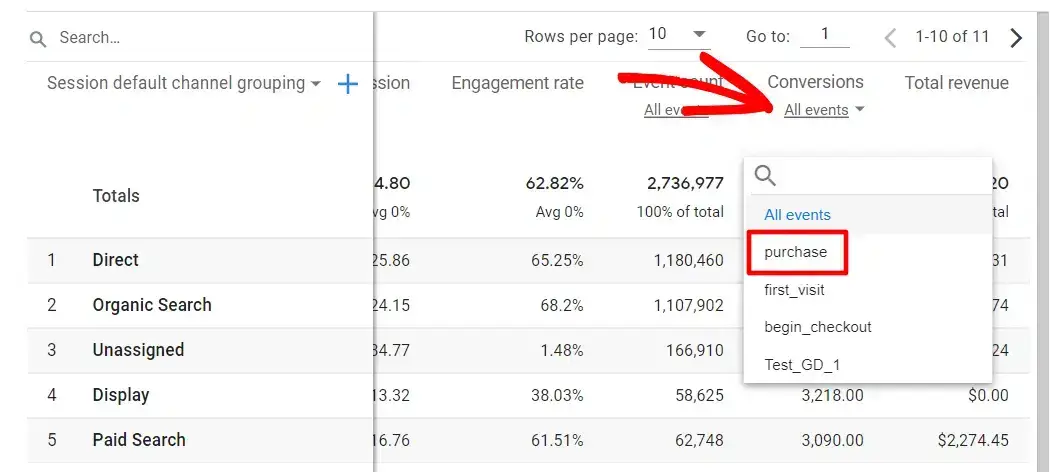
Now, your table is displaying the total number of purchases and revenue for each traffic channel.
And there you have it, folks!
You’ve made it to the end of the tutorial. You can now easily track your WooCommerce store in Google Analytics and see different reports to grow your business.
Set Up Google Analytics for WooCommerce Today!
I hope you like our article on how to properly set up Google Analytics for WooCommerce. You can also check out some of our other articles for WooCommerce:
- How to Show Popular Products in WooCommerce (Step by Step)
- 10 WooCommerce SEO Tips to Drive More Sales
- 20 Best WooCommerce Plugins to Boost Sales
Not using ExactMetrics yet? What are you waiting for?
Don’t forget to follow us on X and Facebook to see all the latest reviews, tips, and Google Analytics tutorials.


